


I recently started using Docker as my main platform for penetration testing and exploring the advantages it can provide. If you’re interested in running self-contained, lightweight environments that take seconds to start, then read on. I guess the first question is…
What Is Docker?
Docker is a technology providing operating-system-level virtualisation, also known as containers. What does this mean exactly? A Docker container is a lightweight, stand-alone, executable package of a piece of software that includes everything needed to run it: code, runtime, system tools, system libraries and settings. In a lot of ways it is similar to a Virtual Machine, except that it runs on the host’s kernel virtualising the OS, as opposed to the hardware.
These are the differences between containers and VMs:
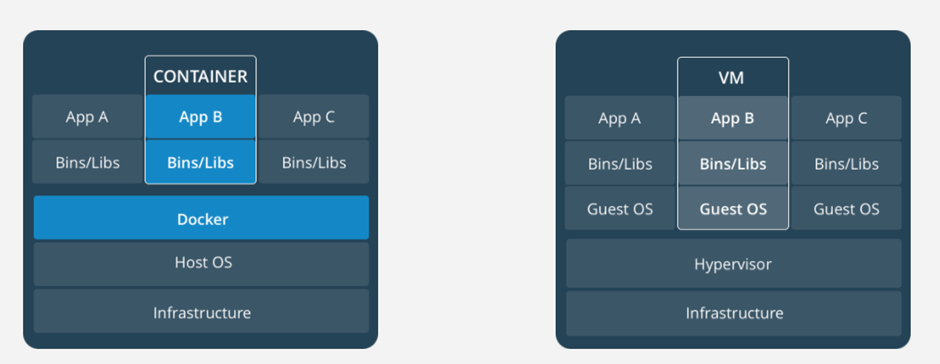
The Docker service runs on the host and handles the abstraction, and the containers run on top of it. Inside a container you have a full self-contained file system and abstracted OS, for example you can see your processes and a few others but there is no init process.
In Docker you write a Dockerfile which is just a set of instructions for creating and configuring an image. You then run this image, the intended use of which is to allow a build-once-run-anywhere approach for developing and running applications, as it provides a bunch of benefits that we don’t care about.
As the containers usually only host a single application each (such as a web application or a database) they don’t typically have support for a GUI, nor do you tend to actually interact with the container in any way once you’ve started it except through the application.
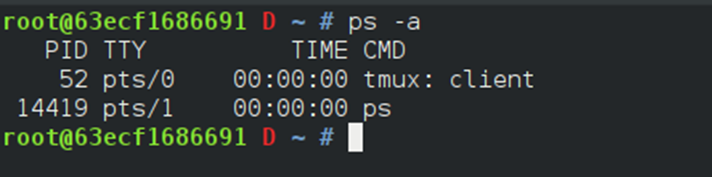
The process list inside of my docker container:
You don’t store data you want to keep in the container file system, as containers are intended to be torn down quickly if an issue is encountered and another spun up in its place. You instead share files with the host or other servers.
So TL;DR the containers should not store state and are customisable, lightweight and quick to start.
Docker for Hackers
This all sounds good, but what does it mean for us? Well while it’s considered “bad practice” to interact with a container while it’s running for developers, there is the option to drop to an interactive prompt for debugging containers.
So what we now have is a container that is easily configurable, launches in seconds, always spins up into the same state and launches a shell. We can use Docker to build and configure an environment containing just the tools we need, and then launch a container and work from that. Our environment will always be exactly the same as it’s launched from an image, and we can easily launch multiple containers at the same time as they don’t consume a lot of resources. Additionally, as we’re starting from a lightweight image and adding the tools we need, and as containers don’t create disks or have to virtualise the hardware, the resulting footprint on the hard drive is far smaller than traditional VMs.
This allows us to have a self-contained testing environment for each job or test or random-tinker, where any processes, installs and so on are all local to that container and don’t pollute your “Testing VM” or host OS. Any data can be written out to the host via the shared volume where it’s saved and can be used by tools on the host, and we can still have connections back to the container for webservers, remote shells and similar.
As the container configuration is just the Dockerfile, our whole environment can also be backed up or shared, and we can get up and running with a very specific configuration on a new box in minutes.
OK, I’ve heard enough. How?
To get started we need to install Docker and write a Dockerfile. In our Dockerfile we start from a prebuilt image on Docker hub. We can start from any number of popular images such as Debian, centOS, Ubuntu, Windows and more. Kali Linux has an official image containing only Metasploit and the top 10 most popular tools, which seems like a great place to start for a testing platform.
From this image, we just run commands and set up your environment. A simple example of a Dockerfile might be:
# From the Kali linux base image
FROM kalilinux/kali-linux-docker

# Update and apt install programs
RUN apt-get update && apt-get upgrade -y && apt-get dist-upgrade -y && apt-get install -y \
 exploitdb \
 exploitdb-bin-sploits \
 git \
 gdb \
 gobuster \
 hashcat \
 hydra \
 man-db \
 minicom \
 nasm \
 nmap \
 sqlmap \
 sslscan \
 wordlists

# Create known_hosts for git cloning
RUN touch /root/.ssh/known_hosts
# Add host keys
RUN ssh-keyscan bitbucket.org >> /root/.ssh/known_hosts
RUN ssh-keyscan github.com >> /root/.ssh/known_hosts

# Clone git repos
RUN git clone https://github.com/danielmiessler/SecLists.git /opt/seclists
RUN git clone https://github.com/PowerShellMafia/PowerSploit.git /opt/powersploit

# Other installs
RUN pip install pwntools

# Update ENV
ENV PATH=$PATH:/opt/powersploit

# Set entrypoint and working directory
WORKDIR /root/

# Indicate we want to expose ports 80 and 443
EXPOSE 80/tcp 443/tcp
Once we have our Dockerfile, we can build the image using docker build. The naming convention for images is yourname/imagename, e.g. the kali image is called kalilinux/kali-linux-docker. We can give our image a name by using the -t (tag) option.
docker build -t yourname/imagename path/to/Dockerfile
Once it’s built we can then run our image. The -ti options indicate that we want a tty and to keep STDIN open for interactive processes, which both apply if we’re running a shell, and the -p option indicates we want to expose the provided ports. The -v (volume) option in the below case indicates that we want to map the /root/clients folder on the host to the /clients folder in the container.
docker run -ti -p 80:80 -p 443:443 -v /root/clients:/clients yourname/imagename
From here, we’re good to go.
Handling Docker containers
By default, a Docker container is stopped as soon as its “main” process ends. In our case this process is the shell, so if you exit the shell the container will stop.
We can list all Docker containers, running and stopped, with the docker ps -a command. From here we can re-start a container with docker start -i container_name or remove it with docker container rm container_name.
The docker ps -a command shows all stopped and running containers:

If we want to create a temporary container that is automatically removed when it is stopped, we can add the –rm option to docker run.
We can clean up Docker using the relevant prune commands. For example, if we have lots of stopped containers we want to clean we can run docker container prune. Similarly, docker image prune for images or docker system prune for everything.
Updating the image
As we build the image once and then run the containers from that image, we’ll find our environment slowly going out-of-date if we don’t update it. We can always update an individual container in the usual fashion if we need a quick update using apt, but we’ll want to rebuild the image from occasionally to avoid doing this every time. Additionally, we may make changes to our Dockerfile and want to update our image.
We can rebuild the image using the original build command, and as Docker caches the image at each step in the Dockerfile it will intelligently continue the build from whatever step is the farthest along prior to any changes. We can completely rebuild the image by adding the –no-cache option to the build command.
Other Tips
- The Docker documentation is very well done, and easy to reference. Additionally, on the command line we get autocompletion for commands and container names and so on, so tabbing for completion can be very useful.
- Many tools used by penetration testers require elevated privileged or access to devices directly. You can grant this to your container by running docker run with the –privileged
- Docker-for-Windows uses Hyper V which is incompatible with VMWare. For me, access to VMs is a requirement, so I run Docker from inside a barebones install of Debian. I still get all the benefits of Docker while getting to keep the VM lightweight and quick to set up and I chain the file sharing using VMWare’s file sharing options. This also grants access to the use of GUI applications if required, as you can just forward your DISPLAY environment to Docker with the -e DISPLAY=$DISPLAY
- In addition to a testing platform, containers can also be used as sandboxes for testing applications. You can spin up, for example, a default Debian container then install an application on it for testing without worrying about having to uninstall it afterwards. There are also Windows containers, but at present these do not contain a GUI environment which limits their use in this regard to CLI apps.


