


Introduction
Our digital forensics work is wide and varied. Often there’s very little that we can talk about in the public domain, so when I find something that we can share I get a bit excited.
In this post I’ll be talking about image scanning apps, and how to reverse engineer them to pinpoint user activity and tie a user to a particular image’s creation from a source file e.g. pages from a PDF.
Image scanning apps offer a multitude of different features such as Optical Character Recognition (OCR) and various image processing and enhancement capabilities. Digging around in them can be incredibly useful for an organisation investigating unauthorised exfiltration of intellectual property, for example.
For this exercise I’m working on an Android phone. The images were stored in a location linking them to a specific application. There are various image scanning apps available, with similar functionality, so for the sake of this post we’ll call the app we used Scanner, and assume that all such apps behave similarly.
Before we get into it here’s a note on accessibility, and why it’s important here.
Accessibility
The accessibility of an unauthorised image is of great significance in investigations. It is far more difficult to attribute the possession or making of unauthorised images to an individual if they’re not stored in a location that is considered accessible.
Accessibility is one of three things to consider, we also need to determine:
- The location of the images on the device
- How they came to be in that location
- How accessible / viewable they are in that location to a standard user without specialist knowledge or tools
These things will come into play as we work through the investigation.
The scenario
An organisation approaches you as they suspect an employee or contractor is leaking confidential information to a third party. They provide you with the suspect’s mobile phone, and details of when they believe the suspect had access to the information. They also provide you with information that they think is being exfiltrated, to verify any findings.
The evidence
The device in question had a number of unauthorised images in the /data/media/0/Scanner/.images/ directory.
The suspect claimed to have no knowledge of these images, denying any possibility that they were present on their device as a result of any actions knowingly taken by them.
Analysis
Let’s break down the file path of where the images were found.
/data/media/0/[Application Name]/ is a common location for Android devices to store user media. Where you see Application Name you’ll usually find a directory named after the app to which the media it contains relates. So, you’d see DCIM for camera media, or WhatsApp for WhatsApp media and so on.
The important point here is that these locations are considered accessible to a standard user since the media can usually be viewed in the associated application, or even in your device’s gallery app.
Now the significant bit. The directory called .images and its contents are inaccessible to a standard user. The reason being that files and folders with a dot (.) after their name makes them hidden on a Linux system. Since Android is a Linux-based Operating System the same applies.
At the time when the device was seized for examination the images were only found in these locations. Since they are regarded as inaccessible to a standard user that doesn’t carry much weight.
So, at this stage we’ve got points 1 and 3 in the accessibility factors covered – location of the images, and whether they are accessible / viewable they are to a standard user. This still leaves us with points 2 – how they came to be present there.
Understanding the app
To analyse the suspect’s device properly we first need to understand precisely how the app behaves and functions. This will show us what user actions might cause images to be present in those hidden directories. This was done by installing it on a laboratory handset.
When the application is first installed, there is a database created on the device that is used to store data relating to the application, files seen / processed, and various activities carried out by the user. At the point of installation, this database is empty.
On the lab device, we have elevated privileges because the device is rooted, so we can also look for those hidden directories. At this point, they’re empty, but below you can see there are hidden directories for .greet, .images, .picToWord and .temp. The .images directory also contains the .afterOCRs one that we saw on the suspect’s phone.

Figure 1 – hidden directories
Next, we processed a simple PDF document consisting of four pages in the application and convert the pages to images using the PDF to Image feature. The end result is that the home screen of the application now shows us the name of the document imported and how many pages it contains.
At this point, the pages of the PDF have been saved as JPEG image files, and entries are added to the database mentioned above that contain metadata relating to the source file (in this example an innocuous ‘PRI Breathing Techniques’ PDF) and any of the other files (the JPEG images of each page) created as a result of the processing.
The images, however, are only present in the hidden directories at this point. The images do not automatically appear in the users’ gallery. The user must choose to save them to the gallery while viewing the files in the app (which you can go back and do at any time). Regardless, it remains a fact that the JPEG versions of these pages are now stored somewhere on the phone.

Figure 2 – images in hidden directories
At the moment, those JPEG file names mean nothing to us. But what we can do is extract and query the database mentioned earlier to obtain metadata about the files processed by the app. Below are some screenshots of the database contents after processing the above PDF.

Figure 3 – ScannerApp document from database

Figure 4 – ScannerApp images from database
These screenshots show two separate tables in the database; the first contains metadata relating to documents imported, and the second contains metadata relating to images created through the app. There’s also the ‘Document ID’ field that links the images back to the document itself, which is excellent for provenance purposes – we can clearly link the images to a source document, and we have the precise date and time that the document was imported, and those images saved.
But in this investigation, the suspect had deleted the source file and then deleted any associated data from within the application. This also removes any reference to the source and outputs in the database. So, at this point all we have is some images stored in the hidden directories we covered earlier.
Putting it together
The next step was relatively simple. The images in the hidden directories had modified timestamps associated with them, but no creation dates are recorded.
These are the file properties for the images on our test handset, including the modified timestamps, which match with the database timestamps noted earlier:
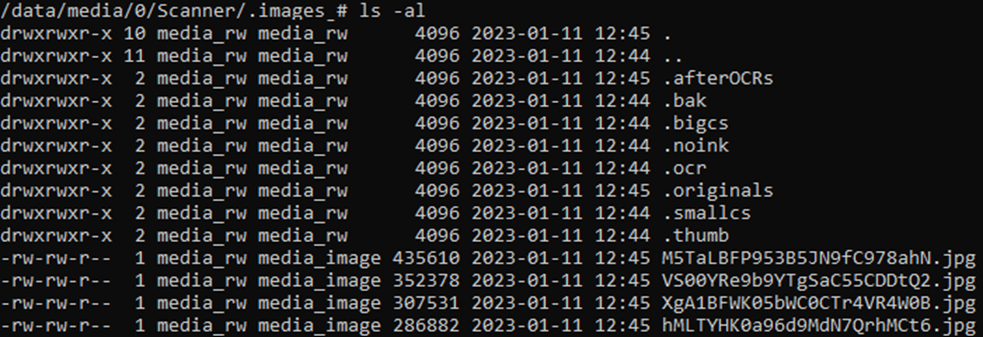
Figure 5 – hidden image modification times
In order to determine the significance of these timestamps, several tests were conducted, the results of which reliably demonstrated that these timestamps directly relate to the time at which they were created by processing a source file.
The act of deleting the source file, whether through the app itself or any other means, had no effect on these modified times. In fact, the only ways to cause those timestamp change are to either:
A. Have the files still present and visible within the application and interact with them through the app, or
B. Access the files directly in their hidden directories through a file browser or other tool
In scenario A, the timestamps associated are either:
- The time at which the images were created by processing a file that contained them, or
- The last time the suspect interacted with the images through the app prior to deletion
In either case, it is clear that the user had direct access to the files at those times.
In scenario B, the implication is that the user does, in fact, possess specialist knowledge or tools, which would invalidate their defence that they were unaware of the files’ existence.
Thus, we can say with high confidence that the modified times associated with the unauthorised images on the suspect’s device give us the exact time at which the suspect processed a source file to create those images, or that was the last time they interacted with them in the app before deleting them.
Wrapping up
All that needs to be done now is to determine whether there was any evidence that might indicate that the device was in the suspect’s possession at the time these files were modified.


