


TL;DR
- Home labs and servers in your home should be secured, the risks are real of spillover to your personal and work lives
- Don’t assume you’re a small fish in a big pond, the pond is smaller than you think it is when you open up services to the internet
- Block access to what you can and harden what you cannot
- Default configurations are, sometimes, rubbish
- Don’t underestimate good security monitoring, backup and patching practices
Introduction
If you are a computer nerd, it’s statistically likely you’ll be self-hosting multiple kinds of web applications on some infrastructure you own for personal use. Whether it’s an old gaming PC running a Jellyfin media server, raspberry PI hosting your family meal recipes, your bedside table (for some reason) or simply your eccentric uncle’s IoT fridge with a Wireguard VPN on it (as we all know, remote access to beer is important). The possibilities are endless. No matter how you do it, I’ve found having a home lab greatly increases both your willingness to learn and general ability to pick up knowledge quickly.
However, all these devices (yes even the fridge!) are still just that, devices. Hardware and software with vulnerabilities that can and will be exploited if you leave them exposed. Please don’t go down the trapdoor of “It’s not a corporate device, it won’t get popped cause those pesky, hoodie-wearing hackers have better targets”. Others have made that mistake in the past and both personal and corporate worlds have paid the price for it.
So I’ve written this guide for old veterans and newbies alike to hopefully check some boxes off on what you can do to reduce the likelihood of your precious fridge becoming the next node in the HTTPBot botnet.
Reduce your attack surface
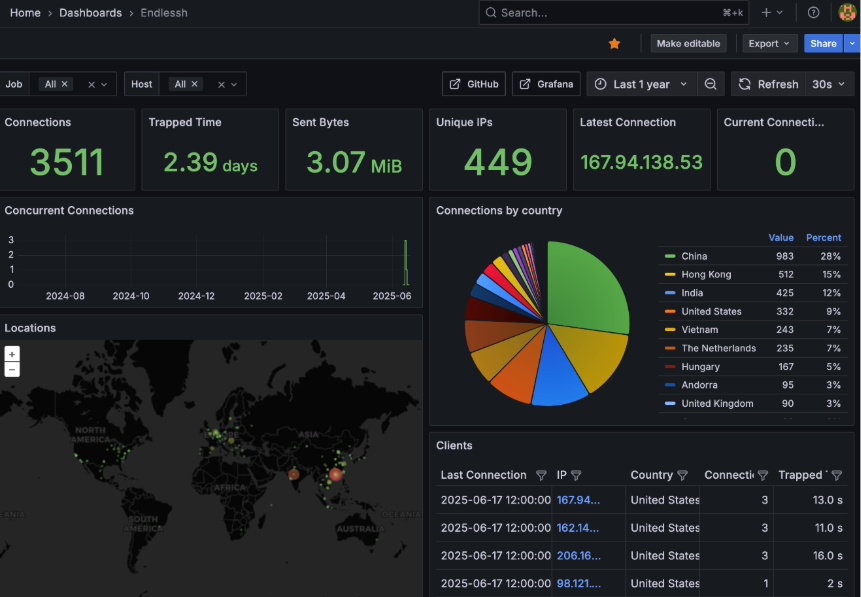
Some of the most common advice is locking down external access tools. These may vary, but for me (on an Ubuntu system), that means SSH, RDP and VNC. The default SSH port (22/TCP) is especially hammered by bots every second, scouring the internet for poorly secured access points. Just take a look at some of my honeypot statistics as proof:
Some easy ways to block these attempts:
Allow-list your SSH port to trusted IP addresses only (e.g. your home network)
- For me, this involved adding a network firewall rule to my VPS that only permitted access from my home IP address. Luckily for me, this doesn’t change very often but you may find this method annoying if yours does.
Change the port SSH runs on
- Any port other than the default will do, and you’ll immediately see a drop in authentication attempts to your box. This guide is pretty good if you want a step-by-step and don’t forget to update your firewall rules once you’re done!
Disable password-based authentication
- Seems obvious to say it but passwords can be weak, leaked or intercepted. Switch up to public key based authentication and disable password-based authentication where you can. Don’t forget to always secure your SSH keys with a passphrase!
SSL Insights have some other recommendations on what you can do but, generally, these three steps will prevent most attacks on your remote access service. These general steps can also be replicated to other services, such as RDP, where needed.
When it comes to reducing the attack surface of the applications you run, there are two key rules I stick by:
- Multi-factor authentication (MFA) is enforced and enabled where possible. Authentik makes this very easy and it can help to manage access to services depending on which friend or family is using your service. If the application does not need to be exposed externally or does support MFA or OAuth, it is only accessible via a Wireguard VPN and access to it is limited behind IP whitelisting to VPN IPs.
- Access to all applications is limited by user groups in Authentik and access is only granted if a user specifically needs it. For example, my daily driver account has access to my Jellyfin media server but does not have access to Authentik’s administrative dashboard as this is reserved for a dedicated SSO administrator account.
Physical attacks
Full disclosure, I do not currently have a “home” lab. I’m renting a dedicated server from a large, EU-based Virtual Private Server (VPS) provider. Hopefully I’ll have the time to move to a physical lab in the near future so I can stop bullying myself. For now, however, physical security controls are simply not in my threat model. Some that come to mind though:
- Fix your hardware in a lockable case or rack.
- Ensure this locked hardware rack is located in a relatively secure part of your house and away from the direct line of sight of windows.
- Consider leveraging full disk encryption as a defence-in-depth measure (may not be possible for some setups).
- Do the usual things to secure your home when you’re out (e.g. lock the door and windows, set your smart doorbell or cameras to alert you of any movement, enable your alarm, etc).
Squash unsafe defaults
The default configurations that are set by the typical services that run within a home lab can be insecure. Obvious and documented default passwords, overexposed ports and sensitive data leakage are just some of the issues you can have if you just YOLO a service up without reviewing its config.
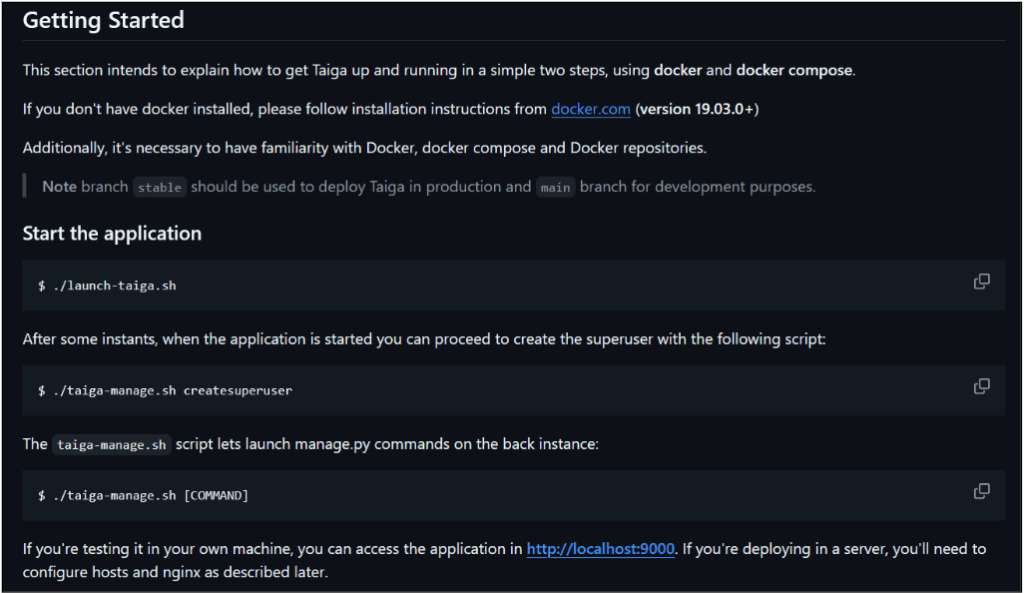
For example, Taiga, a self-hosted Kanban board and productivity tool, provides this repository as an initial starting point. In there is a docker-compose.yml file, which defines the specifications of the container the web application will run in, and a .env file, which defines the environment and keys.
The .env file is of particular interest, as it contains lots of very obvious and weak keys:
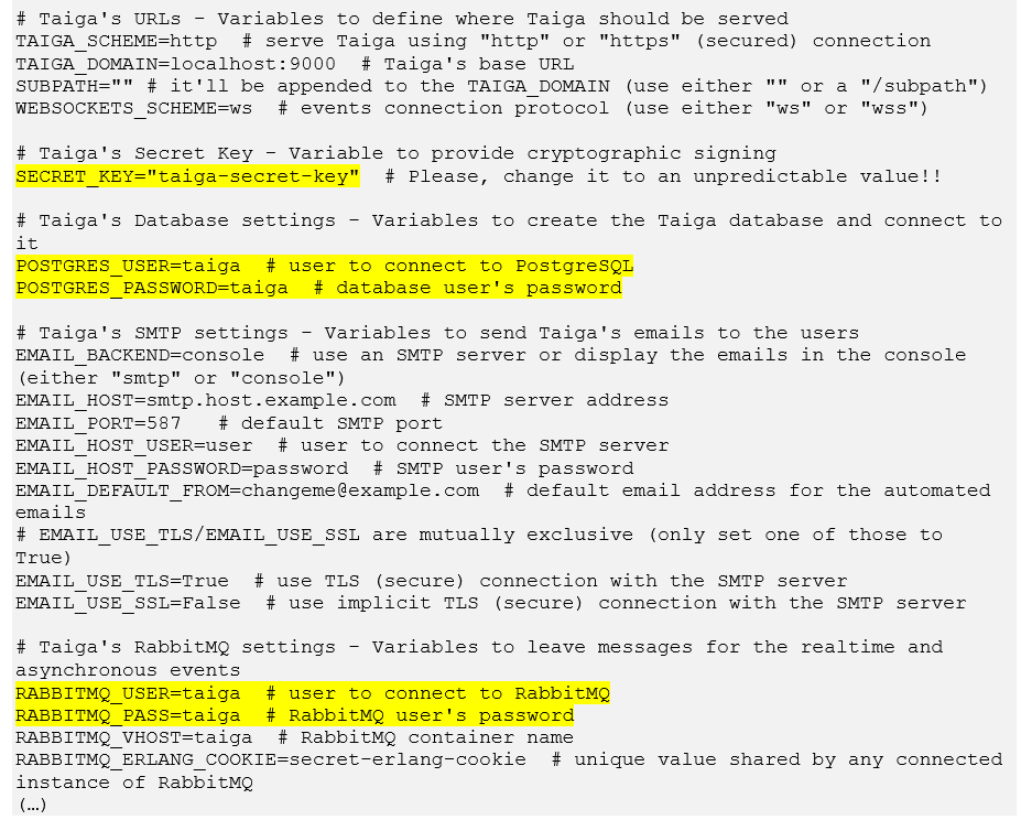
There’s even a comment in the file that warns you that you should change the default values, but this can be missed if someone is just skimming through the README and not really thinking:
Sometimes, your enemy is not an application’s configuration file, but the software that runs its container. There is a painful and somewhat easily missed quirk with Docker, in that it ignores any firewall rules set by the Uncomplicated Firewall (UFW), the default firewall for Ubuntu. As a result, Ubuntu users relying on UFW to restrict traffic to internal services may find themselves accidentally exposing them with a Docker Compose file such as the following:

Such a definition is extremely common among Docker Compose files and, without a patch or explicit host address specification, can prove dangerous if the host is connected to untrusted networks (for example, the public internet).
None of this is a dig at Taiga in particular, lots of projects do this where they assume the user is aware that they need to change the default settings and configurations. However, it can present a risk to time-pressed or newbie administrators who may accidentally create trivial attack vectors.
TLS everywhere!
When I first started building out my home lab, I didn’t really need to encrypt the internal traffic. Oh sure, pretty much everything that hit the external interface was secured with TLS but very little internally. In hindsight, this was a mistake, as all it would take would be one compromised container to potentially intercept all the communications in a Docker network. This could include communications between a frontend application container and its backend API or database, along with all the credential and information disclosure goodies that come with it.
In this instance, I had secured my external domain with a wildcard certificate. So, instead of buying a new domain and certificate or mess around with self-signed certificates on a billion different Docker containers, I instead created a sub-domain under my wildcard domain. This domain, internal.mydomain.com, still encrypted traffic with TLS using the wildcard certificate and I could just host my internal applications under this domain (e.g. portainer.internal.mydomain.com).
Such a configuration can be achieved in nginx, and probably a lot easier in other solutions, but these are my basic config files for each type of site:
Internal:
server {
    listen 10.66.66.1:80 http2;

    set $tld "internal.my.tld";
    set $name "faction";
    server_name faction.internal.my.tld;

    # Import common defaults
    include /etc/nginx/settings/common-settings.conf;

    # Redirect to HTTPS
    return 301 https://$host$request_uri;
}

server {
    listen 10.66.66.1:443 ssl http2;

    # Set vars
    set $tld "internal.my.tld";
    set $name "faction";
    server_name faction.internal.my.tld;

    # Import common defaults
    include /etc/nginx/settings/common-settings.conf;
    include /etc/nginx/settings/tls-settings-internal.conf;

    # Setup logging
    access_log /var/log/nginx/faction-access.log stripsecrets;
    error_log /var/log/nginx/faction-error.log;

    location / {
        # Allow VPN and local clients, deny all others
        allow 10.66.66.0/24;
        allow 127.0.0.0/24;
        deny all;

        proxy_set_header Host $host;
        proxy_set_header X-Forwarded-Host $host;
        proxy_set_header X-Forwarded-Server $host;
        proxy_set_header X-Forwarded-Proto $scheme;
        proxy_set_header X-Real-IP $remote_addr;
        proxy_set_header X-Forwarded-For $proxy_add_x_forwarded_for;
        proxy_http_version 1.1;
        proxy_set_header Upgrade $http_upgrade;
        proxy_set_header Connection $connection_upgrade;
        proxy_pass http://10.66.66.1:8081;
    }
}
External
server {
    listen 127.0.0.1:80;

    set $tld "my.tld";
    set $name "meals";
    server_name meals.my.tld;

    # Import common defaults
    include /etc/nginx/settings/common-settings.conf;

    # Redirect to HTTPS
    return 301 https://$host$request_uri;
}

server {
    listen 127.0.0.1:443 ssl http2;

    set $tld "my.tld";
    set $name "meals";
    server_name meals.my.tld;

    # Import common defaults
    #include /etc/nginx/settings/common-settings.conf;
    # Block access by direct IP
    if ( $host != $server_name ) {
        return 444; #CONNECTION CLOSED WITHOUT RESPONSE
    }

    # Add robots.txt
    location = /robots.txt {
        add_header Content-Type text/plain;
        return 200 "User-agent: *\nDisallow: /\n";
    }
    include /etc/nginx/settings/tls-settings-external.conf;

    # Setup logging
    access_log /var/log/nginx/$name-access.log stripsecrets;
    error_log /var/log/nginx/$name-error.log;

    # Setup Pterodactyl Recommendations -> https://pterodactyl.io/panel/1.0/webserver_configuration.html
    client_body_timeout 120s;
    sendfile off;
    add_header X-XSS-Protection "1; mode=block";
    add_header 'Strict-Transport-Security' "max-age=31536000" 'always';
    add_header X-Content-Type-Options "nosniff";
    add_header X-Robots-Tag none;
    add_header Content-Security-Policy "frame-ancestors 'self'";
    add_header X-Frame-Options DENY;
    add_header Referrer-Policy same-origin;

    location / {
        proxy_set_header X-Forwarded-For $proxy_add_x_forwarded_for;
        proxy_set_header X-Forwarded-Proto $scheme;
        proxy_set_header Host $host;
        proxy_set_header Upgrade $http_upgrade;
        proxy_set_header Connection "upgrade";
        proxy_http_version 1.1;
        proxy_pass http://127.0.0.1:9925;
        proxy_redirect http:// https://;
    }
}
Layer on layer
As with corporate environments, you need layers of security. I’m not suggesting you sell your nan’s car and house for a top-tier EDR licence, but you should definitely look into adding some basic controls for when something nasty slips in.
Running processes at the minimum privilege level and ensuring that they are spread out across multiple accounts according to their use case is half the battle. For example, I have one user for running and storing media, one for running game servers, one for running my sandbox pentest environments, and so on. That way, if one group gets popped, it’s not necessarily game over for any live data on my box, as it’s stored under a different user. Similarly, these processes do not run with administrative permissions and only a handful of internal status monitors have access to sockets that are common for privilege escalation (e.g. docker.sock).
On the subject of Docker, separating your Docker Compose stacks out into their own networks is an effective way of limiting the blast radius of any compromised containers. One popped jellyfin container may break your media server, but at least it won’t be able to spread directly to other containers if it’s locked into its own network. Similar solutions exist for other containerisation solutions (such as proxmox) too, so have a look at your software’s documentation for how you can implement this.
Each of the Docker networks below run a different software stack, with some cross-over depending on the application’s requirements (e.g., access to the authentik-internals network for some production applications so they can reach it’s LDAP service):
$ docker network ls
NETWORK ID     NAME                   DRIVER    SCOPE
acb0ca850548   authentik-internals    bridge    local
6322e87a4864   bridge                 bridge    local
810cb309ba40   endlessh               bridge    local
f4fe63656891   faction                bridge    local
b1cd9317633f   freshrss               bridge    local
4f92932a59c8   homelab                bridge    local
6f7d0aa6a76c   host                   host      local
f35b365ea129   internal-dns           bridge    local
37953a3aff4b   mail                   bridge    local
5d5f3574bb9c   mealie_mealie          bridge    local
45ab7a23c7d9   none                   null      local
a2dfe24bc804   portainer_default      bridge    local
d01dd5dc3718   pterodactyl            bridge    local
da62c6716bb7   sso                    bridge    local
b47ce34c2f09   taiga-docker_taiga     bridge    local
d4fd83e66e60   uptime-kuma-external   bridge    local
be15dee0a5d5   uptime-kuma-internal   bridge    local
f3d2535f6413   wings0                 bridge    local
Patching too, can fall by the wayside a little bit. Especially if you’re not using a managed solution (such as apt) for handling software and operating system updates. On my system, any software running on the host itself is installed using apt and regularly updated using a cronjob. To implement a similar system yourself, you can use the crontab command:
# Switch to root user
sudo su
# Copy your existing crontab to a file
crontab -l > crontab.bak
# Add in your cron job to update the system every Monday at 3am
echo "0 3 * * 1 apt update && apt upgrade -y" >> crontab.bak
# Install new crontab from file
crontab crontab.bak
rm crontab.bak
For Docker containers, I make use of Containrrr’s excellent watchtower tool, a very simple container that checks for and automatically updates your containers. With these two changes, I don’t really need to think too much about patching, as it’s handled for me.
Possibly as important as patching (but not always implemented correctly) is the backing up of important data. If the worst happens and your box is wiped out, having an easy off-site backup to restore from is crucial to a fast recovery. This doesn’t just apply to the modern threat of ransomware. Maybe one of your drives dies on you, or perhaps you fiddled with an operating system configuration you probably shouldn’t have; you’ll need a way to get back to roughly the same point you were in prior to it all hitting the fan. Your backups should be:
- Regular, ideally once a day if you have the storage for it.
- Immutable, meaning they can’t be deleted or modified until after a set time period.
- Off-site, meaning that they are stored in a different location or at a different cloud provider to your live server.
- Flexible, meaning that it’s easier to restore your live server from a backup in a time of crisis and not battle with command line flags in a panic for ages.
Personally, I like borg backup (Borg) but I’m slightly old school. There are a multitude of other options, some of which are used commercially (e.g. Veeam and rsync) so it’s good practice if you’re looking to pivot into a system administrator career. Regarding Borg, Hetzner has some decent documentation on how to implement it on their storage box service and my own solution takes a similar approach to this.
Finally, it sounds obvious, but make sure any actual operating system user accounts are secured with strong passwords. It may not be game ending if your media server user is compromised, but it may be if it has sudo privileges and a password of Password123!.
Make Big Brother jealous of your monitoring
You know the monitoring they have in Nineteen Eighty-Four? There’s nothing wrong with making it look amateur by comparison when it comes to your home lab. Without it, the first sign that your home lab has been popped is when your mealie recipes start suggesting you add rocks to your pizza or when you start getting accusations from your ISP about spam distribution.
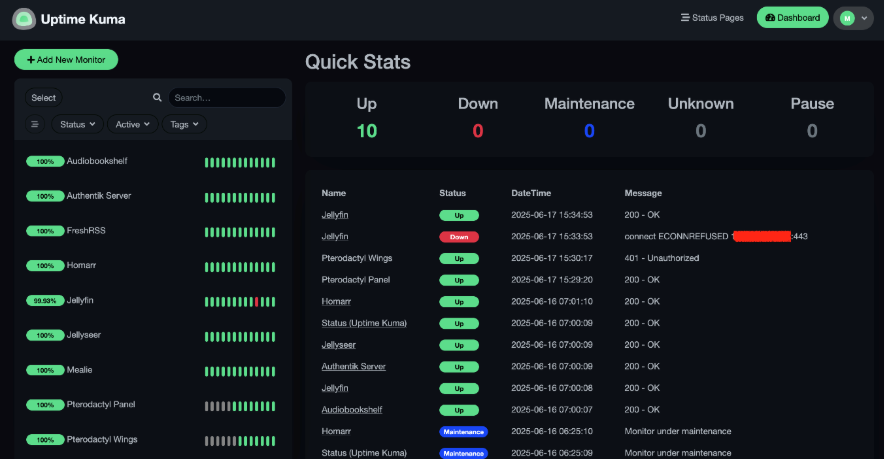
I’ve found a great initial starting tool is uptime kuma (Kuma), but your options are limitless here. Kuma is rather good for its website monitoring, but also for its ability to monitor internal and miscellaneous processes. It includes various alerting options that can send a message once a pre-defined threshold is reached. I’ve got it set up so it plugs into all the internal Docker networks it needs to and will fire off an email if it detects disruption, which can be a good indicator of compromise:
Prefer more active monitoring? A regular Clam Anti-Virus scan can be useful for catching malware that has landed on the file system of your server or one of its containers. It’s not as quick as some of the other AV providers out there, as it lacks any sort of real-time monitoring. It can, however, be set up to run as often as required and is generally effective at clearing up most off-the-shelf malware that may be picked up. For instance, I’ve set it up to conduct a thorough system scan once a day and notify me via email if it finds any malicious activity:
#!/bin/bash
DATE=$(date +"%Y_%m_%d-%H_%M_%S")
LOGFILE="/root/ClamAV-Logs/Clamscan-All-$DATE.log"
EMAIL_MSG="Please see the log file attached.";
EMAIL_FROM="[email protected]";
EMAIL_TO="<MY-PERSONAL-EMAIL>";

# Output to a logfile
exec > >(tee -i "${LOGFILE}")
exec 2>&1

# Run Scan
echo "INFO: Starting Scan..."
clamscan --infected --remove --move "/root/ClamAV-Quarentine" --exclude-dir "/root/ClamAV-Quarentine" --exclude-dir "/home/user/.exegol/exegol-resources" --exclude-dir "/home/user/GOAD" --max-filesize=1000M --recursive --bell --log="$LOGFILE" --file-list=/root/clamav-targets.txt

# Get value of infected items found
echo "INFO: Scan complete. Getting malware count..."
MALWARE=$(tail "$LOGFILE" | grep Infected | cut -d " " -f3)

# If non-zero, send email with attached logfile
if [ "$MALWARE" -ne "0" ]
then
    echo "WARNING: $MALWARE instance(s) of malware found! Sending notification email..."
    echo "$EMAIL_MSG" | mail -A "$LOGFILE" -s "WARNING - Malware Detected on Server" -r "$EMAIL_FROM" "$EMAIL_TO"
    echo "INFO: Notification email sent. Exiting..."
else
    echo "INFO: No malware found. Exiting..."
fi

exit 0
Conclusion
Anything exposing services to the public internet is at risk of compromise, no matter how small a fish you are. However, you don’t need to factor in a cybersecurity budget for your home lab either. All of the suggestions mentioned in this post cost nothing outside of the little time required to set them up and are worth their weight in gold without you even realising it half the time. Happy hacking!


