


TL;DR
- Converted a real car into a game controller by intercepting CAN data
- Tapped into the CAN bus using cheap wire splicers and a Kvaser USBCAN interface
- Mapped steering, brake, and throttle signals to game controls using Python
- A car is an impractical demo
- What are we going to do next year?
Introduction
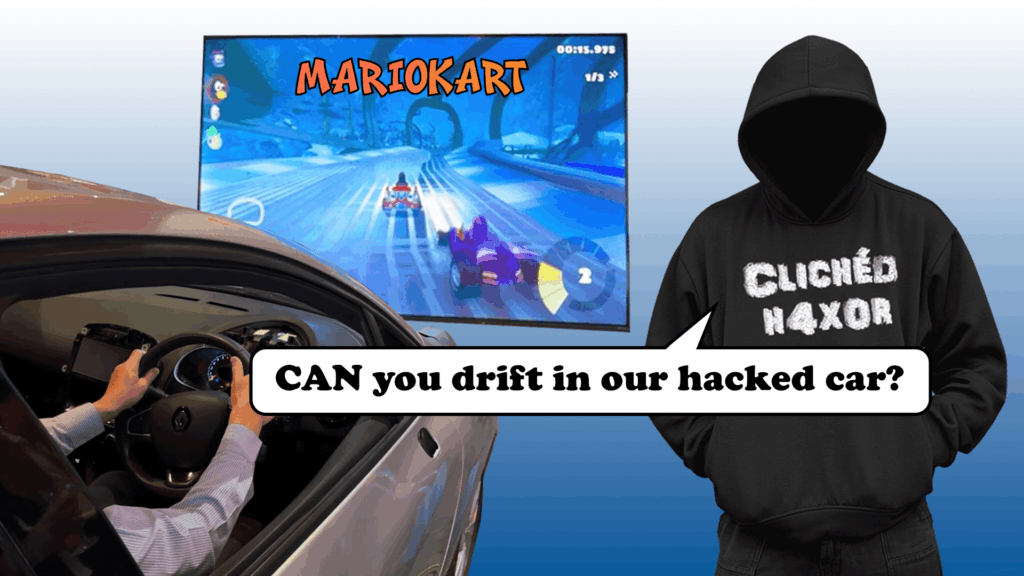
If you went to our PTP Cyber Fest over the Infosec week you may have seen the PTP hack car being used as a games controller for the game SuperTuxKart (a free and open-source Mario Kart type game). You really could steer, accelerate and brake using the car, ‘driving’ the on screen kart!
This was based on a silly idea I had last year as a way of making a more fun demo than just teaching people how to intercept and replay CAN messages. It turns out that Timm Lauser and Jannie Hamborg from Darmstadt University did something similar with an ID.3 and SuperTuxKart, and presented it at DEFCON 32 in 2024.
The PTP hack car is a second-hand 2016 Renault Clio that was bought because it was relatively cheap, was recent enough to feature an ‘eCall’ telematics module, small enough to fit in the garage attached to our lab and was local. It is used by our team to experiment and mess around with automotive testing on a real vehicle. It also uses a mixture of CAN and LIN for different components.
And yes, the car does still work and can be driven, one of my colleagues manoeuvred it into the building for PTP Cyber Fest (although we had to remove the wing mirrors). No, it would not pass its MOT without a lot of work, mainly because the air filter has been removed to access the car’s Engine Control Unit (ECU).
Step 1: Tap into the CAN bus
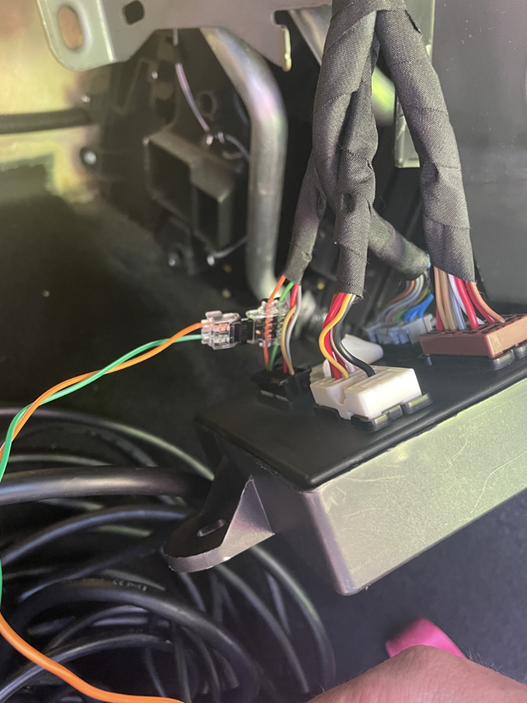
I had already had a route into the CAN bus from last year’s PTP Cyber Fest. As I was aiming to show CAN over OBDII the route I’d used was to identify the Body Control Module (BCM) and then tap directly into the CAN wires using a wire splicer.
The splicers are cheap products that just cut away a tiny bit of insulation from the wires and allow a tap to be made. They are often used for adding third party products to cars (e.g. monitoring black boxes) and can be bought from a number of places. Mine came directly from Amazon.
Step 2 : Find the CAN messages
Identifying what messages are sent when using the steering wheel, brake and throttle were the first problems, as these would be used as inputs.
I had used the steering wheel and brake as part of my demo last year so working these out required me to work out where I had placed the original scripts I had used. The throttle was a bit more of a problem, I had search through a number of different sources for the CAN messages for the make of car (Renault Clio) and come up with nothing.
It took a while before I realised that I refer to it as “accelerator” whereas the official term is “throttle”. This made it easier and I located the CanZE source code, which had mappings for other Renault vehicles, which was close enough to give me some useful hints.
This, along with some time in the hack car moving the steering wheel and pressing the pedals, allowed me to identify the arbitration IDs and which bits of data were used for each state. I’m not going to go too far into the CAN protocol here, in essence, once you get the electrical state right and know the bus speed (which I used a Kvaser Leaf Pro for), a standard CAN packet consists of an 11 bit arbitration ID, 8 octets of data and a selection of flags and metadata about the packet.
Because CAN packets are so small (8 octet payload) and there are only a small number of arbitration IDs (0x800, or 2048 in decimal) and smaller arbitration IDs have a higher priority, often messages go down to specific bits within the packet. Several CAN database formats refer to the packet as a stream of bits rather than using octets, but my mind works in octets. The ones for steering, brake pedal and the throttle are below. (octet and bit numbers start from 0).
Table 1
| Function | Arbitration ID | Size | Octet # and bits |
| Steering | 0x0c6 | 16 bits | octet 0 and 1 |
| Brake | 0x1f6 | 1 bit | octet 3, bit 3 |
| Throttle | 0x186 | 9 bits | octet 4, octet 5 bit 0 |
Now I can write a bit of simple Python, using the library python-can that pulls these values off the bus and does something with them.
Step 3: Controlling something
Making the CAN messages do something required a translation method, I could patch the SuperTuxKart source to take controller input from CAN, but this would have taken quite a bit of time and required a full build environment.
So I cheated. found an easy route
The Python module pynput allows Python to issue input device events, like a mouse click or a key press. I have used this in the past to inject data through an RDP session to copy tools over by “typing” them.
This time, I just amended my script to “press” the keys within SuperTuxKart: up, down, left and right. This sort of worked, but I hadn’t accounted for how fast the CANbus was! When testing I steered, it then pressed that key for every packet, leading to hundreds of key presses for each event, with SuperTuxKart lagging way behind the CAN bus.
That wouldn’t do.
Step 4: Re-architecting
As described above, you can’t control something like that. A new architecture was needed: instead of making a state on the bus inject a key press, we update a simple state machine from CAN, then we have another thread that reads the state machine every <n> time and makes the key press.
This would require some tuning, but was the easiest route.
Step one would be designing the state machine. It used a Python dataclass, with a method to represent it as a dictionary. With hindsight, I should’ve just used a dictionary, but sat in the driver’s seat of a Renault Clio with the sun beaming down on you is not the best development environment!
This is really simple:
@dataclass
class CarController:
	# Controller state object
	throttle: int = 0
	brake: int = 0
	steering: int = 0

def AsDictionary(this):
    return {
        "throttle": this.throttle,
        "brake": this.brake,
        "steering": this.steering
    }
The script is available on our GitHub account here.
Then I used Python’s threading module to run a thread that would receive messages from CAN, interpret them and update the dataclass. At this point I needed to design my thresholds. Brakes were easy as it was an on and off state. The throttle was simple as most people would just push it to the floor, so I just made a threshold that felt right.
Steering though, steering was my bane. Using this method makes a digital steer rather than an analogue one, where you have to actively move the steering wheel left and right. To add to this, as we weren’t engaging the engine, the power steering wasn’t engaged. We also had the car’s tyres on a physical floor and as there was a mechanical link to the front wheels, they always moved.
I didn’t want to tear up the tyres or the floor, so I made the steering threshold relatively small (< 0x8030 was right, > 0x80d0 was left). This mostly worked, except for a couple of people who tried to steer like it was a car which must’ve been hard to do and probably took off quite a bit of rubber from the tyres.
SuperTuxKart has weapons which could be fired. I really hoped I could put in a control for these, ideally the horn. Unfortunately the Clio uses LIN to manage the controls on the steering wheel and the horn doesn’t use CAN. In the interest of everybody’s hearing I did remove the fuse for the horn just in case people got carried away.
Sending messages to the instrument cluster to show speed would’ve been the cherry on the top, but I ran out of time (and most people were looking at the monitor instead) so this didn’t happen.
Step 5: Displaying the messages
It was suggested that showing the CAN messages in real time would be informative so that I could point out how it worked. Getting a second tap wouldn’t have been hard, but having a second reader required another device, which I didn’t have with me. After wasting some time to get a clone ODBII reader working, it was time to fix it.
So, with an update to my script to dump the important CAN messages, using colorama to display each line in a static location on screen and to highlight the important octets in red.
Step 6: It all breaks
An old axiom is that a demo never works when its needed, and a sacrifice is needed to the demo gods, and, yes this happened. It worked fine for a random amount of time, then it would crash, sometime after a whole lap had been driven, sometimes within seconds of starting.
We had to suspend the demo and just talk about automotive testing for a couple of hours as I needed time to troubleshoot the problem.
A few breaks later when I had the chance to Google and read, going down some false paths (e.g. applying filters to reduce the CAN messages being handled) I noticed that python CAN was not thread safe by default. The whole problem was just a simple race condition.
The documentation had a thread safe mechanism to read the CAN bus, all I needed to do was change can.Bus() to can.ThreadSafeBus() and it all started working!
There were some other ancillary problems: if you don’t start the engine, the car shuts down electrical systems after about 5 minutes. We worked around this by asking people to remove and re-insert the key before they started their lap. Sometimes we forgot. Sorry.
The other problem was keeping the car’s battery topped up, leading to occasional downtime when I had to use the plug-in charger. This also occurred with the laptop, leading to some interesting cable runs.
Next time
I’m going to use something more portable than a car, even a small car. Anybody got a cheap motorcycle they want to sell?


