


Introduction
Unless you have been living under a rock for the last year or so, Active Directory Certificate Services (AD CS) abuse continues to be a hot topic in offensive security, ever since the excellent research released by Will Schroeder (@harmj0y) and Lee Christensen (@tifkin_). I, like many, have enjoyed the fruits of Will and Lee’s research since its release last year.
Up until now exploitation of these AD CS misconfigurations typically requires tools like Certify directly over C2, or Oliver Lyak’s excellent certipy tool over SOCKS into the target environment.
Recently, my genius and handsome colleague Nick (guess who tech QA’d this post?) and I got into a conversation around living off the land techniques for AD CS abuse. The environment he was targeting at the time was brutal from a red teamer perspective, with a high functioning SOC and excellent detection capability. In situations such as this, living of the land is a much more effective way of remaining undetected and blending in with legitimate traffic.
Legitimate AD CS usage
AD CS can be used for a variety of certificates aimed at different functions, from server authentication (traditionally used for TLS encryption when communicating with a webserver), to code signing certificates used for signing software. Once AD CS is configured within an Active Directory environment, one such use is for end user authentication when logging into a Windows host, traditionally facilitated using Smartcards.
Private keys are generated securely on a smartcard, with a corresponding certificate matching the private key signed by the AD CS CA server being loaded onto the card once it is signed. If the correct type of certificate is found on a Smartcard attached to the host, then this card is offered up as an alternative authentication mechanism for the end user.
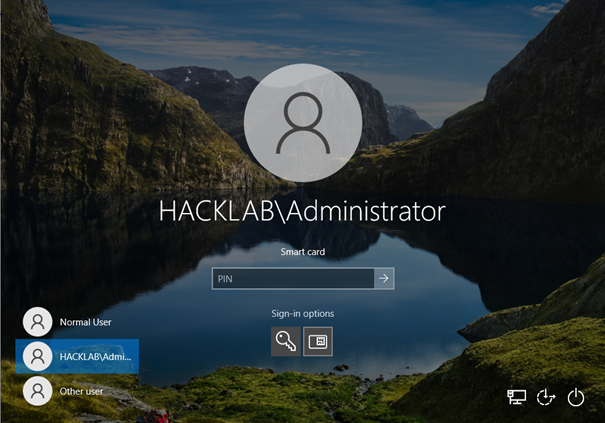
Figure 1 Typical Smartcard Logon Experience
Smartcards have the added bonus of passthrough authentication via remote access solutions like Remote Desktop and Citrix Workspace. A redirection channel can be setup between the local client where the smartcard resides to the remote access machine handling the authentication. So, for us to be able to live off the land we need to be able to load our private key and certificate onto a smartcard. Sure, this would be possible using a physical card setup, but a virtual card would be far better and more flexible than the physical alternative.
So, Nick and I thought it would be a great idea to attempt to emulate a virtual smartcard from the attacking machine not under the watchful eye of the SOC. But before diving down that rabbit hole, we also needed to determine what templates could be vulnerable, enrol and export a certificate and private key, using only tools available from the operating system itself, and ideally away from the command line.
Enumerating and enrolling off the land
There are several ways to enrol for certificates using traditional Windows features and tools. The certutil command line tool and the web enrolment endpoint that is sometimes exposed, to name a few. But we wanted to avoid the command line if possible and not rely on the web enrolment endpoint as often this is not available.
Manage User Certificates MMC snap-in to the rescue. This MMC snap-in is designed for use by normal unprivileged users. It essentially allows the user to manage their own certificate store by importing, exporting, and more importantly enrolling for new certificates via AD CS.
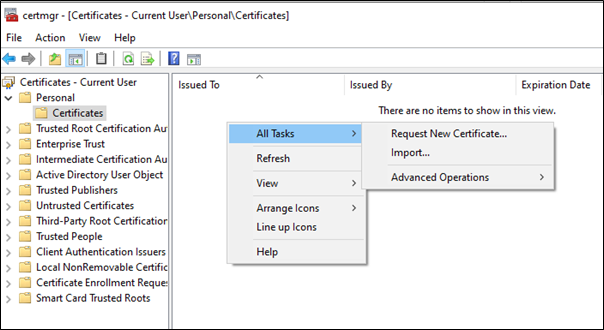
Figure 2 Requesting a new certificate
Will and Lee’s research identified 8 different vulnerabilities named ESC1 – ESC8. Not all vulnerable templates can be easily enumerated using this technique, but ESC1 through ESC4 are generally easy to spot. For our purposes we are interested in ESC1 abuse.

Figure 3 Smartcard template vulnerable to ESC1
The EKU’s of the certificate template are mapped to the Application Policies within the expanded details. For Active Directory authentication purposes, we either need Client Authentication or Smart Card Logon. For ESC1 to be abused, the template also needs to be setup to allow the enrolee to supply the subject. This value is used in the “alternative name” section of the certificate, and in this instance, it is easy to spot, as you’ll get a warning More information is required to enrol for this certificate, Click here to configure settings. Clicking the properties button will yield the following dialog:
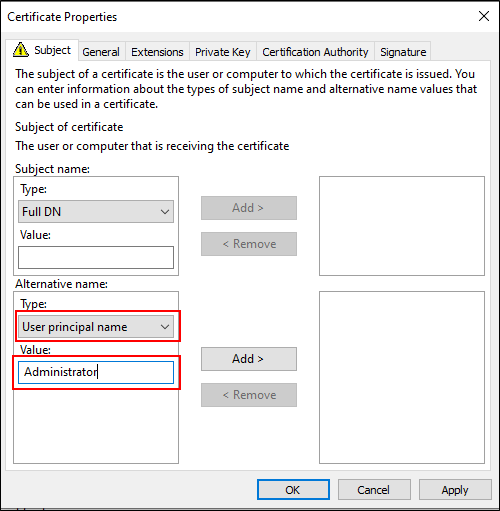
Figure 4 Enrolment properties
For the alternative name, select User principal name and enter the user you would like to impersonate within the Value field and click Add.
Navigate to the Private Key tab and under Key Options make sure to check Make private key exportable option.
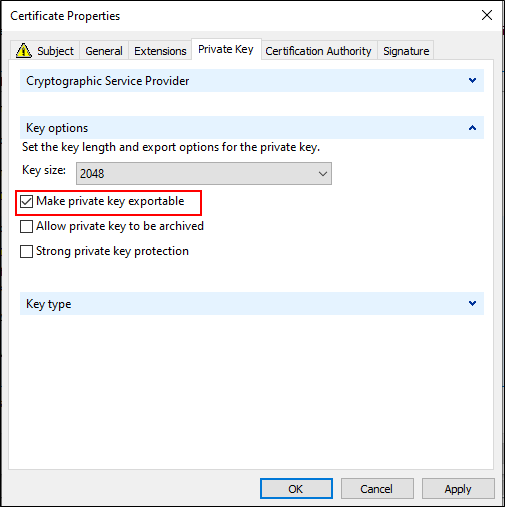
Figure 5 Mark private key as exportable
Finally, click OK to save the options that will be used to enrol for a certificate using the chosen template. The warning should disappear on the main Certificate Enrolment dialog, and you can then proceed to enrol for the certificate.
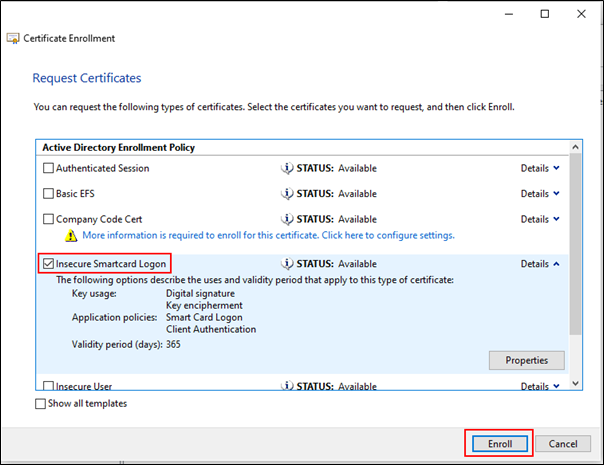
Figure 6 Finish enrolment
Once enrolment is complete, your newly minted certificate will be present within the Personal certificate store. Upon inspecting the certificate, you will notice the targeted user listed under the subject alternative name.
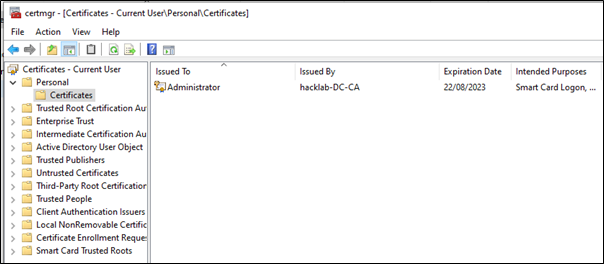
Figure 7. Certificate ready for export
The last step is to export the certificate and private key to a file that can then be used by the smart card emulator to authenticate as the user.
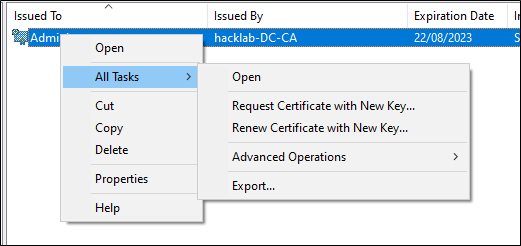
Figure 8 Initiate export dialog
Make sure the export private key option is selected, since the certificate on its own is of no use to us.

Figure 9 Select export private key option
Untick all options selected by default, we just want a PFX file with the certificate and private key present.
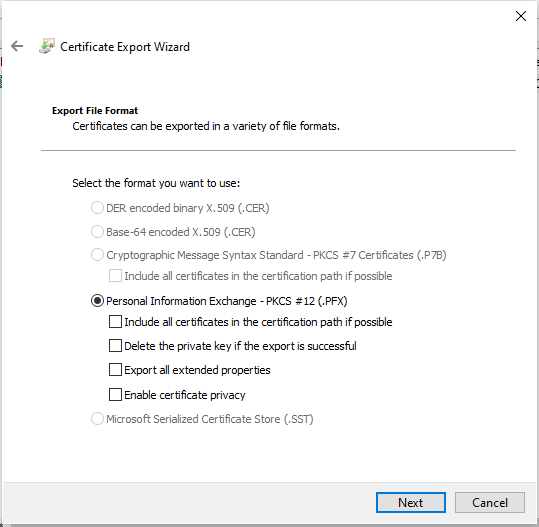
Enable a password used for encrypting the PFX file
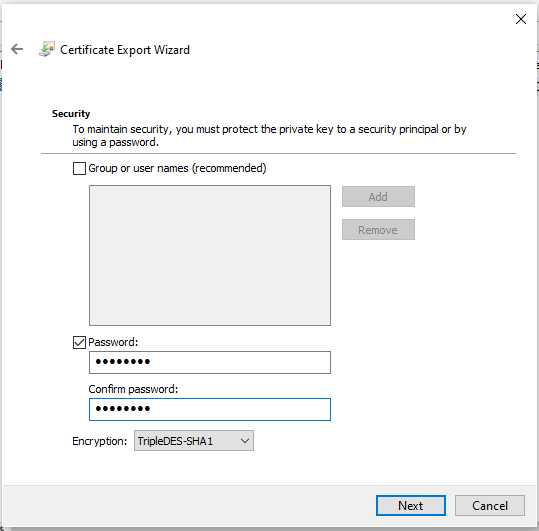
Finally, save the PFX file to a preferred location.
At this stage you should have a PFX file with a certificate and private key inside the target environment. I’m not going to cover the myriad of ways you can exfiltrate the file, but the idea will be to exfiltrate the file via OneDrive, GitHub, Email, or any other mechanism you can find to obtain the PFX file within your attacking environment.
Virtualising using PIVert
The second part of the challenge was of course virtualising the PFX file as a smartcard from your attacking workstation. I highly recommend a read of the comments to my tweet. Lots of different methods and ideas from some great people (@Carlos_Perez, @awakecoding and @an0n_r0) that are both possible today and theory in the future. But for me, the route chosen was emulation of a smart card operating system wide from Windows.
So, what type of smartcard do we need to emulate to support Windows based smartcard authentication? There are 2 types that Windows supports out of the box. NIST SP 800-73 Personal Identity Verification Cards (PIV) and Microsoft’s Generic Identity Device Specification (GIDS). Both specifications implement a standard way of authenticating an end user securely by keeping private keys sealed away inside the smartcard ICU itself. Yubikey devices for example support the PIV specification.
After looking at both specifications, PIV seemed to be the easiest to implement for our use case. Since we already have a usable private key and certificate via the PFX file, there was no need to implement the official PIV standard specification for the creation or importing of private keys and certificates. This could simply be done via reading the PFX directly from the card emulator software and exposing it as a certificate and key that is already present on the card.
For this I wrote a new tool called PIVert. PIVert utilises a UMDF driver written by Fabio Ottavi. The driver exposes a virtual smart card reader over a named pipe. A user mode application can then connect to the named pipe to emulate a specific type of smart card, and for our use case, we are emulating the PIV application standard.
With this in mind, other than a few informational commands that Windows queries to determine if the card is indeed PIV compatible when a card is inserted, only three key commands needed to be emulated to achieve a successful logon with the emulated card are:
GET DATA command
As the name implies, the GET DATA command is used to query specific type of data objects from the PIV card. The key data object of interest is the PIV Card Authentication certificate. This is certificate that is used for signing the data used during authentication and is returned by extracting the enrolled X.509 certificate from the PFX file.
VERIFY command
The VERIFY command is generally supported on all types of smart cards, and is the command used for verifying the smart card PIN. PIVert is setup to accept any PIN prior to signing any requests.
GENERAL AUTHENTICATE command
Finally, the GENERAL AUTHENTICATE command is used for signing requests. During authentication, Windows will transmit a PKCS #1 1.5 padded message to the smart card for RSA based keys. The emulator then signs the request using the private key extracted from the PFX file and the signed result is returned from the virtual card.
PIVert usage
You can find the latest code and release of PIVert here on GitHub.
Installation
On a clean machine that hasn’t used PIVert before, the first step is to install the BixVReader virtual smart card reader driver (WARNING: this does install a self-signed trusted root certificate authority certificate since the driver is self-signed using a test certificate). The install step also sets the HKEY_LOCAL_MACHINE\SOFTWARE\Policies\Microsoft\Windows\SmartCardCredentialProvider\AllowCertificatesWithNoEKUregistry key. Without this option, only certificates with the Smartcard Logon EKU are offered for authentication. With this option enabled, certificates with the User Authentication EKU are also available for authentication.
.\PIVert.exe install
[=] AllowCertificatesWithNoEKU on SmartCard Credential Provider not set, enabling...
[+] Enabled AllowCertificatesWithNoEKU on SmartCard Credential Provider
[=] Writing BixVReader.ini config to C:\Windows
[=] Installing driver signing certificate into Root and Trusted Publishers local machine store
[=] Installing driver MSI
[+] Installer completed
Emulating a PIV Card
To emulate a PIV card using the exfiltrated PFX, you simply specify the PFX file and PFX password as command line arguments
.\PIVert.exe .\Administrator.pfx password
[=] Connected to Smartcard Data Pipe
[=] Connected to Smartcard Event Pipe
[+] Connected Virtal Smart Card Driver
[+] Virtual card inserted
[=] Press ESC to exit, or any other key to remove and reinsert the virtual card?
[=] Unsupported INS ca with CLA 0
[=] Request for PIV DataObject: CardHolderUniqieID
[=] Request for PIV DataObject: CertPIVAuth
[=] Request for PIV DataObject: CertSign
[=] Request for PIV DataObject: CertKeyMan
[=] Request for PIV DataObject: CertCardAuth
[=] Request for PIV DataObject: KeyHistory
[=] Request for PIV DataObject: CertPIVAuth
[=] Request for PIV DataObject: CertSign
[=] Request for PIV DataObject: CertCardAuth
[=] Request for PIV DataObject: CardHolderUniqieID
[=] Request for PIV DataObject: CertKeyMan
[=] Request for PIV DataObject: KeyHistory
There does appear to be a bug in the driver (or potentially my code :D) were sometimes the virtual card insertion is not detected by Windows. To combat this issue, you can press any key other than ESC to virtually remove and re-insert the card. You’ll know when this as happened as you won’t see the requests for DataObjects on start-up like above.
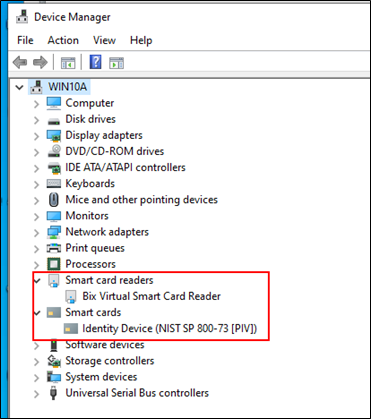
Confirmation
Once PIVert is started, the PIV card should be exposed to the operating system. You can confirm this via Device Manager
Additionally, if you attempt a Remote Desktop connection to any host you should also see the Smart card credential along with the certificate for the user that has been impersonated.
Authenticating to RDP
With the PIV smartcard now being emulated, using your new identity is a piece of cake. When connecting to a host over RDP you can select the More choices option when entering the credential within the Remote Desktop Client app.
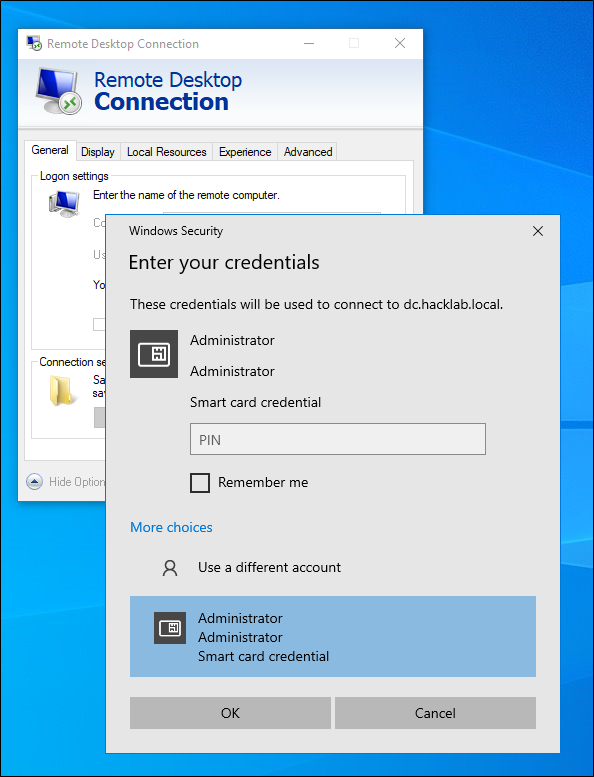
Figure 10 Using the emulated PIV card with RDP
Select the correct identity and just hit OK since PIVert will accept any PIN.
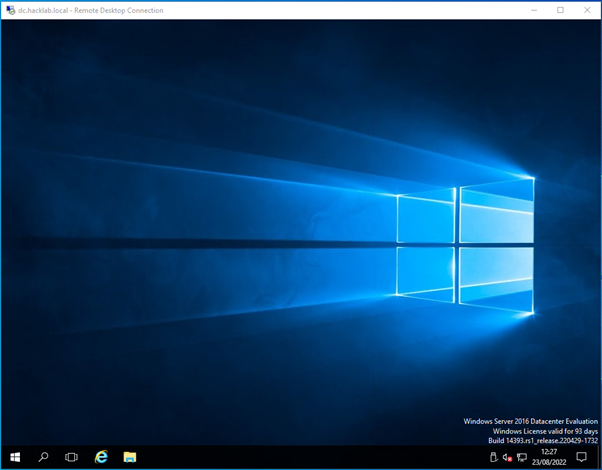
Figure 11 Login success
Caveats
Now there is one caveat to consider. The AllowCertificatesWithNoEKUregistry registry value that is set as part of the PIVert install process is specific to the client where PIVert is running, therefore only takes effect when the Remote Desktop Client is enumerating certificates from the connecting client host itself during NLA authentication. The client will also redirect the smartcard to the host after the connection has been made. So, if you lock the screen within the RDP session and the smartcard doesn’t have a certificate that holds the Smartcard Logon EKU, then you will not be able to unlock the session since the host will complain that it cannot find a suitable certificate for logon.

Figure 12 RDP host cannot find a valid certificate on the redirected smartcard
You can bypass this issue one of two ways. Disconnect the RDP session and reconnect a second time, or alternatively you can set the AllowCertificatesWithNoEKUregistry registry key on the remote host after login, but this will require local admin on the host.
Ideally enrolling for a certificate that does have the Smartcard Logon EKU is best. Smartcard logon works seamlessly with external perimeter solutions like Citrix and VMware too in this scenario, otherwise you would need a mechanism to set the AllowCertificatesWithNoEKUregistry key on the Citrix VM you are connecting to prior to attempting smartcard authentication.
If Storefront is already setup for smartcard authentication (seldom seen in my experience), then smartcard passthrough authentication will work even if the certificate doesn’t have the Smartcard Logon EKU.
Prevention and detection
By far the best solution is making sure that AD CS certificate templates are not vulnerable in the first place. Following Will and Lee’s whitepaper will certainly help in this regard.
But even non vulnerable templates can result in persistence opportunities for attackers that have compromised end user workstations through requesting and exporting a PFX file for the compromised account.
Leveraging event id 4768 can help identify PKINIT based authentication requests be it via tools like Rubeus, certipy or legitimately via RDP smartcard logon.
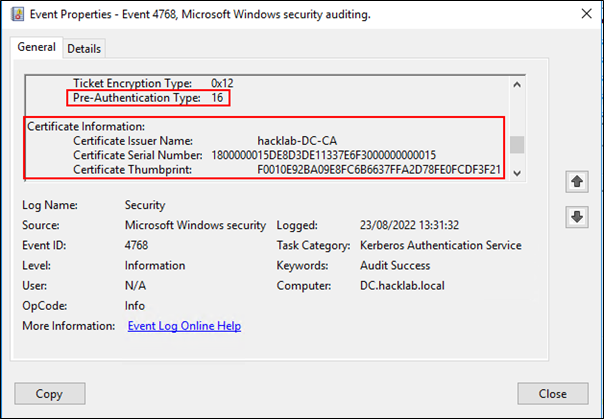
Pre-Authentication Type will be generally set to 16 for PKINIT based requests but could potentially be 15 for older clients or attackers trying to bypass alerts based on 16. If you don’t leverage PKINIT within your Active Directory environment at all, your SIEM should be configured to light up like a Christmas tree whenever pre-authentication type is 15 or 16. But be warned, mutual TLS authentication via hosted IIS websites can also trigger this type of event when a client certificate is presented to the web server.


