


At PTP we have developed a reputation in the IoT space as a group who enjoys finding silly Internet connected devices, pulling them apart and exploiting design flaws to steal all the data. In fact the first thing I was handed when I joined the company was a first-generation Internet kettle, which I found an open telnet port on which allowed you to steal the Wi-Fi WPA key from the last network it connected to.
We now have a core of very skilled hardware testers who do in-depth testing of hardware devices so that companies can make sure their devices are secure before going to market. I am not one of these testers. My day-to-day job focuses on infrastructure, web application and cloud penetration testing.
…but ever since the kettle I’ve always been interested in the hardware side of things.
The Dumb2Smart project!
Because of that I have decided to try my hand at building a cloud managed IoT device just to see if it can be done securely. I’m going to lean on the expertise that the hardware team have to do the best job that I can. My hope is that this project can serve as a guide to the sorts of things that companies should look for when designing their own products.
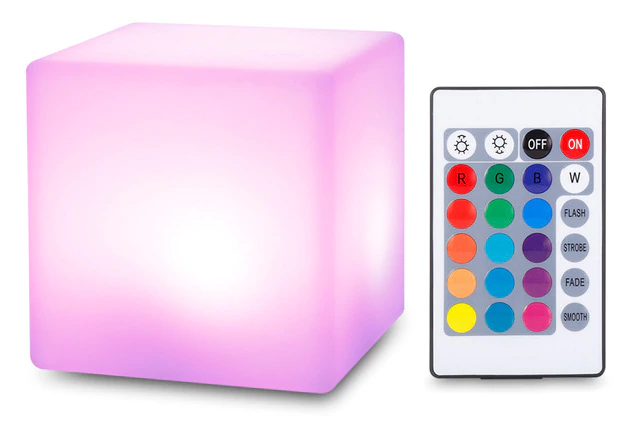
In the video I kick off by finding a dumb device which can serve as a base that I can use to develop my own IoT product. The device I chose is a widely available and simple LED cube. It has no “smart” technology. It uses an infra-red remote control to set the colour and the animated patterns that it displays.
Hopes, dreams, and plan B
I had initially hoped that the internal circuitry would be a little more advanced, and that I would have opportunity to interface directly with with the LED controller. Instead I went with plan B: Preserve the well constructed water resistance of the device and instead interface with it over IR by making a device which can send codes on demand.
The video shows a breakdown of the LED device with a tour of the circuit board alongside a logical circuit diagram. I manage to build an Arduino device to capture the code the IR remote is sending, and another Arduino device to prove that these can be replayed at the LED cube and reliably control it.
The project is ongoing, and the next steps will be to have my PoC circuit running on my chosen SoC, the ESP32, and then getting that device to be managed by a cloud hosted infrastructure along with secure updates, APIs and voice assistant integration. I have chosen the ESP32 to start building my IoT device due to some security features which have been added which are not present in the older ESP8266 and similar chipsets.
ESP32 explained
The ESP32 has a hardware eFuse which can be used to store AES keys in a way that they are only accessible to the ESP32 hardware itself, and not the software running on it. This is used by the ESP32 to implement the additional security features, encrypted flash and secure boot.
These utilise the AES keys to verify that the bootloader has not been altered before allowing the ESP32 to start. Once the verified bootloader it loaded another AES key is used to verify that the application firmware has not been altered before allowing it to start and perform the tasks that the device is designed to perform.
The AES key in the efuse is also used to encrypt the onboard flash used by the ESP32 application for data storage, meaning that we can store sensitive information like API keys, credentials and user data without the risk of an attacker with physical access to the device being able to dump the contents of the flash memory and gain access to this data.
More to come
The combination of these security features, and sensible decisions around device enrollment, updating and API access, I hope will demonstrate that it is possible to build an IoT device which considers the common threat models the users of these devices operate under.


