


I was recently trying to clear enough space in my office in order to find places to put other stuff. This is a sisyphean task, which I think can only be completed if I buy a bigger house.
Anyway, this quickly resulted in a pile of old technology and stuff to take apart. One of the things in this pile was an old Logitech wireless mouse where I had lost the dongle that plugs into the computer.
As I was removing the batteries to throw those into the battery recycle, I noticed that there were 8 test pads under one of the batteries.
What am I to do? You know this, take it apart! It was a lot harder than I thought as it had a number of sub-boards which were soldered to the main board. After a “gentle” extraction I got the motherboard out.
Unfortunately; I forgot to take a photo earlier in the process, so here’s the motherboard after I soldered some wires to the test pads. (For those of you who noticed how dirty my keyboard was in the past, you may be pleased to note that it has been cleaned).
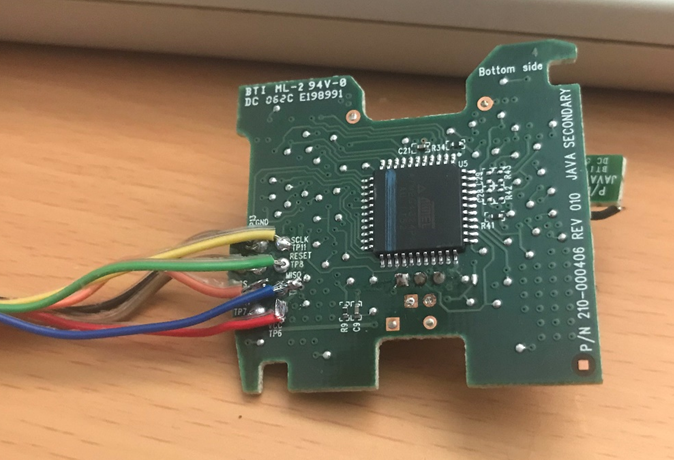
That chip in the middle is an Atmel ATMEGA324PA MCU. Internally it has an AVR core, 32KB of flash memory (the 32 in the version number) and 1KB EEPROM.
Those of you who read our articles will know what I’m thinking: can I read the Flash and EEPROM memory out? Of course we can; otherwise this wouldn’t be a very exciting article.
Trying to read the chip
Those eight pads were labelled up, which read out:
| GND | O | O | SCLK |
| MOSI | O | O | RESET |
| NCS | O | O | MISO |
| VBAT | O | O | VCC |
Those of you who have touch SPI before might recognise SCLK, MOSI and MISO; but may notice a lack of ENABLE (or SS). This is because the AVR In Serial Programming protocol is based on SPI, which doesn’t use ENABLE, but has an extra pin, RESET, which is used to reset the MCU and enable ISP.
As you can see from the datasheet, the protocol is relatively simple, but it’s a tiny bit more complex that normal SPI. Fortunately a tool already exists to do this hard stuff for use: avrdude.
Avrdude can use a number of programmers to talk to an AVR chip, including a bus pirate and a generic Linux GPIO connection. Because I already use a Raspberry Pi for reading SPI flash, I thought I’d use this to do my reading.
You can obtain avrdude from a Raspbian package, but this hasn’t got linuxgpio compiled in; it has got linuxspi, which is meant to use the SPI pins on the PI; but I found that this was flaky and wouldn’t get a decent read. So the first step is to download it and compile it with linuxgpio enabled:
pi@raspberrypi:~/tools $ cd avrdude-6.2/
:~/tools/avrdude-6.2 $ ./configure --enable-linuxgpio
checking build system type... armv7l-unknown-linux-gnueabihf
checking host system type... armv7l-unknown-linux-gnueabihf
checking target system type... armv7l-unknown-linux-gnueabihf
checking for a BSD-compatible install... /usr/bin/install -c
[…]
Configuration summary:
----------------------
DON'T HAVE libelf
DO HAVE    libusb
DO HAVE    libusb_1_0
DON'T HAVE libftdi1
DON'T HAVE libftdi
DON'T HAVE libhid
DO HAVE    pthread
DISABLED   doc
DISABLED   parport
ENABLED    linuxgpio
pi@raspberrypi:~/tools/avrdude-6.2 $ make
make  all-recursive
make[1]: Entering directory '/home/pi/tools/avrdude-6.2'
Making all in .
[…]
pi@raspberrypi:~/tools/avrdude-6.2 $ sudo make install
make  install-recursive
make[1]: Entering directory '/home/pi/tools/avrdude-6.2'
Making install in .
make[2]: Entering directory '/home/pi/tools/avrdude-6.2'
make[3]: Entering directory '/home/pi/tools/avrdude-6.2'
/bin/mkdir -p '/usr/local/lib'
[…]
There are a selection of libraries that you will need to install before it will make; unfortunately I didn’t note these down, so you have the joy of finding these out for yourself!
The next step is to tell avrdude which pins we’re going to use. I chose a cluster around the PI SPI pins, just to make it easier. Many guides on line will say to connect up VCC to the 5V output from the Pi (pins 2 and 4). I chose not to do this for a number of reasons:
- Didn’t want to stress the Pi’s power supply
- A 3.3 V output is near the SPI pins
So, here’s my avrdude configuration, note that the pin numbers are the GPIO number, not the actual pins themselves. Anyway, append this to the end of /usr/local/etc/avrdude.conf using your favourite editor (i.e. vi):
programmer
 id = "linuxgpio";
 desc = "Use the Linux sysfs interface to bitbang GPIO lines";
 type = "linuxgpio";
 reset = 25;
 sck = 11;
 mosi = 10;
 miso = 9;
;
Now we need to wire it up – most of it is simple, only we will need to wire MOSI to MISO and MISO to MOSI:
| Raspberry PI | Device | |
| Pin number | Use | |
| 17 | 3.3v | VCC |
| 19 | GPIO10, MOSI | MISO |
| 20 | Ground | GND |
| 21 | GPIO 9, MISO | MOSI |
| 22 | GPIO 25 | RESET |
| 23 | GPIO 11, SCK | SCK |
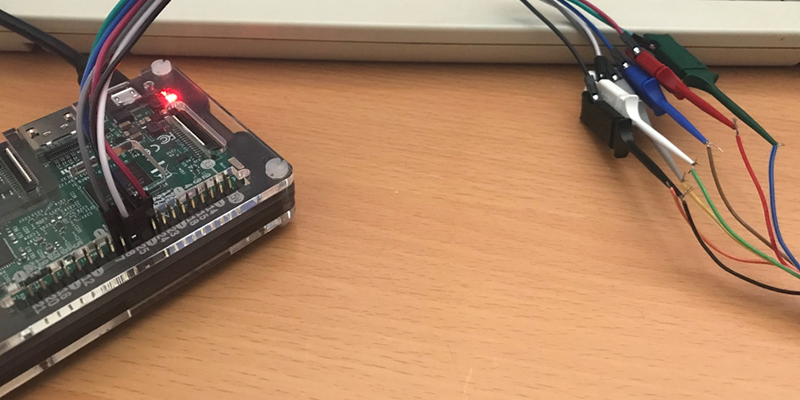
This looks a bit like this (I just want to highlight my clean keyboard really):

So let’s see whether it works. We call avrdude supplying the programmer with the -c (strange choice) flag as “linuxgpio” and the chip type, with the -p (another strange choice) flag as m324pa. You can get a list of supported chips by missing out the -p flag.
pi@raspberrypi:~ $ sudo avrdude -c linuxgpio -p m324pa

avrdude: AVR device initialized and ready to accept instructions

Reading | ################################################## | 100% 0.00s

avrdude: Device signature = 0x1e9511 (probably m324pa)

avrdude: safemode: Fuses OK (E:FE, H:90, L:62)

avrdude done.  Thank you.
The above shows that we have had a successful connection to the chip and it has responded with the signature we’ve expected.
Avrdude has also read three of the device’s four fuses, these are configuration bytes that configure how the device acts, the values can be found by looking in the datasheet, or by using an online site.
For our purposes the one fuse it doesn’t show is actually the most important one for our purposes: the lock fuse. This configures whether the device can be read or written. We can read this separately using the rather strangely formatted -U flag.
The -U flag takes a number of colon (:) separated parameters, in the order of:
source:action:destination:format
For our purposes, we want to the source to be the lock fuse (lock), we want to read it (r) and write it to stdout (-) as a hex value (h). Also it would be useful if we suppress all other text, which conveniently is written to stderr:
pi@raspberrypi:~ $ sudo avrdude -c linuxgpio -p m324pa -U lock:r:-:h 2>/dev/null
0x2c
If you decode the value of the lock fuse, this shows:

The most important for use is that bottom entry – Mode 3. This means that we cannot read out the flash, as we can show by attempting to read the raw value out to a file, out.bin:
pi@raspberrypi:~ $ sudo avrdude -c linuxgpio -p m324pa -U flash:r:out.bin:r

avrdude: AVR device initialized and ready to accept instructions

Reading | ################################################## | 100% 0.00s

avrdude: Device signature = 0x1e9511 (probably m324pa)
avrdude: reading flash memory:

Reading | ################################################## | 100% 10.90s

avrdude: Flash is empty, resulting file has no contents.
avrdude: writing output file "out.bin"

avrdude: safemode: Fuses OK (E:FE, H:90, L:62)

avrdude done.  Thank you.
As we can see, the highlighted bit above shows that a read failed. That’s not good and it’s non-trivial to bypass the fuse value. That’s not really a good demonstration. So, just to round this off I’ll take a reading from another popular Atmel device. In this case, an Arduino Leonardo I just had hanging around from a failed project.
The Arduino has a well defined ICSP header that I can just connect the Pi pins to. Whilst connecting I’d advise placing VCC last, as connecting this will power up the Arduino.
Now we can attempt to read it, using avrdude. My Leonardo is running with a slightly different processor than the mouse – an Atmega32U4, so we’ll need to change the -p flag appropriately:
pi@raspberrypi:~ $ sudo avrdude -c linuxgpio -p m32u4

avrdude: AVR device initialized and ready to accept instructions

Reading | ################################################## | 100% 0.00s

avrdude: Device signature = 0x1e9587 (probably m32u4)

avrdude: safemode: Fuses OK (E:CB, H:D8, L:FF)

avrdude done.  Thank you.
As the Arduinos are designed to be programmed and messed with, the lock fuse should be set appropriately:
pi@raspberrypi:~ $ sudo avrdude -c linuxgpio -p m32u4 -U lock:r:-:h 2>/dev/null
0x2f
Which translates to:

Cool; so a read should work:
pi@raspberrypi:~ $ sudo avrdude -c linuxgpio -p m32u4 -U flash:r:out.bin:r

avrdude: AVR device initialized and ready to accept instructions

Reading | ################################################## | 100% 0.00s

avrdude: Device signature = 0x1e9587 (probably m32u4)
avrdude: reading flash memory:

Reading | ################################################## | 100% 11.63s

avrdude: writing output file "out.bin"

avrdude: safemode: Fuses OK (E:CB, H:D8, L:FF)

avrdude done.  Thank you.

pi@raspberrypi:~ $ ls -l out.bin
-rw-r--r-- 1 root root 32730 Oct  6 10:29 out.bin
pi@raspberrypi:~ $ hexdump -C out.bin | tail
00007f50  23 36 00 01 00 02 01 00  01 09 02 3e 00 02 01 00  |#6.........>....|
00007f60  80 32 09 04 00 00 01 02  02 01 00 05 24 00 10 01  |.2..........$...|
00007f70  04 24 02 04 05 24 06 00  01 07 05 82 03 08 00 ff  |.$...$..........|
00007f80  09 04 01 00 02 0a 00 00  00 07 05 04 02 10 00 01  |................|
00007f90  07 05 83 02 10 00 01 04  03 09 04 22 03 41 00 72  |...........".A.r|
00007fa0  00 64 00 75 00 69 00 6e  00 6f 00 20 00 4c 00 65  |.d.u.i.n.o. .L.e|
00007fb0  00 6f 00 6e 00 61 00 72  00 64 00 6f 00 00 00 18  |.o.n.a.r.d.o....|
00007fc0  03 41 00 72 00 64 00 75  00 69 00 6e 00 6f 00 20  |.A.r.d.u.i.n.o. |
00007fd0  00 4c 00 4c 00 43 00 00  00 00                    |.L.L.C....|
00007fda
Yep; that looks like it worked!


