


It’s not uncommon for red teamers to regularly tear down and rebuild their test labs, I know I do on a sometimes daily basis. It keeps things fresh and manageable, and now, using Infrastructure as Code (IaC), we can create a consistent environment to test tools and techniques in. If we break something it’s fine, just run the script again!
In this post I’ll detail how, using Packer, Terraform, and Ansible, to go from an empty ESXi server to an up and running Windows domain in minimum time.
I’ve put all the necessary stuff on GitHub for you.
Setup
First you’re going to need to set up an ESXi server. I mean, what kind of Red Teamer are you if you can’t? 😊 There’ll be no cloud solutions here thank you very much.
Enable SSH
We’re going to need to enable SSH within ESXi, you can do this through the web interface. Remember to disable it afterwards.
Connect to your ESXi server over SSH and enable GuestIPHack. This allows the provisioning host to infer the IP of our new VMs from ESXi using ARP packet inspection:
esxcli system settings advanced set -o /Net/GuestIPHack -i 1
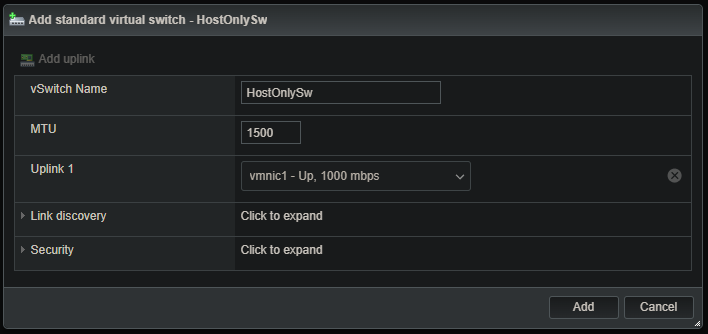
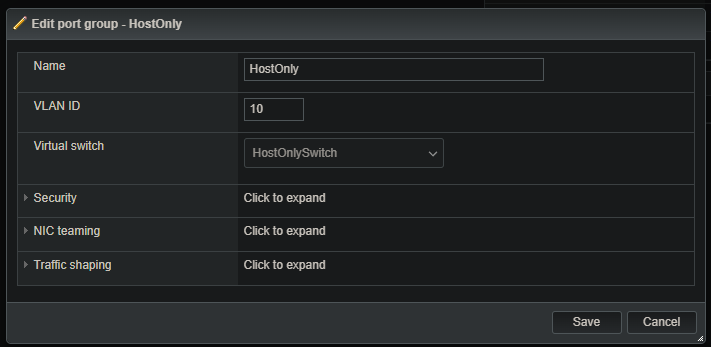
Create a new network
We now need a new network for the domain to live on. We can configure this after we’re up and running to isolate it from our home network.
We’ll create a virtual switch, then create a port group and assign it to that switch.
Networking > Virtual switches > Add standard virtual switch:
Networking > Port groups > Add port group:
Provisioning
Now the ESXi server is ready to go we’re going to need somewhere to provision it from. I find this easier with WSL but any Linux based host will work.
We’ll need to install OVFTool, this is used for importing / exporting / managing VMs remotely from the command line. It is genuinely awesome, but in order to get it you need to use the VMware website and create an account:
Download the .bundle file to execute as a script and it should install nicely.
There are now a few other things we need:
- Packer
- Terraform
- Ansible
- Python3-WinRM
- SSHPass
These can all be installed without leaving the comfort of our terminal.
We’ll need to add the Packer repo to our sources, but DO NOT install the version from the default Ubuntu repo, it’s old and broken:
curl -fsSL https://apt.releases.hashicorp.com/gpg | sudo apt-key add -
sudo apt-add-repository "deb [arch=amd64] https://apt.releases.hashicorp.com $(lsb_release -cs) main"
sudo apt-get update && sudo apt-get install packer

apt install ansible  python3-winrm sshpass terraform
We’re now we’re ready to start VMing.
Packer: Making the VM Images
Packer automates VM image building. We create a JSON config file, provide a link to an ISO, plus some parameters for the machine (such as disk size, memory allocation etc.), and it will go away and do the magic for us.
We’re going to need a Windows 10 and a Windows Server 2016 VM image. Doing so means that when we want to add more hosts, we can just deploy the same image again.
Word of warning. There are plenty of Packer templates available. Some are old and don’t work with the latest version of Packer.
You’ll need to read through a few to get a feel for the kind of things that go in there. Here are some good examples:
I like to use DetectionLab‘s Packer config and scripts. They just work. DetectionLab was what got me interested in IaC in the first place and is an awesome project, which you can read more about here.
First up we need to point Packer at our ESXi server. We’re going to change variables.json so go to the packer_files directory:
{
"esxi_host": "192.168.X.X",
"esxi_datastore": "datastore_name_here",
"esxi_username": "root_yolo",
"esxi_password": "password_here",
"esxi_network_with_dhcp_and_internet": "VM Network"
}
The two main Packer config files we’re going to be using are:
- windows_10_esxi.json
- windows_2016_esxi.json
Check your version of Windows 10
The DetectionLab Packer config will install Windows 10 Enterprise Evaluation.
With my GitHub repo it’s Windows 10 Pro.
It’s an important distinction because as far as I know it’s not possible to upgrade Windows 10 Enterprise Evaluation to a fully licensed version, whereas the Windows 10 Pro image can be licensed after the grace period expires. Good to know if you want to set up a more permanent lab.
You can change the base specification for each template in these files, I like to give them 8GB of RAM to try and speed things up.
Next steps
For this next stage I’ll use Tmux to split the terminal in half so we can run each instance in parallel (Screen can also be used):
tmux
Ctrl + B
Shift + 5
In the first window:
packer build -var-file variables.json windows_10_esxi.json
In the second window (Ctrl + B, Ctrl + Right):
packer build -var-file variables.json windows_2016_esxi.json
This will take some time as it’s going to download the ISOs for each version of Windows from the MS website, then install them as a VM onto the ESXi server using OVFTool. Then it’s going to run the system prep scripts listed in the packer config, then shutdown the VM and turn it into a image:
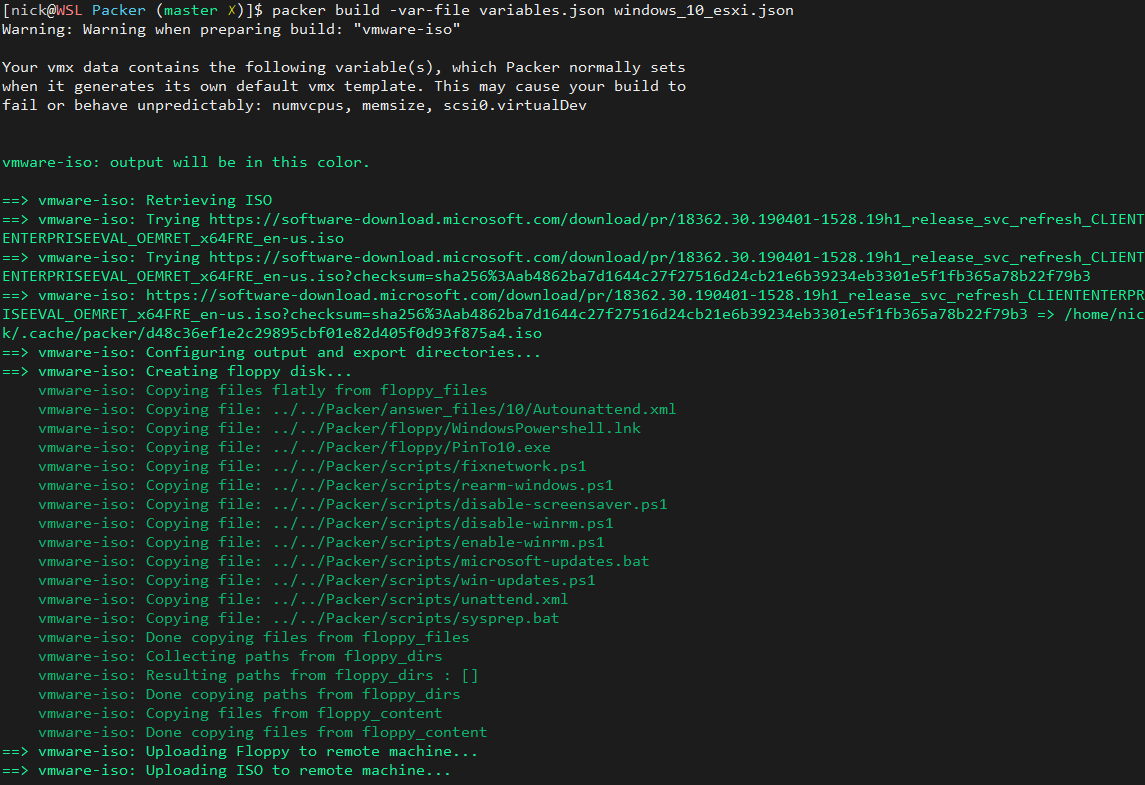
This took 9 minutes on my server, but it’ll vary depending on your line speed and how much juice your server has:
Build 'vmware-iso' finished after 9 minutes 3 seconds.
While this is running, you can switch to your ESXi console to see the magic happening in real-life:
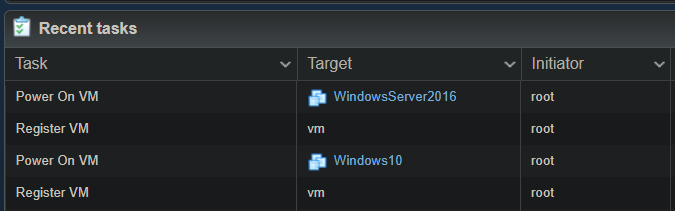
Clicking on the individual VM names gives you a console preview, so you can get an idea what stage they’re at in the provisioning process. You can also and make sure they haven’t stalled at installing Windows or something similar. At the time of writing there were no issues with the scripts from my repo.
It’s complete when you have two new VMs that are in powered off state:

That’s the VM images done. For reference you can exit tmux by pressing Ctrl + D.
Terraform: Deploy VMs from the Images
It’s now time to use Terraform, which takes the prepped VM images and turns them into blank Windows machines.
Lets create some config files. In the terraform_files directory, edit variables.tf like so:
variable "esxi_hostname" {
  default = "<IP>"
}

variable "esxi_hostport" {
  default = "22"
}

variable "esxi_username" {
  default = "root"
}

variable "esxi_password" {
  default = "<password>"
}

variable "esxi_datastore" {
  default = "<datastore>"
}

variable "vm_network" {
  default = "VM Network"
}

variable "hostonly_network" {
  default = "HostOnly"
}
ESXi isn’t officially supported by Terraform, not without vSphere at least. In order to get it to play nicely we need to use some of Jonathan Senkerik’s magic: https://github.com/josenk/terraform-provider-esxi
Even though it’s from an unofficial provider it works like a charm. Kudos.
versions.tf:
terraform {
  required_version = ">= 1.0.0"
  required_providers {
    esxi = {
      source = "josenk/esxi"
      version = "1.9.0"
    }
  }
}
main.tf is where the action happens and where can define our infrastructure. I’ve configured this to create a Windows 2016 server, and two Windows 10 hosts:
# Define our ESXi variables from variables.tf
provider "esxi" {
  esxi_hostname = var.esxi_hostname
  esxi_hostport = var.esxi_hostport
  esxi_username = var.esxi_username
  esxi_password = var.esxi_password
}

# Domain Controller
resource "esxi_guest" "dc1" {
  guest_name = "dc1"
  disk_store = var.esxi_datastore
  guestos    = "windows9srv-64"
  boot_disk_type = "thin"
  memsize            = "8192"
  numvcpus           = "2"
  resource_pool_name = "/"
  power              = "on"
  clone_from_vm = "WindowsServer2016"
  # This is the network that bridges your host machine with the ESXi VM
  network_interfaces {
    virtual_network = var.vm_network
    mac_address     = "00:50:56:a1:b1:c1"
    nic_type        = "e1000"
  }
  # This is the local network that will be used for VM comms
  network_interfaces {
    virtual_network = var.hostonly_network
    mac_address     = "00:50:56:a1:b2:c1"
    nic_type        = "e1000"
  }
  guest_startup_timeout  = 45
  guest_shutdown_timeout = 30
}

# Workstation 1
resource "esxi_guest" "workstation1" {
  guest_name = "workstation1"
  disk_store = var.esxi_datastore
  guestos    = "windows9-64"
  boot_disk_type = "thin"
  memsize            = "8192"
  numvcpus           = "2"
  resource_pool_name = "/"
  power              = "on"
  clone_from_vm = "Windows10"
  # This is the network that bridges your host machine with the ESXi VM
  network_interfaces {
    virtual_network = var.vm_network
    mac_address     = "00:50:56:a2:b1:c3"
    nic_type        = "e1000"
  }
  # This is the local network that will be used for VM comms
  network_interfaces {
    virtual_network = var.hostonly_network
    mac_address     = "00:50:56:a2:b2:c3"
    nic_type        = "e1000"
  }
  guest_startup_timeout  = 45
  guest_shutdown_timeout = 30
}

# Workstation 2
resource "esxi_guest" "workstation2" {
  guest_name = "workstation2"
  disk_store = var.esxi_datastore
  guestos    = "windows9-64"
  boot_disk_type = "thin"
  memsize            = "8192"
  numvcpus           = "2"
  resource_pool_name = "/"
  power              = "on"
  clone_from_vm = "Windows10"
  # This is the network that bridges your host machine with the ESXi VM
  network_interfaces {
    virtual_network = var.vm_network
    mac_address     = "00:50:56:a2:b1:c4"
    nic_type        = "e1000"
  }
  # This is the local network that will be used for VM comms
  network_interfaces {
    virtual_network = var.hostonly_network
    mac_address     = "00:50:56:a2:b2:c4"
    nic_type        = "e1000"
  }
  guest_startup_timeout  = 45
  guest_shutdown_timeout = 30
}
Build it
Now that we’ve defined it it’s time to build it.
First, initialise terraform to download the ESXi provider defined in versions.tf, and run a plan to check we’ve configured our main.tf correctly and give our infrastructure a final check over:
[nick@WSL redlab ]$ terraform init

Initializing the backend...

Initializing provider plugins...
- Finding josenk/esxi versions matching "1.9.0"...
- Installing josenk/esxi v1.9.0...
- Installed josenk/esxi v1.9.0 (self-signed, key ID A3C2BB2C490C3920)

Partner and community providers are signed by their developers.
If you'd like to know more about provider signing, you can read about it here:
https://www.terraform.io/docs/cli/plugins/signing.html

Terraform has created a lock file .terraform.lock.hcl to record the provider
selections it made above. Include this file in your version control repository
so that Terraform can guarantee to make the same selections by default when
you run "terraform init" in the future.

Terraform has been successfully initialized!

You may now begin working with Terraform. Try running "terraform plan" to see
any changes that are required for your infrastructure. All Terraform commands
should now work.

If you ever set or change modules or backend configuration for Terraform,
rerun this command to reinitialize your working directory. If you forget, other
commands will detect it and remind you to do so if necessary.

[nick@WSL redlab ]$ terraform plan

Terraform used the selected providers to generate the following execution plan. Resource actions
are indicated with the following symbols:
  + create

Terraform will perform the following actions:

  # esxi_guest.dc1 will be created
  + resource "esxi_guest" "dc1" {
    + boot_disk_size         = (known after apply)
    + boot_disk_type         = "thin"
    + clone_from_vm          = "WindowsServer2016"
    + disk_store             = "datastore"
    + guest_name             = "dc1"
    + guest_shutdown_timeout = 30
    + guest_startup_timeout  = 45
    + guestos                = "windows9srv-64"
    + id                     = (known after apply)
    + ip_address             = (known after apply)
    + memsize                = "8192"
    + notes                  = (known after apply)
    + numvcpus               = "2"
    + ovf_properties_timer   = (known after apply)
    + power                  = "on"
    + resource_pool_name     = "/"
    + virthwver              = (known after apply)

  + network_interfaces {
    + mac_address     = "00:50:56:a1:b1:c1"
    + nic_type        = "e1000"
    + virtual_network = "VM Network"
      }

    + network_interfaces {
      + mac_address     = "00:50:56:a1:b2:c1"
      + nic_type        = "e1000"
      + virtual_network = "HostOnly"
      }
    }

  # esxi_guest.workstation1 will be created
  + resource "esxi_guest" "workstation1" {
    + boot_disk_size         = (known after apply)
    + boot_disk_type         = "thin"
    + clone_from_vm          = "Windows10"
    + disk_store             = "datastore"
    + guest_name             = "workstation1"
    + guest_shutdown_timeout = 30
    + guest_startup_timeout  = 45
    + guestos                = "windows9-64"
    + id                     = (known after apply)
    + ip_address             = (known after apply)
    + memsize                = "8192"
    + notes                  = (known after apply)
    + numvcpus               = "2"
    + ovf_properties_timer   = (known after apply)
    + power                  = "on"
    + resource_pool_name     = "/"
    + virthwver              = (known after apply)

+ network_interfaces {
    + mac_address     = "00:50:56:a2:b1:c3"
    + nic_type        = "e1000"
    + virtual_network = "VM Network"
  }
  + network_interfaces {
    + mac_address     = "00:50:56:a2:b2:c3"
    + nic_type        = "e1000"
    + virtual_network = "HostOnly"
  }
}

  # esxi_guest.workstation2 will be created
  + resource "esxi_guest" "workstation2" {
    + boot_disk_size         = (known after apply)
    + boot_disk_type         = "thin"
    + clone_from_vm          = "Windows10"
    + disk_store             = "datastore"
    + guest_name             = "workstation2"
    + guest_shutdown_timeout = 30
    + guest_startup_timeout  = 45
    + guestos                = "windows9-64"
    + id                     = (known after apply)
    + ip_address             = (known after apply)
    + memsize                = "8192"
    + notes                  = (known after apply)
    + numvcpus               = "2"
    + ovf_properties_timer   = (known after apply)
    + power                  = "on"
    + resource_pool_name     = "/"
    + virthwver              = (known after apply)

    + network_interfaces {
      + mac_address     = "00:50:56:a2:b1:c4"
      + nic_type        = "e1000"
      + virtual_network = "VM Network"
    }
    + network_interfaces {
      + mac_address     = "00:50:56:a2:b2:c4"
      + nic_type        = "e1000"
      + virtual_network = "HostOnly"
    }
  }

Plan: 5 to add, 0 to change, 0 to destroy.
Run terraform apply and enter “yes” when prompted to get things moving.
This will take a while, so grab a coffee and toast some marshmallows on whatever device is running ESXi in your house.
Once this is done I HIGHLY recommend taking a VM snapshot of each host, just in case. Accidents happen.
Ansible: Provision the hosts
We’re nearly there, we just need to configure the hosts with Red Hat’s Ansible. Ansible connects to hosts asynchronously and provisions then using remote management tools. In this case we’re using WinRM because slow and unpredictable is the best way.
First we need to manually create an inventory file. Although we could automate this step with an inventory template, let’s try and keep it simple for now. Ansible uses this file to find hosts on the network, so grab the IPs for each host from the ESXi console, and put them into the following file:
inventory.yml:
---
dc1:
  hosts:
    0.0.0.0:
workstation1:
  hosts:
    0.0.0.0:

workstation2:
  hosts:
    0.0.0.0:
Now’s time to create a variables file with passwords, users, domain name and other bits and bobs. These can be changed depending on your requirements. Make a directory called group_vars and add some values to all.yml:
ansible_user: vagrant
ansible_password: vagrant
ansible_port: 5985
ansible_connection: winrm
ansible_winrm_transport: basic
ansible_winrm_server_cert_validation: ignore

domain_name: hacklab.local

domain_admin_user: overwatch
domain_admin_pass: DomainAdminPass1!

domain_user_user: alice
domain_user_pass: AlicePass1!

exchange_domain_user: '{{ domain_admin_user }}@{{ domain_name | upper }}'
exchange_domain_pass: '{{ domain_admin_pass }}'
Ansible uses YAML files to run instructions on hosts, they call them ‘playbooks’. We can assign different playbooks to different hosts to provision them as we see fit. For example if we want to set up a Domain Controller and two Windows 10 workstations we can create playbooks for both scenarios.
Make the following directory structure/file:
roles/dc1/tasks/main.yml
Then add the following set of instructions to configure the host as a domain controller:
---
- name: Disable Windows Firewall
  win_shell: "Set-NetFirewallProfile -Profile Domain,Public,Private -Enabled False"

- name: Hostname -> DC
  win_hostname:
    name: dc
  register: res

- name: Reboot
  win_reboot:
m  when: res.reboot_required

- name: Disable password complexity
  win_security_policy:
    section: System Access
    key: PasswordComplexity
    value: 0

- name: Set Local Admin Password
  win_user:
    name: Administrator
    password: '{{ domain_admin_pass }}'
    state: present
    groups_action: add
    groups:
      - Administrators
      - Users
  ignore_errors: yes

- name: Set HostOnly IP address
  win_shell: "If (-not(Get-NetIPAddress | where {$_.IPAddress -eq '192.168.56.100'})) {$adapter =
(get-netadapter | where {$_.MacAddress -eq '00-50-56-A1-B2-C1'}).Name; New-NetIPAddress –InterfaceAlias
$adapter –AddressFamily IPv4 -IPAddress 192.168.56.100 –PrefixLength 24 -DefaultGateway 192.168.56.1 }
Else { Write-Host 'IP Address Already Created.' }"

- name: Set DNS server
  win_shell: "$adapter = (get-netadapter | where {$_.MacAddress -eq '00-50-56-A1-B2-C1'}).Name;
Set-DnsClientServerAddress -InterfaceAlias $adapter -ServerAddresses 127.0.0.1,8.8.8.8"

- name: Check Variables are Configured
  assert:
    that:
    - domain_name is defined
    - domain_admin_user is defined
    - domain_admin_pass is defined

- name: Install Active Directory Domain Services
  win_feature: >
    name=AD-Domain-Services
    include_management_tools=yes
    include_sub_features=yes
    state=present
  register: adds_installed

- name: Install RSAT AD Admin Center
  win_feature:
    name: RSAT-AD-AdminCenter
    state: present
  register: rsat_installed

- name: Rebooting
  win_reboot:
    reboot_timeout_sec: 60
- name: Create Domain
  win_domain:
    dns_domain_name: '{{ domain_name }}'
    safe_mode_password: '{{ domain_admin_pass }}'
  register: domain_setup

- name: Reboot After Domain Creation
  win_reboot:
  when: domain_setup.reboot_required

- name: Create Domain Admin Account
  win_domain_user:
    name: '{{ domain_admin_user }}'
    upn: '{{ domain_admin_user }}@{{ domain_name }}'
    description: '{{ domain_admin_user }} Domain Account'
    password: '{{ domain_admin_pass }}'
    password_never_expires: yes
    groups:
    - Domain Admins
    - Enterprise Admins
    - Schema Admins
    state: present
  register: pri_domain_setup_create_user_result
  retries: 30
  delay: 15
  until: pri_domain_setup_create_user_result is successful

- name: Create Domain User Account
  win_domain_user:
    name: '{{ domain_user_user }}'
    upn: '{{ domain_user_user }}@{{ domain_name }}'
    description: '{{ domain_user_user }} Domain Account'
    password: '{{ domain_user_pass }}'
    password_never_expires: yes
    groups:
    - Domain Users
    state: present
  register: create_user_result
  retries: 30
  delay: 15
  until: create_user_result is successful

- name: Verify Account was Created
  win_whoami:
  become: yes
  become_method: runas
  vars:
    ansible_become_user: '{{ domain_admin_user }}@{{ domain_name }}'
    ansible_become_pass: '{{ domain_admin_pass }}'
Next in roles/common/tasks/main.yml we can configure a generic “common” playbook that can be run on several hosts. In our case it’ll be on the Workstations:
---

- name: Disable Windows Firewall
  win_shell: "Set-NetFirewallProfile -Profile Domain,Public,Private -Enabled False"

- name: Install git
  win_chocolatey:
    name: git
    state: present

- name: Check Variables are Set
  assert:
    that:
    - domain_admin_user is defined
    - domain_admin_pass is defined

- name: Join Host to Domain
  win_domain_membership:
    dns_domain_name: '{{ domain_name }}'
    domain_admin_user: '{{ domain_admin_user }}@{{ domain_name }}'
    domain_admin_password: '{{ domain_admin_pass }}'
    state: domain
  register: domain_join_result

- name: Reboot Host After Joining Domain
  win_reboot:
  when: domain_join_result.reboot_required

- name: Test Domain User Login
  win_whoami:
  become: yes
  become_method: runas
  vars:
    ansible_become_user: '{{ domain_user_user }}@{{ domain_name}}'
    ansible_become_password: '{{ domain_user_pass }}'
IP configuration playbook
Now we can create a playbook that sets up the IP configuration of each workstation.
This seems a laborious way of assigning a static IP and setting a hostname, but I couldn’t figure out a better way.
Further down the line we can use these files so that they can configure each host with different tools or whatever on them. In roles/workstation1/tasks/main.yml:
---

- name: Hostname -> workstation1
  win_hostname:
    name: workstation1
  register: res

- name: Reboot
  win_reboot:
  when: res.reboot_required

- name: Set HostOnly IP Address
 win_shell: "If (-not(get-netipaddress | where {$_.IPAddress -eq '192.168.56.110'})) {$adapter =
(get-netadapter | where {$_.MacAddress -eq '00-50-56-A2-B2-C3'}).Name; New-NetIPAddress –InterfaceAlias
$adapter –AddressFamily IPv4 -IPAddress 192.168.56.110 –PrefixLength 24 -DefaultGateway 192.168.56.1 }
Else { Write-Host 'IP Address Already Created.' }"

- name: Set HostOnly DNS Address
  win_shell: "$adapter = (get-netadapter | where {$_.MacAddress -eq '00-50-56-A2-B2-C3'}).Name;
Set-DnsClientServerAddress -InterfaceAlias $adapter -ServerAddresses 192.168.56.100,8.8.8.8"
Workstation2: roles/workstation2/tasks/main.yml:
---

- name: Hostname -> workstation2
  win_hostname:
    name: workstation2
  register: res

- name: Reboot
  win_reboot:
  when: res.reboot_required

- name: Set HostOnly IP Address
  win_shell: "If (-not(get-netipaddress | where {$_.IPAddress -eq '192.168.56.111'})) {$adapter =
(get-netadapter | where {$_.MacAddress -eq '00-50-56-A2-B2-C4'}).Name; New-NetIPAddress –InterfaceAlias
$adapter –AddressFamily IPv4 -IPAddress 192.168.56.111 –PrefixLength 24 -DefaultGateway 192.168.56.1 }
Else { Write-Host 'IP Address Already Created.' }"

- name: Set HostOnly DNS Address
  win_shell: "$adapter = (get-netadapter | where {$_.MacAddress -eq '00-50-56-A2-B2-C4'}).Name;
Set-DnsClientServerAddress -InterfaceAlias $adapter -ServerAddresses 192.168.56.100,8.8.8.8"
The static IPs are assigned based on their MAC address which is set up through Terraform. It seems a convoluted way to do it but it works.
Finally, we need to create a master playbook to tie everything together. This will be the file we execute with Ansible and will run all the various tasks we’ve assigned to each role.
In our top directory, lets create playbook.yml:
---

- hosts: dc1
  strategy: free
  gather_facts: False
  roles:
    - dc1
  tags: dc1

- hosts: workstation1
  strategy: free
  gather_facts: False
  roles:
    - workstation1
     - common
  tags: workstation1

- hosts: workstation2
  strategy: free
  gather_facts: False
  roles:
    - workstation2
    - common
  tags: workstation2
Then let’s fire it off with:
ansible-playbook -v playbook.yml -i inventory.yml
Enjoy
Now kick back and wait until your domain is configured for you. If everything goes to plan, take a snapshot and play away.
If anything breaks in the lab, you can delete the VMs and start again from the Terraform stage, or if you snapshotted them just roll it back.


