Like most testers I use Nmap on pretty much every single engagement I do.
It has become a tool which both network admins and penetration testers rely on to map a network for both good and evil purposes.
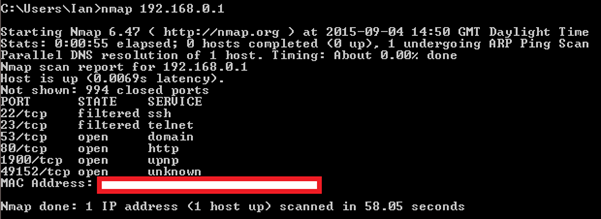
Anyone who has used Nmap will know that you can get some very valuable results using only the defaults, for example:

This will perform a ping host discovery and a default TCP connect scan of the top 1000 TCP ports as defined by the Nmap services file on the target IP address. If you are interested in a general overview of a network host then you can probably stop here, however most of you will want to look a little deeper at what is going on. I tend to find that I settle on a number of default options when I am doing an initial scan, these are as follows:
This command sets some common options that I find give all of the information that I need for an initial scan of the network.
This is what they are and what they achieve:
–iL
Firstly the –iL option reads the hosts to scan from a file rather than clutter up the command line with a list of IPs or network ranges. I find this useful as once I have a defined scope from a client I can drop it in this file (scope.txt) and read it in using all my tools, reducing the chance of me accidently going off scope.
–Pn
Next up is –Pn, this tells Nmap that I do not want it to try and determine if any hosts are up before moving onto a port scan. This is important as by default Nmap will only do a port scan on a host that it can ping, and if a host is not replying to ICMP echo requests, but is otherwise hosting services that you can connect to then the Nmap default setting will miss any open ports.
–sS
Moving on we have –sS defining the scan type, in this instance it is a TCP SYN, or half-open scan. This scan technique is fairly quick as it does not complete a TCP three-way handshake, and as an added benefit this also makes it quite stealthy as most systems will not log an incomplete connection. Now we start to see some of Nmap’s functionality that starts to go beyond a simple port scan.
–A
This sets a number of other common Nmap options using a single option rather than having to set each one individually, these are OS detection, version detection, default script scanning and host traceroute. This is all valuable information and can often indicate vulnerabilities in a discovered service, who needs Nessus! (just kidding, DON’T use Nmap as your vulnerability scanner).
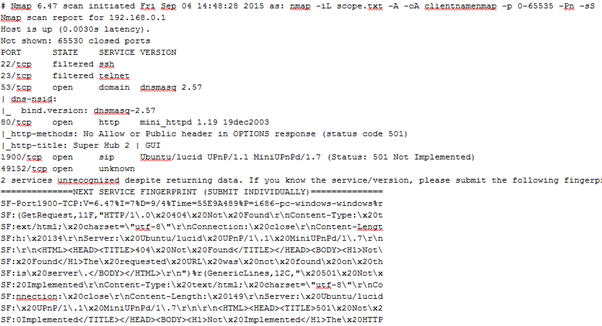
–oA clientnmapname
I have heard it said that the only difference between science and mucking around is writing down your results, and this is where –oA clientnmapname comes in. There are a number of formats that Nmap can use when writing its results to disk, and these are often importable into other tools such as Metasploit and other automated parsing scripts. My preference is to use the -oA option so that the results are written out using all formats to files named after the string supplied after the option, so I don’t end up unable to import my results elsewhere because I didn’t select ‘grepabble’ when I started a 6 hour scan.

Nmap output file example
–p 0-65535
And finally we come to the actual ports to scan, defined using -p 0-65535. This tells Nmap that I want it to check all possible TCP ports on every host, because you never know where an application or sysadmin is going to hide a web app, ssh or ftp server with default credentials.
Advanced options
Now I’m sure all the long in the tooth greybeards reading so far are wondering when I’m going to get the ‘advanced options’ portion of the blog post, well wait no longer!
As I said above, the options I’ve been talking about are my go-to defaults for an initial scan of a network, and they are usually sufficient for the job at hand. There are some networks and hosts however that are configured in such a way that using the options I’ve supplied above will take so long to complete that you will never actually get the results that you are after.
These situations are usually down to network firewalls between you and your targets, or host based firewalls running on the targets that prevent the IP being scanned from sending the all-important reset packet (RST) when you attempt to connect to a closed or filtered port. This means that Nmap will have to wait for a network timeout to occur before it moves onto the next port.
In a typical LAN environment you can expect a response back from a port in approximately 100ms, a RST if it is closed and an ACK if it is open. If the hosts are firewalled and not sending RST packets then Nmap will wait for an extended period of time before deciding that the port is actually closed and moving onto the next one. Now, Nmap has been designed to dynamically change the default timeout period based on what it observes coming from the scanned hosts, but in an environment that is heavily firewalled this value will remain in the 1000s of ms, greatly increasing the time taken to scan a host.
You can get around this issue by using the –max-rtt-timout [X]ms option, and telling Nmap to wait no longer than [X]ms before giving up and moving onto the next port. A good value to use on a typical LAN environment is about 100ms, and a good way to determine the actual roundtrip time is by doing an initial scan for common ports such as 21, 23, 53, 80, 135 and 443 and measure the time reported by Nmap for these ports. Try to be conservative when setting this value, as setting it too low will mean some open ports may be missed.
Another useful option you may want to look at is –min-hostgroup. This option tells Nmap to scan a minimum number of hosts in parallel. Normally Nmap will dynamically increase this number once it has managed to measure the network conditions, however it does start at a default of 5 hosts, which if they are slow to respond firewalled hosts can make the beginning of the scan a very long process. Setting this value to a higher number, such as 128 can dramatically speed up the initial part of large scan.
There are a large number of other timing options that Nmap provides that you can tweak based on your own network conditions, but I have found the ones above to be a good starting point when scanning a network that is hostile to penetration testers, as always monitor the results you are getting back from your tools and adjust your options accordingly.
The full documentation for Nmap can be found at https://nmap.org and I recommend that anyone using the tool spend some time reading though the documentation, as you may find some esoteric options that can help you out with a scanning issue that you are experiencing.
Final advice
As a final piece of advice, I recommend tweaking Nmap’s options conservatively to reduce the risk of missing open ports, and rely on the dynamic timing that Nmap provides when at all possible. That being said, if you have enough information on the network conditions then playing with these settings can make scanning a large number of hosts much easier.


