


This week I’m going to go into (drum roll please) firmware extraction! A thrilling subject at the best of times, which I’m sure you’ll agree is just the thing to read whilst weeping into your microwaved meal at your solitary existence.
Why would you want to extract firmware from a device in the first place? Well, you might need to do a comprehensive assessment of the device for vulnerabilities, or you might want to flash it to run custom builds, to add a route into the command line for example.
It was actually going to be quite exciting about how I used a logic analyser to analyse the console connection on my NAS box and gained a shell and found cool stuff on there. Then I got carried away with a multimeter and shorted some things and bricked my NAS.
If I was sensible I would’ve written and screenshotted as I went along. I’m not sensible.
I thought I would go into the firmware extraction anyway. My ex-NAS was a Zyxel NSA310, a cheap, functional 1 disk device that ran a basic Linux OS and had an okay web front end that allowed me to stream music over my house (and allowed my good lady to watch stuff on the TV).
Initial Analysis
My first step was to obtain a copy of the firmware. This was the hardest step and took me a long time. Oh, okay, I typed “Zyxel NSA310 firmware” into Google.
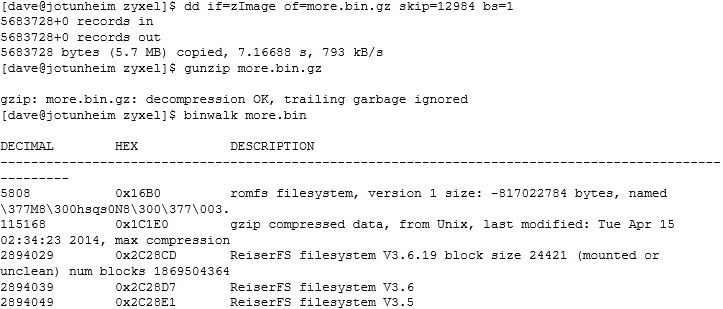
This came down as a zip with a PDF and a binary image. Usually these sort of images will be archives of the sections of the operating system, such as the boot image and filing system. To quickly see what was in here I ran the Binwalk tool, which looks for common file patterns in a file:
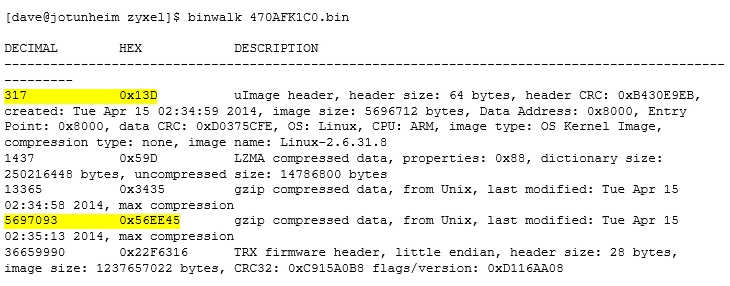
You have to be careful of Binwalk, because it does produce a lot of false positives, but from here we can see two entries that look roughly right and another that appears to be part of another section. (I’m ignoring the gzip data at 0x3435 as it looks to be part of the uImage archive). This gives us a start at something to look at.
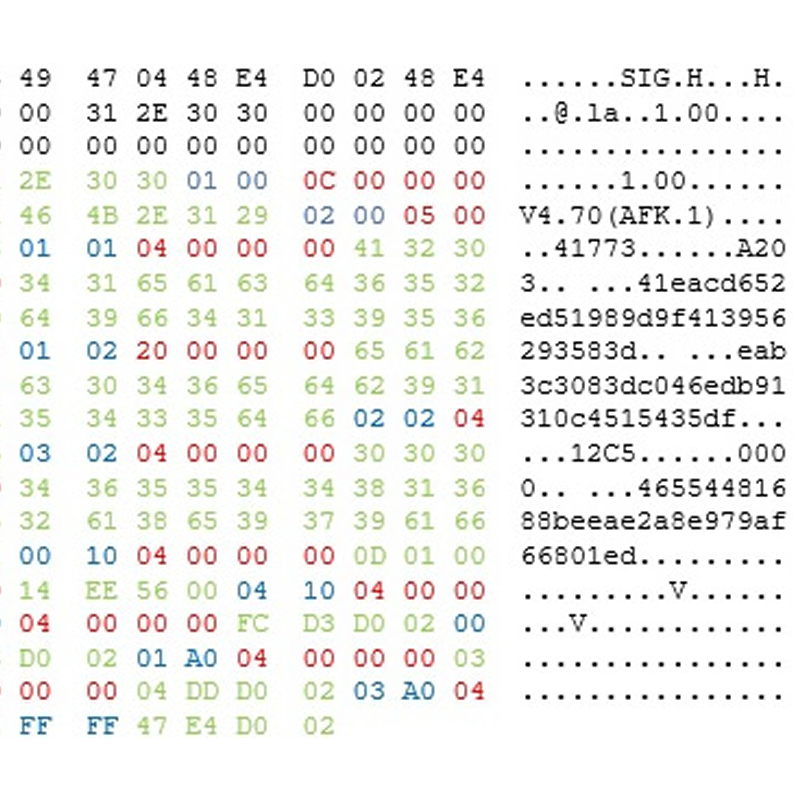
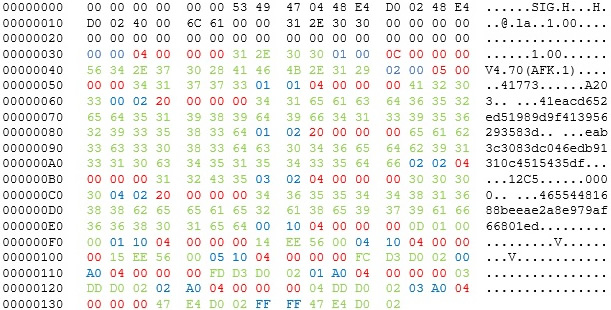
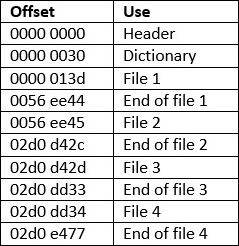
You may also notice that the data starts at 0x13D – this leaves a bit of space for some header data which could be useful. A quick hex dump of this content later and I can start analysing it. In fact, here’s a very quick analysis below.
Further Analysis
What I’ve done is noticed that there’s a simple pattern, starting from 0x30 of <u8 > <u8 > <u32 > (Using C notification “u” for unsigned and then the number of bits) <data > where the u32 is a little endian number giving the length of the data. I’ve highlighted what I mean below (u8s in blue; u32 in red and data in green):
We can assume the u8s are some sort of indicator of data type and semantics, the u32 is data length and data is well, data. If we put that all in a list we have the below dictionary of data:
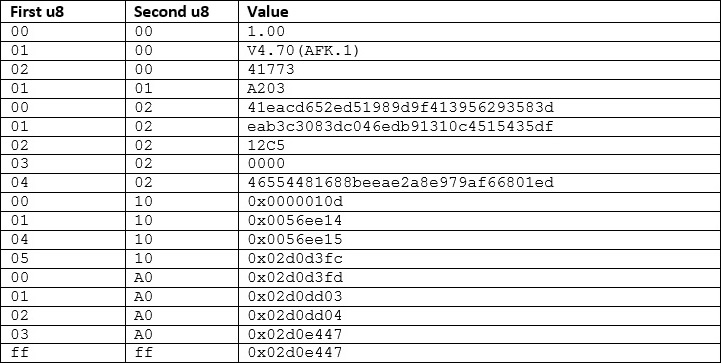
I’ve mangled the “Value” column between hex integer (signified by 0x) and a string where it makes semantic sense.
What we can immediately see is that [00 02], [01 02] and [04 02] look like hash values (and are the right size for md5 hashes) and the numbers where “Second u8” is 0x10 or 0xA0 appears to be pointers within the file.
If we look at [00 10], we have the number 0x010d, add the start of the dictionary to this, and we have 0x013d, which is one of the interesting looking bits of data that Binwalk gave us.
There’s one way to prove this is all working out how it should – if we extract the uImage starting at 0x013d we can then md5 hash it. If it matches one of the hashes then we’ve worked out a lot of the internals.
So, we’re going to extract, starting to the value at [00 10] and ending at [04 10] (I’ve missed a step here, this is just to massage the figures so it works). To do this quickly I’m going to use the Unix command line tool dd. Now dd doesn’t understand hex and uses a count for size, rather than an absolute pointer. We’re actually abusing it – a more sensible solution would be to code something, but I’m feeling lazy.
So, I’m reading from the infile of 470AFK1C0.bin to an outfile of uimage.bin, with a blocksize of 1 byte, skipping the first 317 (0x13d) bytes for a count of 5966776 ([04 10] – [00 10] converted to decimal).
This gives us a file uimage.bin, now we md5 it:
41eacd652ed51989d9f413956293583d uimage.bin
That’s the value of [00 02], success! We can now make the assumptions about the layout of the firmware block:
Some mangling with a calculator and dd and we can extract all 4 embedded files. File 1 matches the md5sum in [00 02]; file 2 matches the md5sum in [01 02] and file 3 and 4 appear to be pre and post installation scripts.
The “files” – File1
So now we’ve extracted them, what’s in them?
File1 is a uImage file – this is a boot image, which holds the Linux kernel and a RAM disk, fortunately there’s a script, extract_uimage.sh that can partially unpack this for us:
Checking for uImage magic word…
1+0 records in
0+1 records out
4 bytes (4 B) copied, 4.8806e-05 s, 82.0 kB/s
uImage recognized.
Extracting data…
89011+1 records in
11126+1 records out
5696712 bytes (5.7 MB) copied, 0.0741967 s, 76.8 MB/s
Checking for ARM mach-type…
3+0 records in
0+1 records out
3 bytes (3 B) copied, 5.3693e-05 s, 55.9 kB/s
Checking for zImage…
1+0 records in
0+1 records out
4 bytes (4 B) copied, 6.934e-05 s, 57.7 kB/s
1+0 records in
0+1 records out
4 bytes (4 B) copied, 6.8421e-05 s, 58.5 kB/s
1+0 records in
0+1 records out
4 bytes (4 B) copied, 6.7079e-05 s, 59.6 kB/s
zImage recognized with start 0x00000000, end 0x0056ECC8 and size 5696712.
>>> uimage.bin extracted to zImage
Now this gets complicated: the zImage file is pretty much everything we need to boot to Linux, so it is itself an archive that contains the Linux kernel and a RAM disk, which will become the root partition on the device.
So, we extract zImage, then Binwalk it:

Oh look, some more gzipped data. We can extract it, gunzip it and Binwalk it again:
Most of the Binwalk stuff is false positives, but we have more gzipped data. Is this finally our illusive RAM disk?

Now, for some reason the RAM disk is in CPIO format (a really, really, archaic archive format from the old days of UNIX). We can extract it:

You will get a load of mknod errors as cpio tries to create device files for the wrong devices, but these can be ignored.
So we finally have the root partition: it is a gzipped cpio archive, stored in a gzipped zImage, stored in a uImage, stored in a firmware archive:
The “files” – File2
File2 is the NAS’s filesystem, a quick file tells us it’s gzipped, which we can then unzip and mount through loop back as if it is a normal file system:
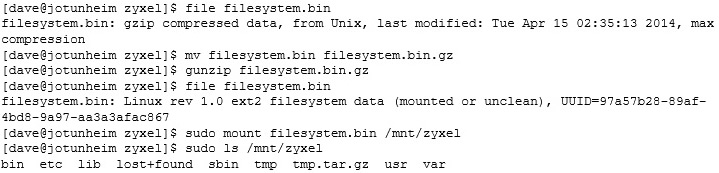
Once we have the filesystem mounted we can start looking for interesting things or vulnerabilities (as we have the source of the web server here as well as all of its utilities). Unfortunately to do this properly means that I need to try it out on a real device, which, since I bricked mine, I can’t really do!


