


Today I’m going to explore and demonstrate an old tool called nfsshell and tell you why it’s still pretty killer in some testing situations.
Nfsshell is one of those incredibly useful but little known tools. Part of the reason for this is that the Network File System (NFS) is quite rare these days.
Not many environments contain large numbers of Solaris, or other UNIX flavour hosts. Linux can be configured to export NFS shares so that’s what I’ll being using in the demonstration.
I’ve used nfsshell a number of times now and it always saves time and hassle. On one test I found an NFS share that was exported across the whole network. Firing up nfsshell I connected to the share and found that it was a backup server for a bunch Solaris hosts. Further investigation revealed that they had backed up everything including the “/etc” directory. This included the “passwd” and “shadow” files, the latter containing the hashes of the user’s passwords. Thank you very much!
Throw the hashes into John the Ripper and crack away. Once that was finished I had root on the environment’s Solaris boxes! I probably see NFS two or three times a year on internal tests, admittedly not that frequent, but if it gets you a compromise on one or more hosts then it’s worth remembering how to exploit it!
Network Filesystem – NFS
First of all we need to look at what NFS is. Most environments are Linux or Windows based, with Windows being ruled over by CIFS/SMB. Sun Solaris (yeah, I know, it should be Oracle but I knew it before it was taken over) is probably the most prevalent UNIX OS that uses NFS. In fact, Sun created NFS many moons ago.
So, what is it? NFS is a network distributed filesystem. A server can export one or more filesystems that can be mounted by a client or clients. The filesystem then appears as a local drive on the client machine. Here’s the original 1989 definition in RFC1094.
Out of interest NFS is implemented over Remote Procedure Call (RPC).
NFS security is partially based on the remote user mounting the filesystem having the same UID (User ID) and GID (Group ID) as the owner of that share. Restrictions can also be placed into the /etc/hosts.allow and /etc/hosts.deny files, but we won’t go into that here. Suffice to say, using the UID and GID as a basis for security isn’t the best way of doing it. It is possible to restrict it to specific hosts, however most sysadmins don’t take this measure.
Discovering NFS shares
There are a few ways you can determine if a server is exporting a filesystem:
- Nessus will report any NFS shares it finds and will try and access them if they are exported without any authentication credentials being required.
- Nmap does something similar to Nessus.
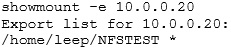
- Use “showmount –e” from a UNIX/Linux/BSD shell prompt.
I’m going to assume here that an NFS share has been found, but for the sake of completeness, here is the output from showmount:
And from Nmap:
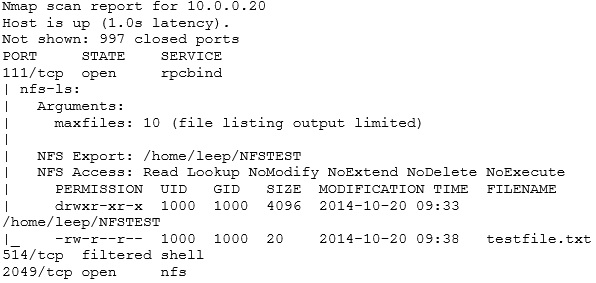
The above gives you some idea of what you would see if NFS shares are being exported.
NFS Shell: Getting and Building It
You can get NFS Shell here: https://github.com/NetDirect/nfsshell.
These are the details of the virtual machine I used:
Linux bt 3.2.6 #1 SMP Fri Feb 17 10:40:05 EST 2012 i686 GNU/Linux
It’s an old VM, but for the purposes of this post it works and nfsshell compiles cleanly (more or less). I have had issues with it compiling on other versions of Linux, but given the zero cost involved in creating a Linux VM, it’s always worthwhile having an out of date OS around for those tools that don’t like modern OSes. You might have more luck with other OSes, try OpenBSD or FreeBSD. You might also be lucky and get it to compile in CygWIN, but I haven’t tried that.
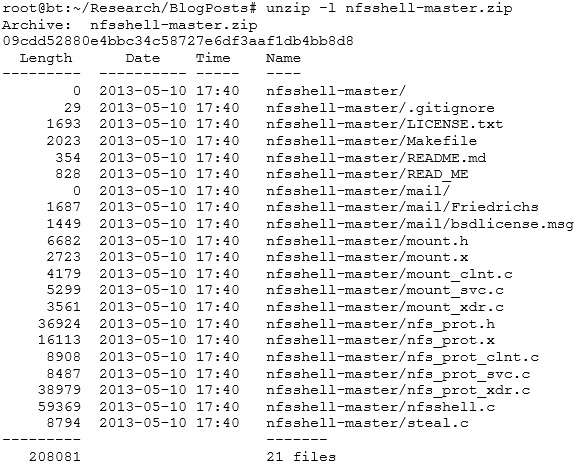
Get the zip file onto your Linux host, unzip it, and change into the directory:
There is a Makefile that may need to be edited. The following lines are the important ones for Linux:

From the above it’s obvious that nfsshell is an old tool as it was tested on Linux kernel release 2.0.33 (1997!).
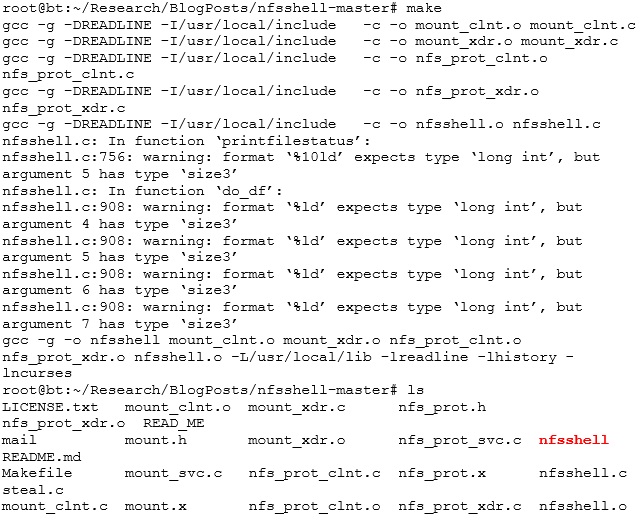
Once the Makefile is correct for the OS you’re using, type “make” at the command prompt and you should get the following (you can safely ignore the compiler warnings). The red file below is the nfsshell binary:
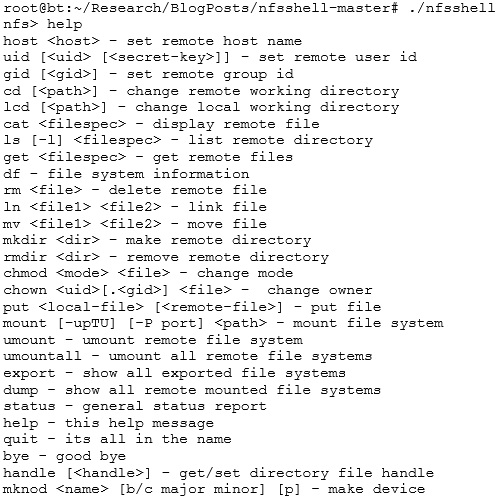
If all goes well, you should be able to run the binary. Type “help” and you should see the following output. The next section goes through how to use it in a simple scenario that sometimes crops up on pen tests.
Using nfsshell
Now for the fun part! It’s best to run this tool as root. The following steps outline how to select the target, list the shares, and mount them (all commands are within nfsshell):
1. Selecting the target, can either be the hostname (assuming you have name servers available to resolve against), or the IP address:
2. Show which shares the target has available:
3. Try and mount them:
All straightforward!
Nfsshell is useful for accessing NFS shares without having to create users with the same UID/GID pair as the target exported filesystem. The following commands within nfsshell set the UID and GID:
gid [<gid>] – set remote group id
First of all you need to mount the remote filesystem. This is done using the following command within nfsshell:
Now we’ve gone through the theory, it’s time for a demo!
Demonstration
I’ve created an NFS share on an Ubuntu virtual machine to demonstrate all of the above.
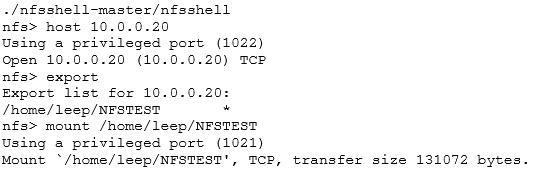
First of all, we start up nfsshell, specify the target host, list the exported shares, and finally mount it:
Next, we list what is on the share:

The “FOO” directory looks interesting (bear with me here…):
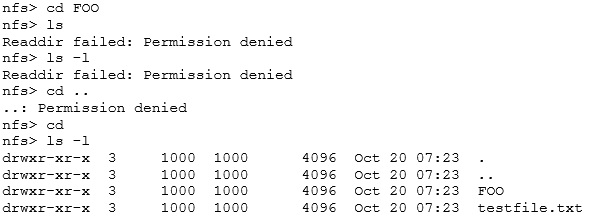
We can see that the directory is owned by a user with UID and GID equal to 1000, so we set our local UID and GID to be the same:
nfs> gid 1000
Let’s try accessing FOO again:

There, we now have access to that test file.
It’s a simple tool but it can be very useful for accessing files on NFS shares without having to create multiple users with different UID and GID combinations.
Conclusion
Given all of the above, what can be done about it? Well:
- Don’t allow NFS shares over the Internet. If you *really* (and I do mean *really*) need to, make sure they are protected by a VPN and an access control device.
- Even on internal networks, don’t use NFS unless you absolutely have to. There are a number of other methods of sharing filesystems securely. For example
http://fuse.sourceforge.net/sshfs.html - Use NFSv4.
NFS was fine back in the day, but even with improvements in security it should really be resigned to the great Internet archives (along with Telnet, FTP, and others of that era).


