


TL;DR
- Perform a password audit in Active Directory (AD)
- Retrieve password hashes from the domain
- Crack passwords using tools like Hashcat and John the Ripper
- View statistic results with DPAT
Introduction
Weak or compromised passwords are still one of the most common ways attackers get into an organisation’s network.
That’s why running password audits in Active Directory is so important. But smaller companies often don’t have the time, budget, or resources to do them regularly.
This blog post gives you a step-by-step guide to run a proper password audit using free tools available online.
Why do audits and training matter?
Without regular audits to spot gaps, and proper staff training on how to create strong, secure passwords, breaches can and do happen. Technical tools alone won’t stop them.
In most cases, the weakest part of the system isn’t the technology, it’s the people using it. That’s why it is important to train users on how to set strong passwords, which can then be audited.
Methods for retrieving password hashes from the domain
ntdsutil.exe
ntdsutil.exe is a Windows Server command line tool allows administrators to retrieve hashes from the domain by creating snapshots of the AD database.
The command listed below will provide you with necessary files (NTDS.dit, SYSTEM and SECURITY to conduct the password cracking which will occur at later steps using John the Ripper and Hashcat.
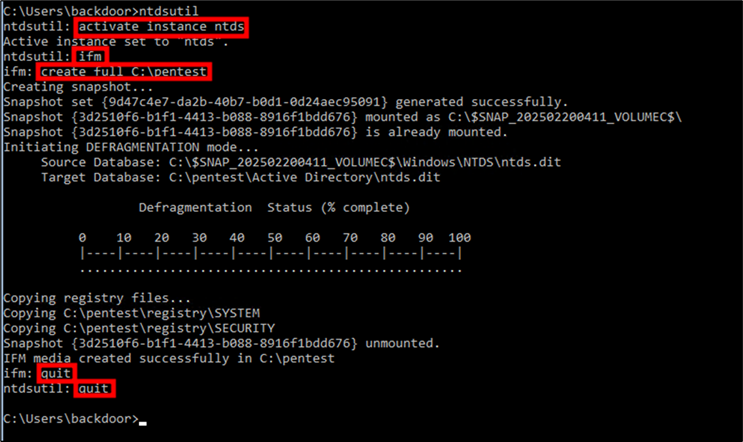
Figure 1: NTDS.dit files
At this stage, you should have the following output files saved in your pentest directory:
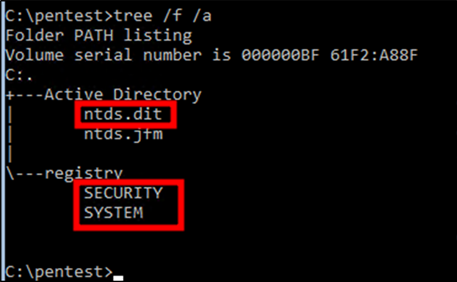
Figure 2: Output files
vssadmin
vssadmin is another built-in utility in Windows that can help you achieve the same results as ntdsutil.exe.
In an admin prompt, create a new shadow copy of the drive where the hashes are stored (C:), copy the NTDS.dit and SYSTEM file from the shadow copy.
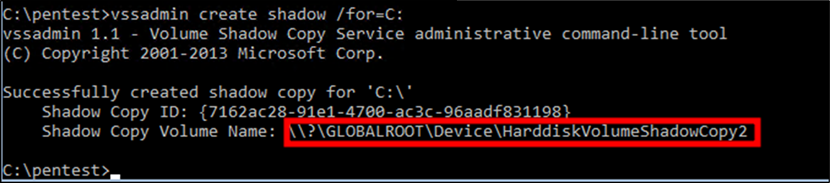
Figure 3: create shadow copy of C: drive
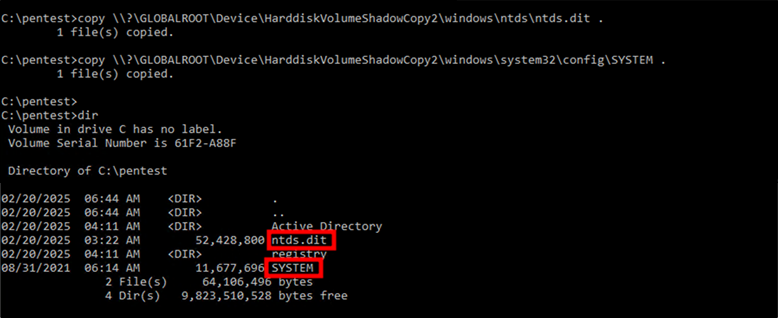
Figure 4: Retrieve NTDS.dit and SYSTEM files
Once the files are copied, you can clean up by deleting the shadow copy, by running the first command below, the second, to verify its deletion:
vssadmin delete shadows /shadow={7162ac28-91e1-4700-ac3c-96aadf831198}
vssadmin list shadows
Impacket secretsdump
This Python tool is from the Impacket suite that allows you to extract password hashes from a domain controller either remotely or offline, as long as you have the NTDS.dit and SYSTEM files.
The instructions on how to download this tool for Kali are here.
Remotely
To extract password hashes from the domain controller, SecretsDump is a tool from Impacket that allows you to pull credentials directly from AD. Here’s how you can use it:
- Open a terminal on your Kali machine (or wherever you’re conducting your security assessment).
- Use the following command to extract the password hashes from the NTDS.dit file on the target domain controller:
impacket-secretsdump -just-dc htb.local/[email protected]
- htb.local is the domain name.
- backdoor is the user account being used to authenticate, .i.e. domain admin.
- 10.129.139.204 is the IP address of the domain controller.
Ensure that in the /etc/resolv.conf an entry is added for nameserver using the IP address of the domain controller.
Extracting hashes directly from the NTDS.dit file can put a strain on the domain controller and can cause in some cases crashes, especially if AD contains a lot of objects or the server is under resourced.
Offline
The command extracts password hashes from the NTDS.dit and SYSTEM files, including password history by specifying the -history flag. The hashes are then saved on the filename provided in the argument for the output flag.
impacket-secretsdump -ntds ntds.dit -system system -history LOCAL -output hashes
Moving files from Windows to Kali
Once you’ve extracted the password hashes and have the necessary files (like NTDS.dit and SYSTEM), the next step is transferring them from the Windows machine to your Kali machine for further analysis. Here’s how you can do that using Impacket’s SMBServer and Robocopy.
Now that you have the NTDS.dit and SYSTEM file, the next step is transferring these files in your kali machine. There are many multiple methods to achieve this and in this blog we will explore one of them:
- Set up the SMB server on Kali
impacket-smbserver share . -smb2support
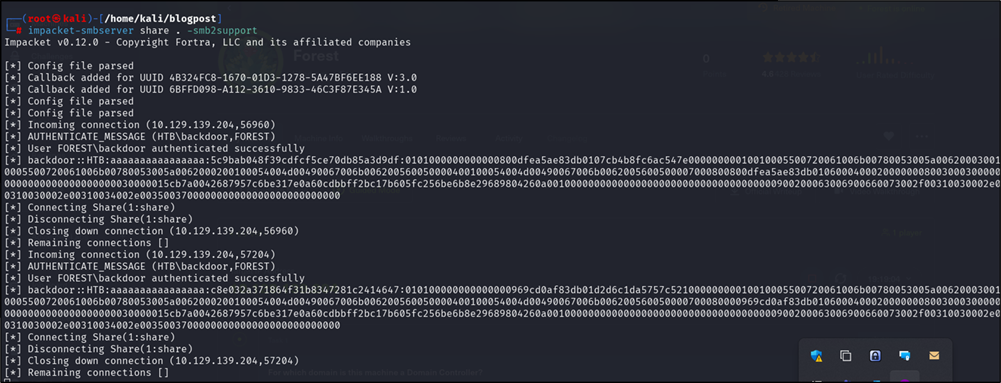
Figure 5: SMB Share
- Copying files using Robocopy
robocopy C:\pentest \\10.10.14.57\share\ /E
- C:\pentest is the directory where the extracted files (like NTDS.dit and SYSTEM) are located.
- \10.10.14.57\share is the path to the SMB share on your Kali machine (replace 10.10.14.57 with your Kali machine’s IP address).
- The /E flag ensures that all subdirectories and files in the pentest folder are copied.
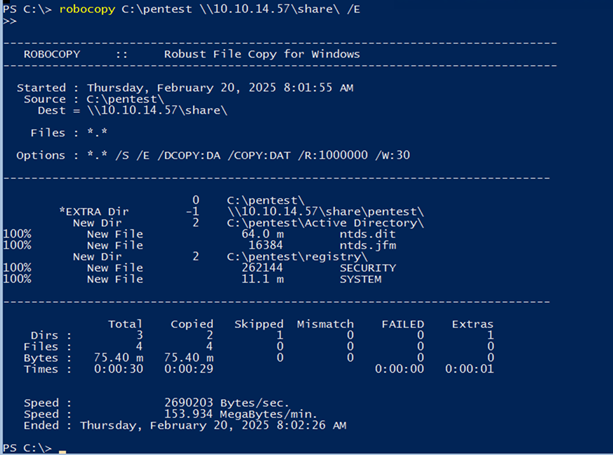
Figure 6: copy files with robocopy
Cracking passwords
Windows uses different hashing algorithms to store passwords which are LM (Lan Manager), known to be now legacy, very weak and vulnerable to rainbow table attacks and secondly NTLM (NT Lan Manager), more secure than the first one but still crackable with tools such as John The Ripper and Hashcat.
John the Ripper
John the Ripper uses techniques like dictionary attacks, brute force and hybrid methods to crack passwords. It comes pre-installed in kali Linux.
In this blog we will demonstrate how to use it. We will start by first creating a base wordlist and rules that can be applied to a wordlist to cover passwords such as “Password123” and “Password1!” Just from the base word “Password”.
What is a Dictionary Attack?
It is the preferred method to attempt to crack passwords in short amount of time. It uses a precompiled list of passwords that users are most likely to use. That initial wordlist will form as the base wordlist which can be custom made or premade such as rockyou.txt.
As users are most often forced through password policy to include numbers and special characters, the use of rules will enable you to expand your base wordlist to include such passwords.
Example: Starting with a wordlist and expanding it with rules
Let’s take a basic wordlist and apply rules to cover different variations of how a password may be written by users.
Step 1: Create or obtain a base wordlist
You can start with a simple wordlist, such as a list of common passwords:
pgsql
Copy
password
admin
letmein
welcome
123456
Step 2: Apply rules in John the Ripper or Hashcat
Both John the Ripper and Hashcat allow you to apply rules, in this demo we will use John the Ripper:
Table 1: Rules for John the Ripper
| Rule | Explanation | Example |
| cAz”[0-9]” | cA: Capitalizes the first letter. z: Changes the last letter to lowercase. “[0-9]”: Adds a digit (0-9) at the end of the word. | For “password”, it becomes: Password1, Password2, …, Password9. |
| sA@Az”[0-9]” | sA@: Substitutes a with @. Az: Capitalizes the first letter and converts the last letter to lowercase. “[0-9]”: Adds a digit at the end. | For “password”, it becomes: P@ssword1, P@ssword2, …, P@ssword9. |
| sA@sO0cAz”[0-9][£!$@#]” | sA@: Substitutes a with @. sO0: Substitutes o with 0. cA: Capitalizes the first letter. z: Changes the last letter to lowercase. “[0-9][£!$@#]”: Adds a digit followed by a special character. | For “password”, it becomes: P@ssw0rd1!, P@ssw0rd2@, …, P@ssw0rd9#. |
| cAz”[0-9][0-9][0-9][0-9]” | cA: Capitalizes the first letter. z: Changes the last letter to lowercase. “[0-9][0-9][0-9][0-9]”: Adds four digits (0000-9999) at the end. | For “password”, it becomes: Password1234, Password5678, …, Password9999. |
| sA@cAz”[0-9][0-9][0-9][0-9][!$@#]” | sA@: Substitutes a with @. cA: Capitalizes the first letter. z: Changes the last letter to lowercase. “[0-9][0-9][0-9][0-9][!$@#]”: Adds four digits followed by a special character. | For “password”, it becomes: P@ssword1234!, P@ssword5678$, …, P@ssword9999#. |
| sA4sE3sI1sO0sS5sT7uAz”[!$@#][!$@#]” | sA4: Substitutes a with 4. sE3: Substitutes e with 3. sI1: Substitutes i with 1. sO0: Substitutes o with 0. sS5: Substitutes s with 5. sT7: Substitutes t with 7. uA: Changes the first letter to uppercase. z: Changes the last letter to lowercase. “[!$@#][!$@#]”: Adds two special characters. | For “password”, it becomes: P4ssw03r1d5T7!!, P4ssw03r1d5T7$@, …, P4ssw03r1d5T7@#. |
| cAz”[0-9][0-9][0-9][0-9][£!$@#]” | cA: Capitalizes the first letter. z: Changes the last letter to lowercase. “[0-9][0-9][0-9][0-9][£!$@#]”: Adds four digits followed by a special character. | For “password”, it becomes: Password1234#, Password5678@, …, Password9999$. |
| cAz”[0-9][0-9][£!$@#][£!$@#]” | cA: Capitalizes the first letter. z: Changes the last letter to lowercase. “[0-9][0-9][£!$@#][£!$@#]”: Adds two digits followed by two special characters. | For “password”, it becomes: Password12!@, Password34$#, …, Password99@!. |
| cAz”[£!$@#][0-9][0-9][0-9]” | cA: Capitalizes the first letter. z: Changes the last letter to lowercase. “[£!$@#][0-9][0-9][0-9]”: Adds a special character followed by three digits. | For “password”, it becomes: Password!123, Password$456, …, Password#789. |
| Az”[£!$@#][0-9][0-9][0-9]” | A: Capitalizes the first letter. z: Changes the last letter to lowercase. “[£!$@#][0-9][0-9][0-9]”: Adds a special character followed by three digits. | For “password”, it becomes: Password!123, Password$456, …, Password#789. |
| lAz”[£!$@#][0-9][0-9][0-9]” | lA: Converts the first letter to lowercase. z: Changes the last letter to lowercase. “[£!$@#][0-9][0-9][0-9]”: Adds a special character followed by three digits. | For “password”, it becomes: password!123, password$456, …, password#789. |
| uAz”[£!$@#][0-9][0-9][0-9]” | uA: Changes the first letter to uppercase. z: Changes the last letter to lowercase. “[£!$@#][0-9][0-9][0-9]”: Adds a special character followed by three digits. | For “password”, it becomes: Password!123, Password$456, …, Password#789. |
Step 3: See How It Covers More Complex Passwords
By applying the above rules, we increase the likelihood of cracking more passwords which would be otherwise missed.
/usr/share/john/rules/john.conf
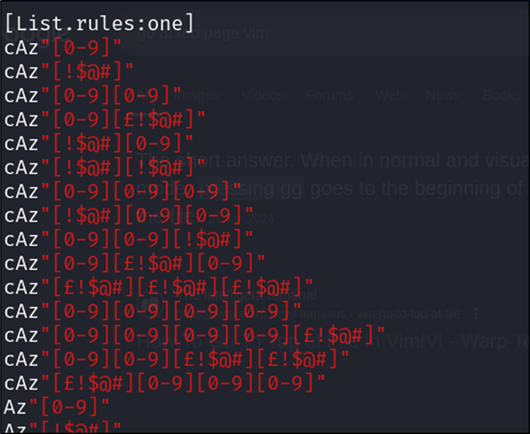
Figure 7: John the Ripper custom list rule
This is the base wordlist:
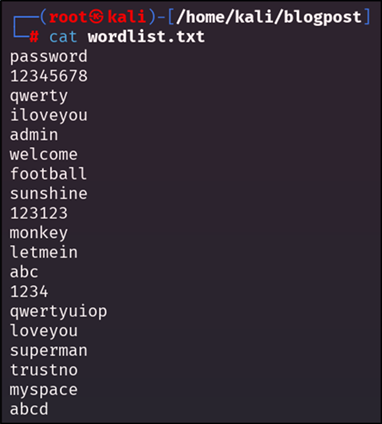
Figure 8: Base wordlist
This is the file which is included in the john.conf in etc to pick up the rule named “one” created earlier:

Figure 9: John the Ripper config rule
Testing the new wordlist by applying rule “One”:
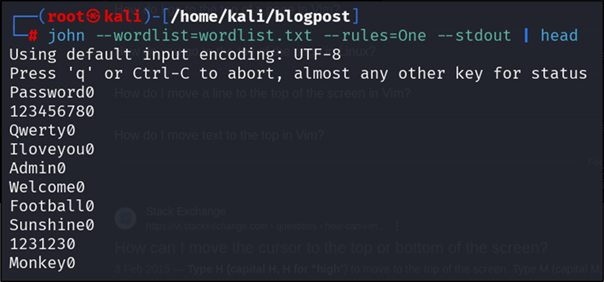
Figure 10: Creating new wordlist
Save the new wordlist with the following command:
john --wordlist=wordlist.txt --rules=One –stdout > new_wordlist.txt

Figure 11: new wordlist size
To view cracked passwords from the pwdump.txt which is the export received by running the secretsdump utility (see the Impacket secretsdump [Offline] section further on).
john --format=nt pwdump.txt --show | head
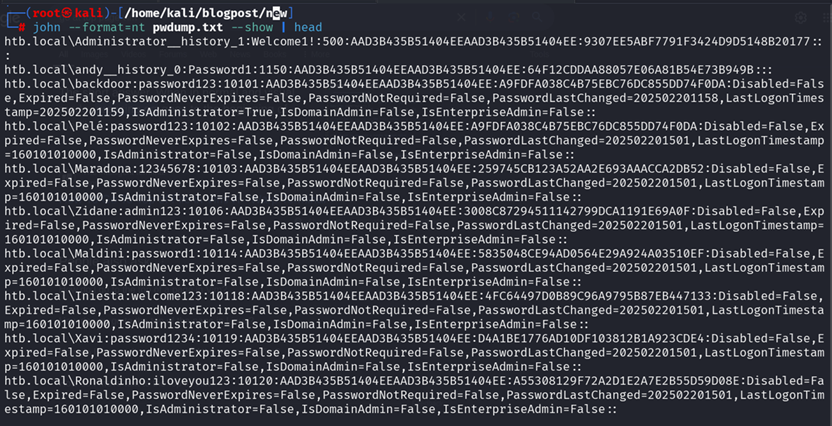
Figure 12: Showing the first ten rows of passwords cracked
john --format=nt pwdump.txt --show | tail -n 1

Figure 13: Showing cracked passwords
Hashcat
Hashcat is an advanced password recovery tool that is fully compatible with John the Ripper. There are precompiled lists on Hashcat which can be found in the following directories:

Figure 14: rules preconfigured
Hashcat comes with built-in rule files like:
- rules/best64.rule
- rules/d3ad0ne.rule
- rules/T0XlC.rule
You can also write your own rule file (e.g. custom.rule) with lines like:
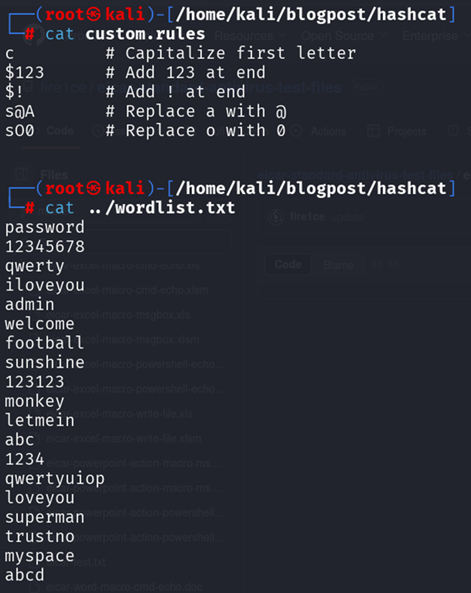
Figure 15: Wordlist.txt and custom rules
hashcat -m 1000 -a 0 ntlm_hashes.txt wordlist.txt -r rules/best64.rule
Flags explained:
-m 1000: NTLM hash mode
-a 0: Dictionary attack
-r: Apply rule file
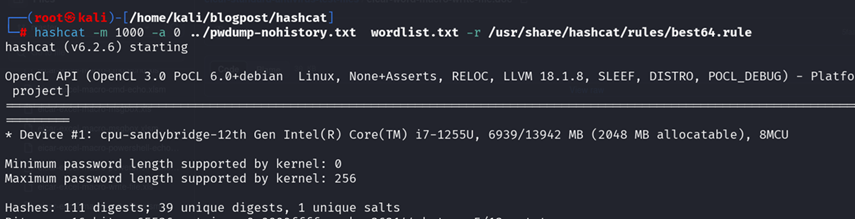
Figure 16: Hashcat command with rule
Below are the cracked passwords:
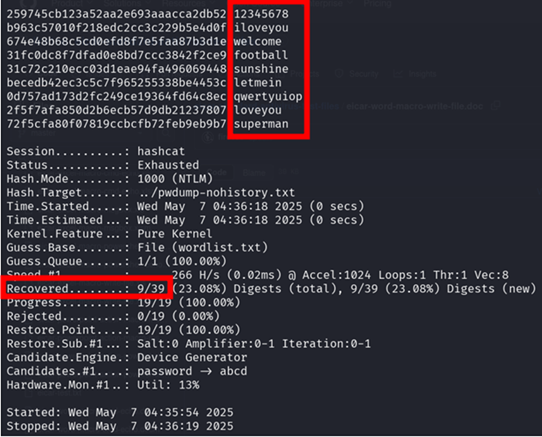
Figure 17: passwords cracked
The below was cracked with rockyou.txt as a wordlist:
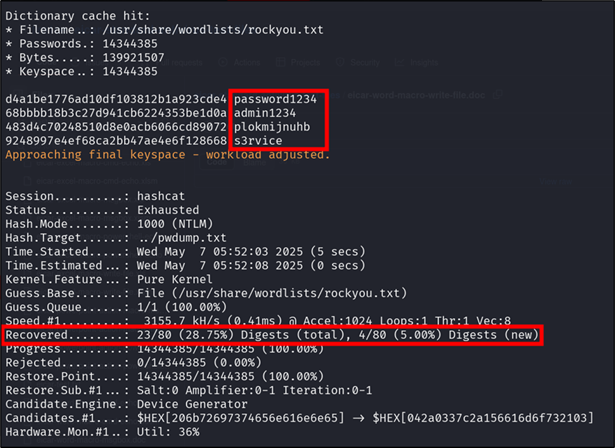
Figure 18: Cracking hashes with rockyou.txt wordlist
Showing all cracked passwords:
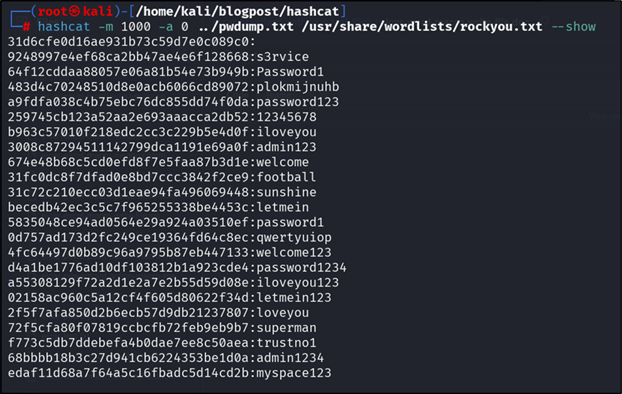
Figure 19: cracked hashes
Locating the potfile, which contains all passwords cracked:

Figure 20: Locate potfile
Analyse passwords
For every privileged list for which you want to get metrics for, include the list of all users in a text file as below:
Get-ADGroupMember -Identity "Domain Admins" | ForEach-Object {
    "$((Get-ADDomain).DNSRoot)\$($_.SamAccountName)"
} | Out-File users.txt
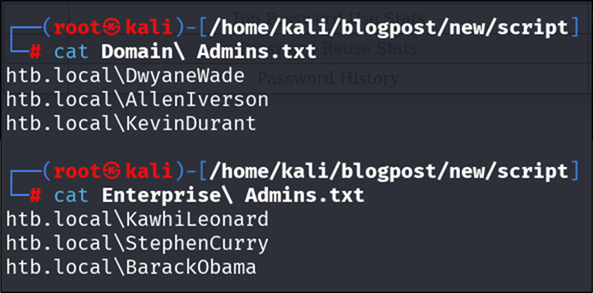
Figure 21: groups
Exporting hashes in a format readable by Hashcat or John the Ripper.
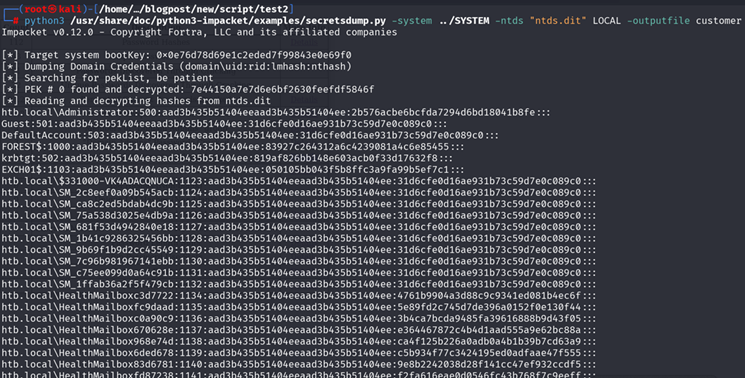
Figure 22: Export hashes for Hashcat or John the Ripper
The results will create “customer.ntds”:
python3 /usr/share/doc/python3-impacket/examples/secretsdump.py -system ../SYSTEM -ntds "ntds.dit" LOCAL -outputfile customer

Password analysis metrics
To get the password analysis metrics, you can use DPAT and run the following command:
python3 ../GodProvider/DPAT/dpat.py -n customer.ntds -c hashcat.potfile -g "Domain Admins.txt" "Enterprise Admins.txt"

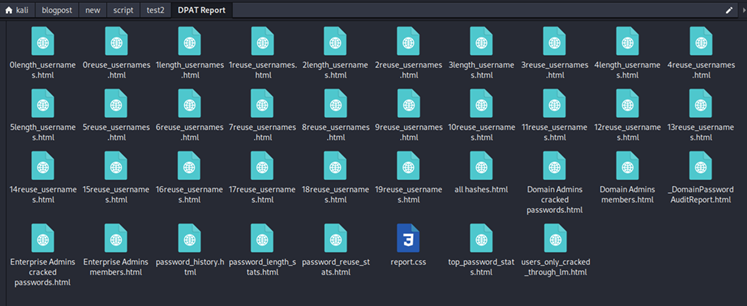
Figure 23: List of all metrics available
All these metrics will be available once the command is run successfully, including and not limited to the following:
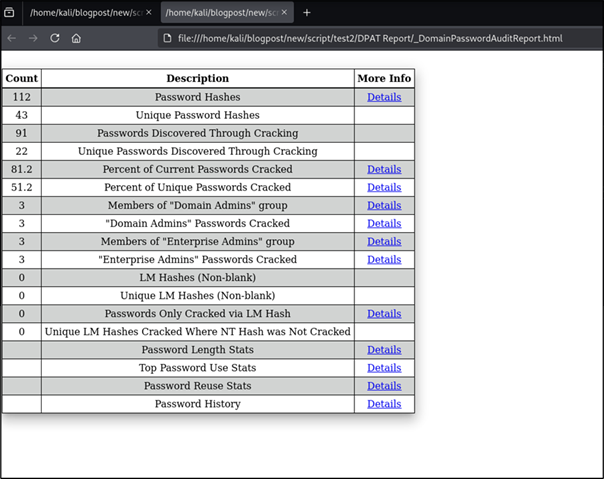
Figure 24: Domain Password Audit Report
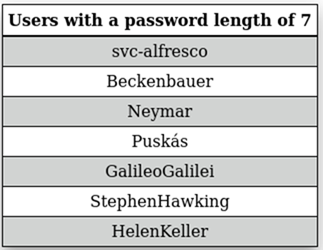
Figure 25: Users with password length < 7
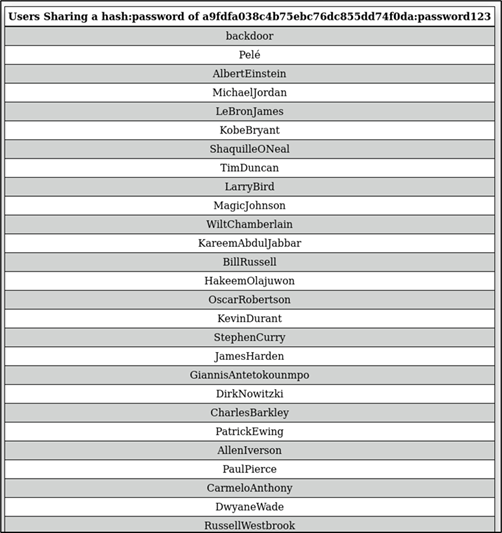
Figure 26: Users sharing the same hash or password
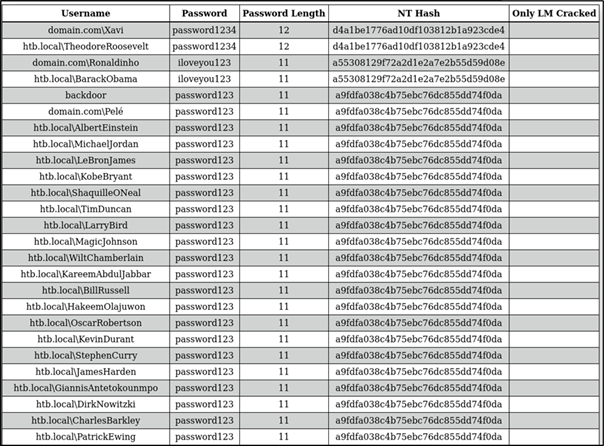
Figure 27: All hashes

Figure 28: Domain Admin cracked passwords
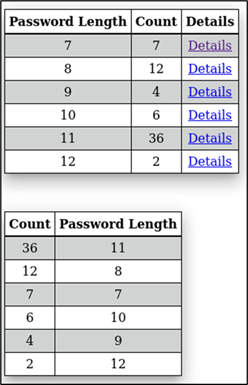
Figure 29: Password length statistics
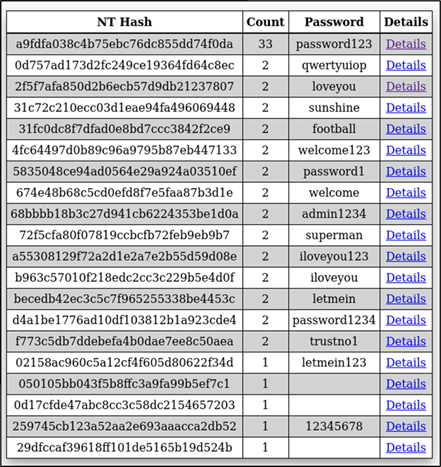
Figure 30: Password reuse statistics
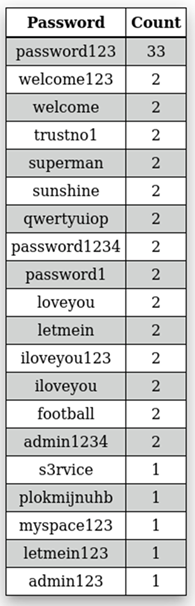
Figure 31: Top statistics password
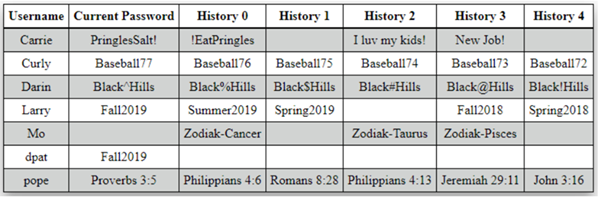
Figure 32: Password history metrics
Conclusion
With the rights tools, and practice it’s possible for SMEs to do their own AD password audits without the expense of enterprise tooling.
Remember though, any password audit is only as good as the follow-up work it generates. Once you’ve identified weak passwords they need remediating. The next step is to use the results to improve your security policies which in turn will help improve your security posture.
We have our own subscription based password auditing tool called PAPA.


