


TL;DR
- Turn on Credential Guard to protect password hashes and Kerberos tickets from credential theft tools like Mimikatz.
- Enable Secure Boot to ensure that only trusted, signed bootloaders and firmware can run, blocking certain types of malware.
- Use UEFI instead of legacy BIOS for a faster, more secure boot process that supports modern protective features.
- Enable Virtual Secure Mode (VSM) to store credentials and encryption keys in an isolated and protected area of memory.
- Ensure IOMMU protection is enabled to block rogue devices from accessing system memory.
Introduction
It’s more common than you might think to miss built-in defences. Windows has a lot of features that help keep your identity safe, make endpoints more secure, control what software can run, and make it easier to see what’s going on if something bad happens. As incident responders, it’s our duty to talk about the types of already available defences that we commonly see misconfigured or not enabled.
In this blog, we’ll discuss 5 built-in Windows security features which will help to protect your organisation from a potential breach.
Windows security features
1. Virtual Secure Mode (VSM)
VSM uses hardware virtualisation to make an area of protected memory that is isolated from the rest of the operating system. Sensitive information, like encryption keys and login credentials, is kept in this safe, separate area of memory. The hypervisor, which is a very trusted and privileged part of the system, is the only way to get to the isolated area, which keeps it safe from unauthorised access. By doing so, even if malware compromises the device’s operating system, the data stored there cannot be reached. Windows also uses VSM in features such as Credential Guard.
To check if VSM is enabled on a system:
- Open a run dialogue (Windows Key + R)
- Type ‘cmd’ and press enter
- Type ‘systeminfo’ and press enter
- In the resultant window, check that “Hyper-V requirements” states “Yes”
To enable VSM on a system:
- Ensure Secure Boot and UEFI are enabled
- Install Hyper-V
- Enable VSM via Group Policy
- Computer Configuration -> Administrative Templates -> System -> Device Guard -> Turn on Visualisation Based Security
2. Credential guard
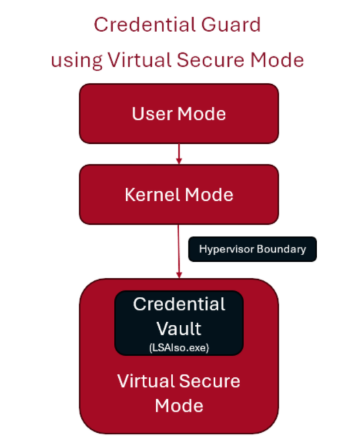
Credential Guard stops different kinds of credential theft attacks by keeping password hashes, Kerberos Ticket Granting Tickets (TGTs), and credentials that applications store safe. It does this by making sure that tools like Mimikatz can’t get to credentials that are out of reach.
Without Credential Guard, secrets are stored in lsass.exe in normal process memory. This means that any administrator or system account with the correct privileges could read or dump its contents. Enabling Credential Guard prevents this by storing secrets in a new isolated location called LSAIso.exe. This works by using Virtualisation-based security (VBS), which protects the isolated LSA process and therefore this becomes inaccessible to the rest of the system.
It’s important to note that Credential Guard is enabled by default on Windows 11 and Windows Server 2025 devices subject to meeting the licence (Enterprise Windows 11), hardware and software requirements set by Microsoft, though not if this was turned off on a device before updating to a version of Windows where this is enabled by default.
To check if Credential Guard is running on a system, use the following command:
(Get-CimInstance -ClassName Win32_DeviceGuard -Namespace root\Microsoft\Windows\DeviceGuard).SecurityServicesRunningCredential Guard can be enabled via Microsoft InTune using the following settings:
- Category: Device Guard
- Setting Name: Credential Guard
- Value: Enabled with UEFI lock (or without UEFI lock if you want to be able to turn this off remotely)
This can also be enabled via Group Policy of via the Registry.
3. Secure boot
Secure Boot is a useful security feature on Windows computers that stops harmful software from loading when you start your computer. It does this by making sure that only software that the device trusts can run. When a device powers on, the firmware verifies the digital signature of all boot components. If everything checks out, the firmware passes control of the system to the operating system, allowing it to boot.
The risks around allowing illegitimate boot code to run are significant. This could lead to boot-level malware giving attackers persistent control of a system.
To check if Secure Boot is enabled on a system, head to System Information on your device, and look for ‘Secure Boot State’.
To enable Secure Boot in Windows 11, go to:
- Settings -> Windows Update
- Advanced options -> Recovery
- Advanced Startup -> Restart now
4. Unified Extensible Firmware Interface (UEFI)
UEFI is a newer, faster and more secure version of firmware that takes the place of the legacy Basic Input/Output System (BIOS). It verifies the integrity of startup components through cryptographic checks. UEFI provides the basis for other Windows security features (such as Secure Boot, Trusted Platform Module (TPM) and BitLocker) to function by protecting a device’s memory during the boot time.
To check if UEFI is enabled on a system:
- Open a run dialogue (Windows Key + R)
- Type ‘msinfo32’ and press enter
- In the resultant window, check that “BIOS Mode” states “UEFI”
Enabling UEFI varies from system to system. Usually, this will involve accessing the Boot Options and toggling the Boot Mode from Legacy to UEFI. You may need to research the specifics in relation to your own system.
5. Input–Output Memory Management Unit (IOMMU)
IOMMU offers further security against memory attacks at a hardware level, complementing the other Windows Security features we’ve talked about so far. It works by controlling how a device component accesses a system’s memory, essentially gatekeeping access to memory. This protects the device from Direct Memory Access (DMA) devices (such as external GPUs) from accessing its memory.
To check whether IOMMU is enabled, or to enable it, will depend on your device’s system, as this will need to be configured via your BIOS (or hopefully, UEFI!) settings.
Conclusion
By enabling these built-in security features, you are not only meeting compliance requirements, but you are also closing off attack paths on your threat surface. These native defences can help protect your identity, keep your boot process safe, and keep your memory isolated. By making sure that these are used consistently throughout your estate, you are taking a low-cost, high-impact step towards being more resilient to cyber threats.


