


This post is a companion to the DEF CON 29 video available here.
A few months ago I purchased an Android phone to do some research around a specific series of NFC chips, which required me to gain root access to the device in order to fully access its hardware capabilities.
Gaining root access on Android phones generally requires unlocking the bootloader, an action which disables the signature verification requirements of the phone so that a modified Android boot image can be deployed. On Qualcomm chipsets this is a standardised process which uses commands in the Android Bootloader to perform the unlock. Smartphone manufacturers often modify the bootloader to add their own restrictions, and require their own tools.
These custom restrictions include forcing a user account to be created to request the unlock and enforcing a waiting period before allowing the unlock to occur.
There are a few practical reasons why a business would want to place these restrictions on their hardware:
- Inexperienced users will not be tricked into deliberately weakening phone security
- Third parties can’t load the devices with malware before sale (e.g. supply chains attacks)
- The manufacturer can track who is unlocking their bootloaders
The phone that I had purchased had these restrictions, requiring me to wait seven days before being allowed to root the device. Due to this, I decided to investigate whether I could bypass the waiting period on an older smartphone that was produced by the same manufacturer. I set myself a challenge to break the bootloader protection before the end of the seven day waiting period.
Standard Bypass Methods
There are some standard methods for bypassing these restrictions, however they all come with their own risks.
The most commonly used approach is to access Qualcomm Emergency Download mode. This is a low-level emergency state boot mode, where diagnostics tools can be used to upload a signed “loader” payload to the chip, which can be used to modify the device’s partitions directly. While this approach is effective, it requires the ability to boot into the mode, which is not always made directly available to users, and access to a signed loader ELF which may not be available for the device.
The second common approach is to attack the device at a hardware level. By disassembling the phone, and connecting to EMMC chip on the board, it is possible to set the “unlock” bit in the configuration partition and gain unlocked access. Public resources exist which outline which pins should be connected to, however this usually requires some hardware knowledge and steady hands. There is also a high risk of irreparably damaging the device.
I did not want to use either of these approaches, and instead wanted to attack the second-stage bootloader. Emergency Download mode is accessed from the first stage bootloader, however additional diagnostics and management tools are available at the next stage in the boot chain.
SDM660 Android Phone
The target device was a mid-range phone released in 2017, which used the Qualcomm Snapdragon 660 as its core chipset.
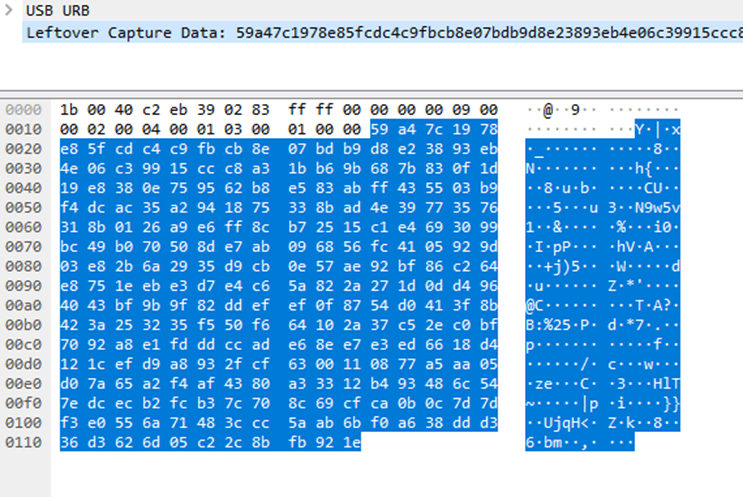
Analysis of the custom unlock functionality implemented by the manufacturer demonstrated that a small unique value was sent from the phone to the unlock tool, and a signature was generated on their servers. After seven days, this would be sent to the phone and verified, performing the unlock. I analysed this process using a Windows host and the USBPCAP USB analysis software.
The request for the unique value, sending of the signature, and request for a bootloader unlock were all performed via the Fastboot interface of the Android Bootloader. This interface is accessible by rebooting into bootloader mode via ADB on the phone, or by holding down the volume down button on boot. This can then be accessed from USB using the “fastboot” command-line tool.
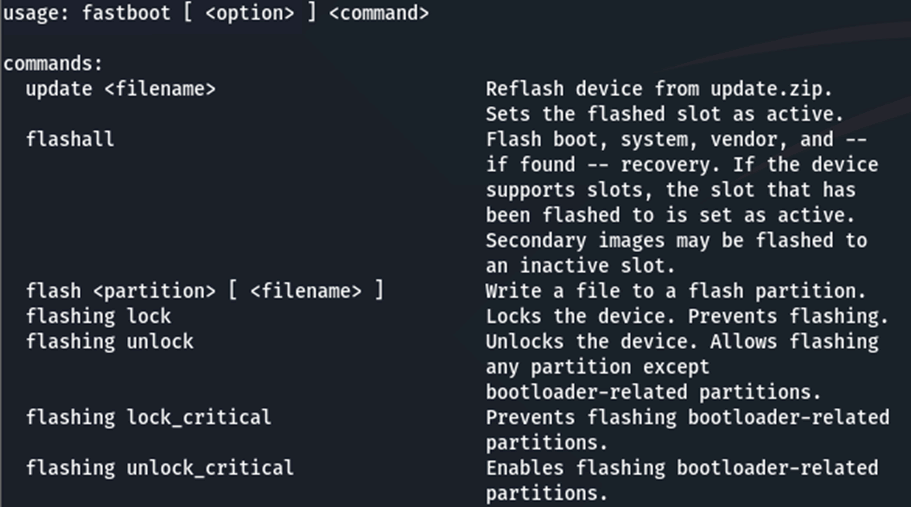
Fastboot
This tool facilitates standard and custom functions, including flashing partitions, getting OEM-specific data, or booting into different modes. Analysis of this tool demonstrated that the fastboot protocol is very simple, and could be implemented using basic C++ code and LibUSB.
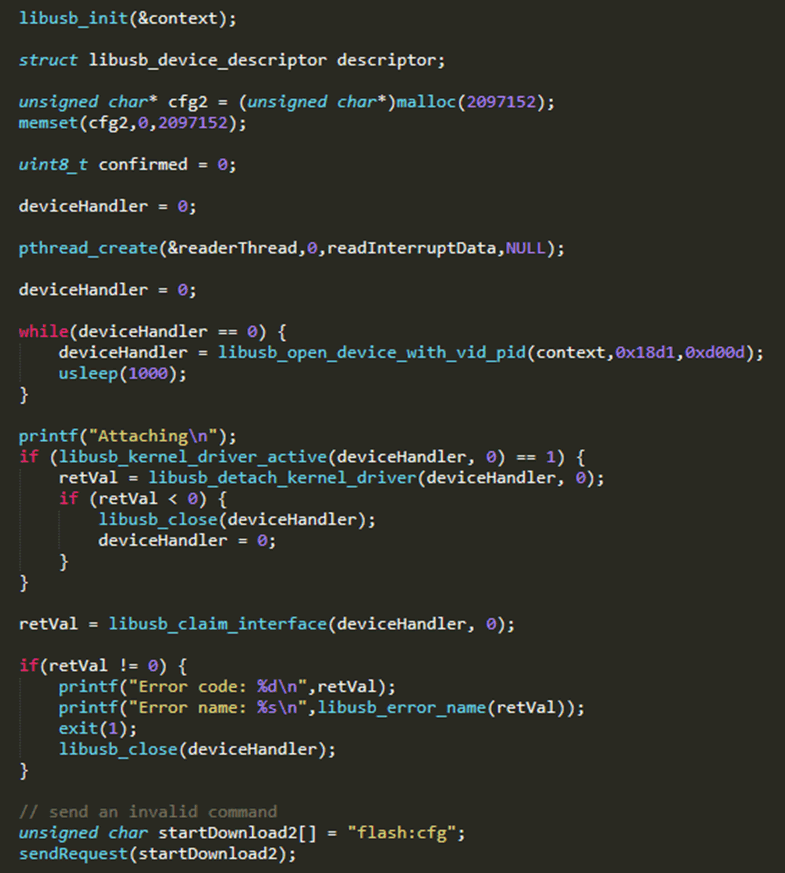
All commands were found to be sent as ASCII text over a single USB endpoint, and responses to the commands were sent asynchronously from another endpoint. I found that libraries existed to facilitate access to the fastboot interface, however I decided to use LibUSB, as this would give me greater control over the communication.
ABL Bootloader
The fastboot interface is provided by the Android bootloader, a second stage bootloader which is stored in the “abl” partition of the phone. The purpose of this bootloader is to verify and load the Android and Recovery images of the phone, to allow for their standard functionality, or to receive fastboot commands. Qualcomm’s version of this bootloader is open source, allowing for easier modification by phone manufacturers.
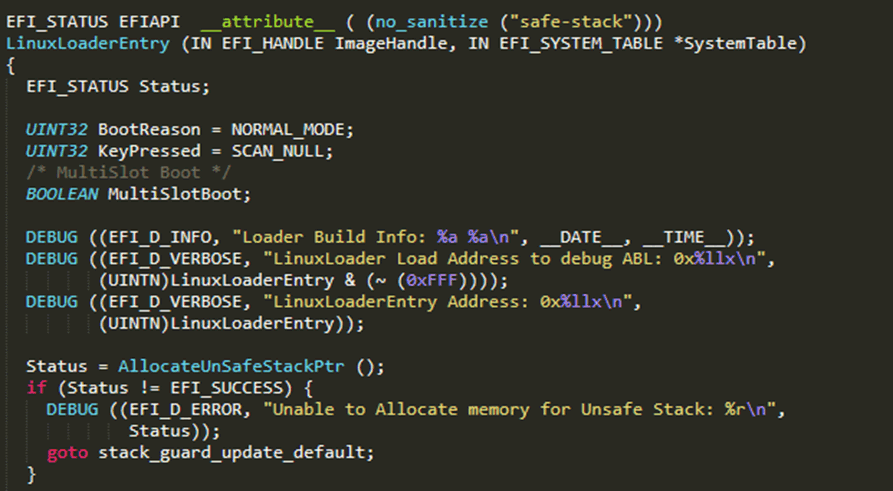
As I was attacking this bootloader, I wanted to make sure that I was in a position to analyse its functionality at a low level. The custom commands added by the phone manufacturer would not be in the source code, so I decided to analyse the compiled bootloader. I accessed the contents of the “abl” partition of the phone by downloading the latest OTA update file, unzipping it, and accessing the “abl.img” file stored within. Analysis of this image found that it was an ELF file, however it did not contain any executable code.
Instead, running the “binwalk” file analysis tool on the file revealed that the ELF contained a EFI system partition. This is a standard format used for booting of Operating Systems on embedded and non-embedded devices, and usage of the “uefi-firmware-parser” tool allowed this to be extracted.
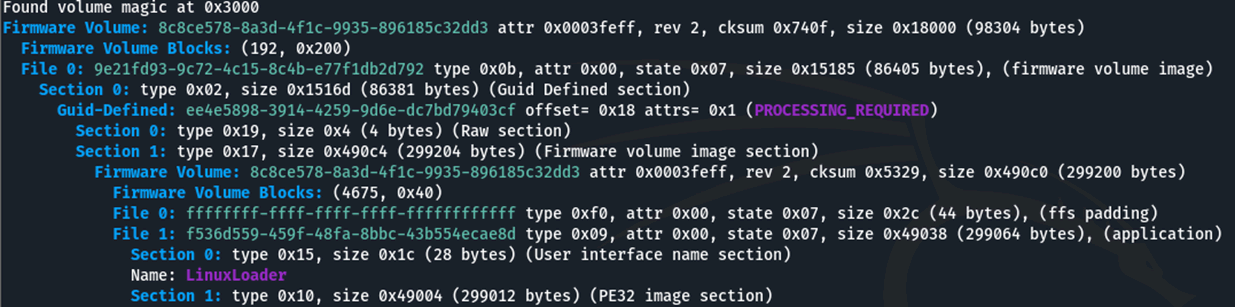
The “LinuxLoader” file stored within this was a Portable Executable, an executable file containing the bootloader code. This standard format could be directly loaded into IDA and disassembled.
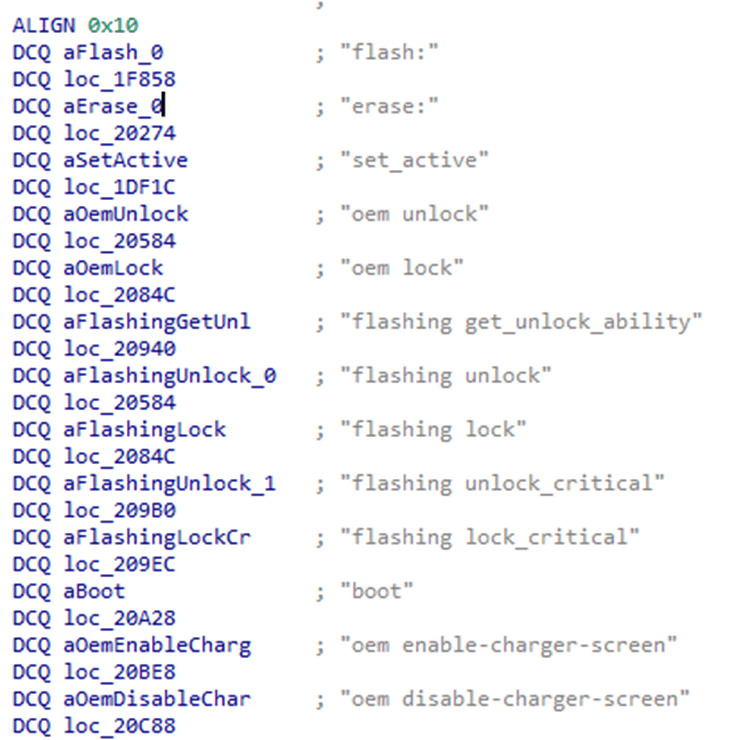
Brief analysis of the bootloader demonstrated that all of the fastboot commands were stored in a table, consisting of the ASCII command, and a function callback for that command. This allowed for rapid analysis of any potentially hidden commands, and would aid in analysis of specific functionality. The bootloader was also found to contain a huge number of debugging strings, which made understanding of the code much easier.
My main goal was to find a memory corruption vulnerability, which would allow me to bypass the unlocking restrictions. To this end, I decided to focus on the “flash:” command. I selected this because it would need to receive large payloads from the host PC to flash device partitions.
The “flash:” command, traditionally doesn’t allow for partitions to be written on devices when the bootloader is locked, however I noticed that the manufacturer had modified their bootloader to allow for flashing of specific, custom, partitions even when in a locked state. These partitions had additional parsing performed on the data that was uploaded, increasing the possibility that there may be weaknesses.
As I was approaching the fastboot protocol from a reverse-engineering perspective, rather than reading any documentation, I had made some assumptions about how data uploads were performed. The correct sequence for uploading is as follows:
- download:<payload size>
- <send full payload>
- flash:<partition>
However, I attempted the following sequence:
- flash:<partition>
- <send payload>
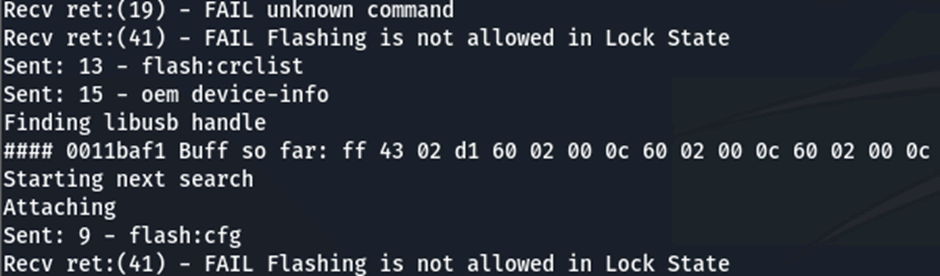
Further to this, I had erroneously left an additional “flash:” command, after this sequence in my code. Running this sequence caused the bootloader to crash after sending the second “flash:” command, with the USB interface no longer receiving commands.
Analysis of the Crash
Unplugging the device from the USB port and plugging it back in found that it would no longer enumerate over USB, meaning that it was completely non-functional. Holding down the power and volume down buttons for ten seconds caused a hard reboot , with no persistent damage to the device.
After reading about how uploads of data were meant to occur in fastboot, using the “download:” command, I surmised that a buffer overflow had occurred, with the large payload I had sent being treated as a fastboot command rather than the partition to be uploaded. This implied that the crash had occurred due to weaknesses in the command processing functionality of the Qualcomm bootloader, rather than any custom functionality implemented by the phone manufacturer.
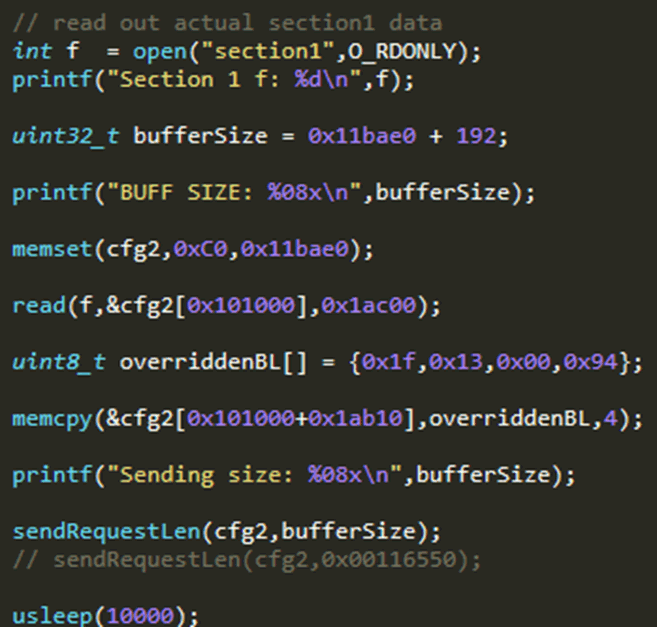
In order to confirm that what I had stumbled upon was a valid buffer overflow, I decided to try a smaller payload size. I had started with a 10 megabyte payload, and attempted the same sequence a 4 kilobyte payload. This smaller payload did not crash the phone, and it continued to function normally.
As smaller payloads did not cause a crash, I elected to perform a binary search in order to identify the largest payload which would not crash the phone. I sent payload sizes half way between the small and large value, and then reduced the largest payload size, or increase the smallest payload size depending on whether the phone crashed or not. This led me to the maximum payload which would not crash the device, which was 0x11bae0 (1161952) bytes in size.
As this was an unusual memory size, I was reasonably sure that this was a buffer overflow of some kind, however as I had no access to the internal hardware, any debugging capabilities, or an overview of the memory map of the bootloader there would be a lot of uncertainty about exactly what was overflowing. I had noted that the bootloader implemented stack canaries using randomised values, meaning that if I was overflowing the stack and hitting the canary, this would likely not be exploitable.
I decided to send an 0x11bae1 (1161953) byte payload, and incremented the last byte from 0x00 up to 0xff. If the phone didn’t crash with a specific value there, then I wasn’t hitting a stack canary, but had found the next byte in the sequence. The valid byte was found to be 0xff at this position.
By constantly power cycling, finding the valid byte value, and then moving to the next byte in the sequence, a reasonable representation of the data in memory at that point could be generated. It would not necessarily be the exact data, but would be close enough not to crash the bootloader. Once this sequence was generated, it would probably be possible to use it to gain code execution in the bootloader, however this would be a long winded process if it could not be automated.
Automated Power Cycling
Automation of power cycling could be performed by removing the battery from the phone, and using a USB relay to cut the power when it was connected to the host PC, but this would require disassembly of the phone and removal of glue around the case. Also, if I was disassembling the phone I could have directly accessed the EMMC and unlocked the bootloader using a hardware-based approach.
While trying to come up with a solution for this, I attempted to constantly hold down the power and volume down buttons of the phone. This caused the phone to be in a boot-loop: it would restart and load the bootloader for a few seconds, and then restart again. I noticed that during this process the USB interface would start functioning for enough time for me to send fastboot commands.
I wrapped a hair tie around the two buttons causing the boot-loop, and found that this approach worked consistently, allowing me to fully automate the process.
I modified the fastboot tool I had written to facilitate this memory dumping. It would wait for the USB interface to come up, attempt the sequence, and then verify whether the bootloader had crashed, and whether it got a “Flashing is not allowed” response. I verified two things as this would be more likely to get an accurate memory dump. Each attempt took 10-30 seconds, meaning that the memory dump would take a while.
I left my phone overnight, attempting this memory dump, and woke up to 0x34 bytes of data that wouldn’t crash the bootloader:
FF 43 02 51 60 02 00 0C 60 02 00 0C 60 02 00 0C 60 02 00 0C E8 00 00 B0 34 00 00 10 01 00 00 0A 08 0D 40 F9 00 00 00 08 C0 00 04 0B 60 02 00 0A D3 9F FF 97
I noted that there were a lot of repeated values, but that these didn’t correspond with the default stack canary value of 0xc0c0c0c0, meaning that they were likely to be unrelated. Also, the data did not look like anything that would be commonly found on a stack, however it was found that each 32-bit word was a valid ARM64 opcode.
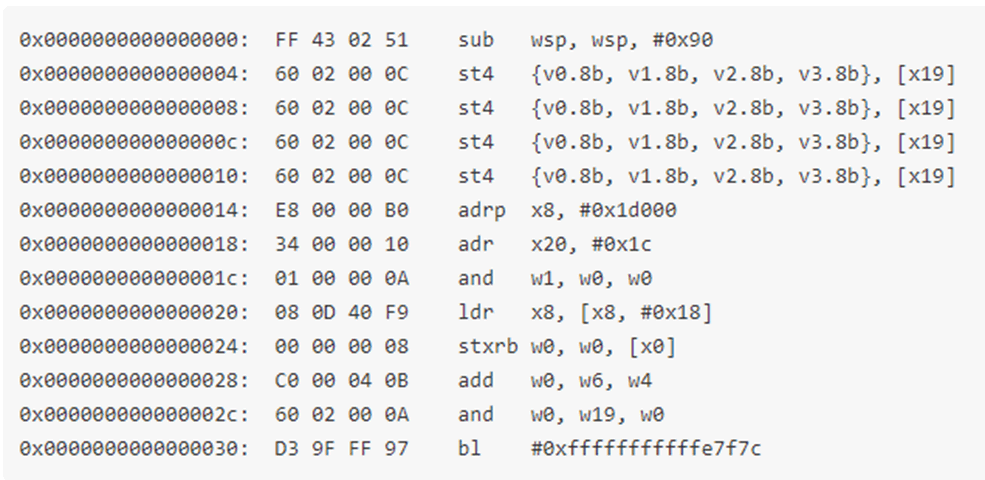
Most of these opcodes, while valid, would not necessarily have to be the same as in the bootloader, however all of the stack management and branch operations would have to be fairly accurate in order for the bootloader to not crash. I attempted to search for the “SUB WSP” and “BL” instructions I had identified in my disassembled bootloader in IDA, however there were no results.
There were a few reasons why this may have been the case. ARM64 operations can often have the same or similar functionality even if bits are flipped in the opcode, registers can be accessed in both 32-bit (Wx) and 64-bit (Xx) mode, and Branch instructions can have conditions that were unintentionally met due to the brute forcing being performed.
Because of these superficial differences, I decided to try and find similar opcodes, opting for the “BL” instruction I had identified as this relies on relative addressing, and the address would have to be fairly similar for the branch to be performed properly. I performed a text search on the opcode’s 32-bit value, but removed the first nybble. This would find similar branches and identified a single valid instruction, in the parser of the partition I was trying to flash to at the start of this analysis.
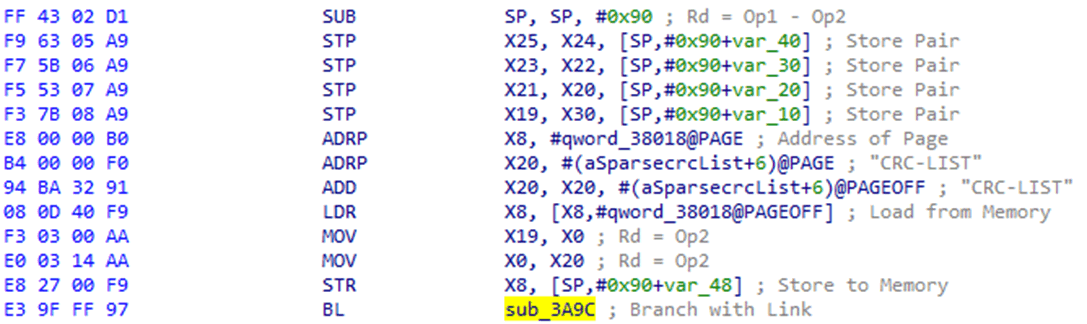
Further checking of the rest of the operations demonstrated that these were also extremely similar. This meant that my bootloader buffer overflow was overwriting the bootloader itself. This also meant that the bootloader was extracted from the EFI filesystem and executed from RAM.
Further analysis of the addresses in use outlined that the bootloader code was overwritten after 0x101000 bytes, and allowed me to overwrite the entire bootloader with the code I had extracted from the Portable Executable, overwriting the bootloader with itself. This would prevent subsequent crashes and allow me to modify any functionality I required by patching the bootloader itself, including the bootloader unlocking code.
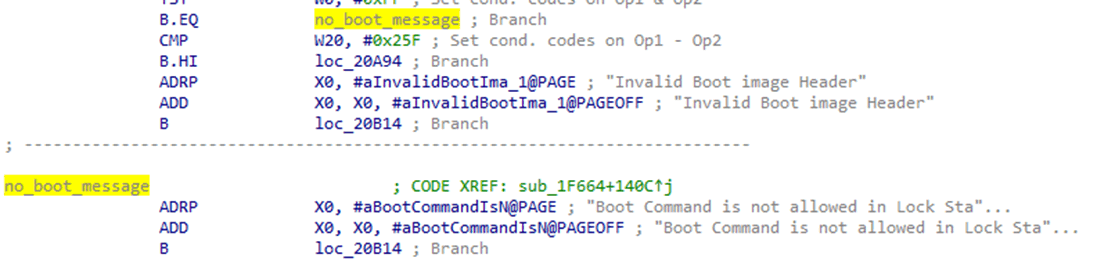
Unlocking the Bootloader
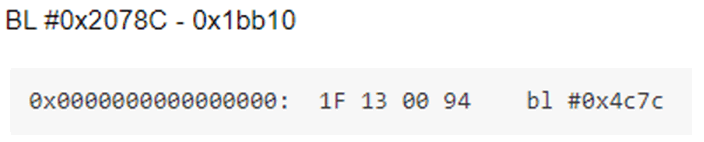
The bootloader code was found to verify the RSA signature provided by the unlock tool, and then perform the unlock. I wanted to jump past this verification and go straight to unlocking. I noticed that the bootloader unlock functionality was performed in a Branch and Link instruction, which are generated by compilers for function calls, and I decided to modify the code I had used for my initial buffer overflow to jump to this. I generated the correct relative address for this, and using an online ARM64 compiler I generated the appropriate BL instruction. I then patched this into the bootloader for this jump.
While it would be difficult to debug this process, a successful unlock would be obvious: the phone would restart, erase the userdata partition, and boot into an unlocked state. This approach was found to be effective, and the device was unlocked.
Implications
I could now root my old phone without the manufacturer’s tools or having to wait seven days. However attempts to perform a similar attack on the newer device was not effective. As such, I assumed that it was only available on SDM660 based devices.
Additional patching of the bootloader could allow for more functionality, such as some limited RAM dumping back from the device for debugging purposes, however this would not allow for any Cold-boot attacks due to restrictions on what areas of RAM could be accessed by the bootloader.
In addition, Qualcomm chips have the ability to encrypt the “userdata” partition of the phone, without requiring a password or PIN from the user. This prevents direct access to it from unsigned Android images and unlocked bootloaders meaning that user’s data would still be protected even if this exploit was performed. Furthermore, bootloader unlocks erase this partition by default.
Replicating The Vulnerability
To confirm my theory that this was possible on all SDM660 devices, I purchased a phone with the same chipset by a different manufacturer. This was released a couple of years after the first device, and was found to have completely disabled bootloader unlocking.
The manufacturer had achieved this by implementing a similar signature protection mechanism to bootloader unlocking as was identified on the first device, but without releasing any tools for this to be performed.
I used an OTA image of the new device to extract the bootloader, in the same manner as I had done for the previous device.
I attempted to perform the same buffer overflow as before, unfortunately it was unsuccessful. However, by sending a much larger payload the new device did crash. By using the same binary search as before, it was possible to identify that this bootloader was overwritten after 0x403000 bytes, rather than the 0x101000 bytes of the first one. With this information a bootloader unlock could be swiftly developed.
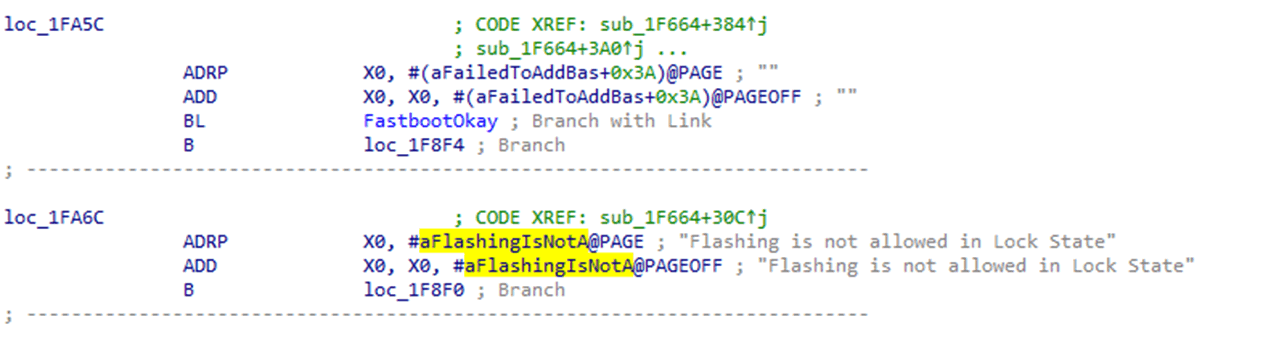
I identified a single branch instruction, which would skip the unlock process if the signature was not verified.

Using a single NOP opcode, this branch could be removed and a bootloader unlock could be performed on the device.
The vulnerability was disclosed directly to Qualcomm, due to its potential existence on all SDM660 based phones.
Bootloader access is not required for users where unlocking is not permitted, it is possible to disable fastboot access entirely in order to prevent attacks against it. Fastboot can then be reactivated via Engineering apps in the main Android OS. Manufacturers who disable bootloader unlocking by consumers often use this approach.
Bypassing Qualcomm’s Userdata Protection
As stated before, Qualcomm’s chips can encrypt the “userdata” partition, to protect user’s data without requiring a password on boot by using an internal key. This prevents chip-off analysis and access to the data via unsigned Android images. I wanted to see if I could bypass this protection and access the userdata partition by modifying the functionality of the bootloader.
I used Qualcomm’s source code to identify how access to the encryption keys and decryption of the partitions was performed. I found that the keys were intentionally inaccessible to the bootloader, and gaining access to them was only possible via an internal API which could not be modified by my attack. This API was found to perform the verification of the booting Android image, as well as verify whether the bootloader was unlocked.
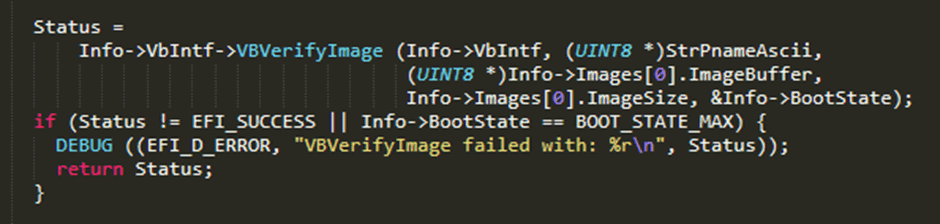
I noted that this function call did not also boot the image, implying that verification of the booting Android image, and actually booting it were two separate functions.
I decided to look at the “boot” fastboot command, a command which boots and executes Android images uploaded from the host PC. I noted that the verification of the image, and starting execution of it were indeed two separate functions.
I decided to see if would be possible to modify the bootloader to swap between a signed and unsigned Android image between these two calls. If this was successful, I would be able to execute an unsigned Android image, without unlocking the bootloader and gain full access to the encrypted userdata partition.
Modifying the Boot Command
The “boot” command receives the full Android “boot” image, via the fastboot “download:” command, which is then verified and executed from RAM. I decided to modify this function to take more than just one Android image.
I modified my fastboot tool, so that instead of sending one image, it would send:
- A four byte offset to an unsigned image.
- A signed image.
- A modified,unsigned image.
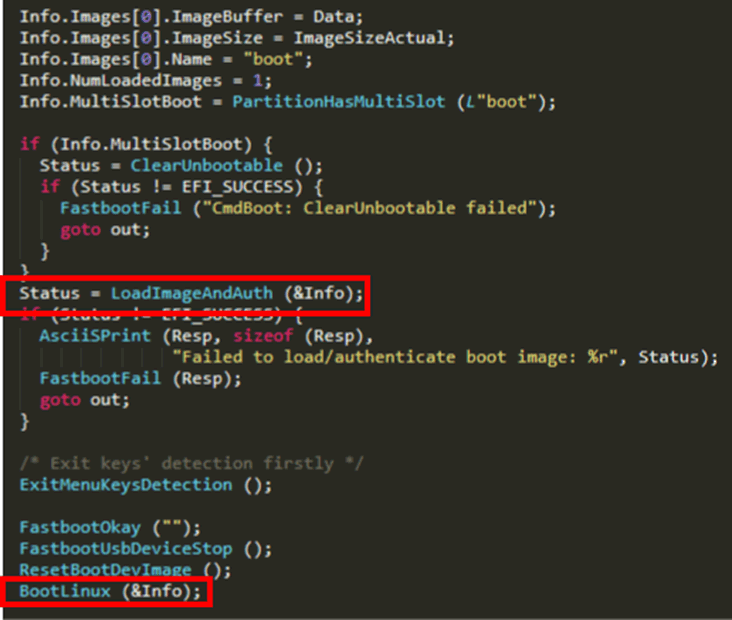
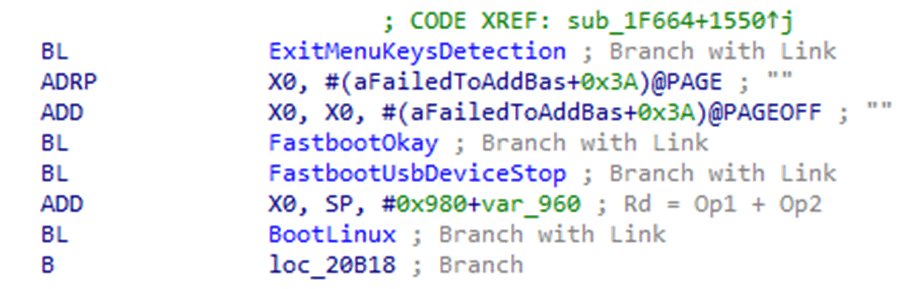
After this, I needed to patch the bootloader to properly use this payload. The first thing I needed to do was bypass the unlock check. The “boot” command, traditionally, only boots uploaded images if the bootloader is unlocked, even if the image is signed. I decided to overwrite this check in the code with an operation which moved the pointer to the new payload up by four bytes – pointing it to the signed Android image.
This would cause the signed image to be verified when the code reached the “LoaderImageAndAuth” function.
After this, I would need space between this function and the “BootLinux” function, in order to swap the images. I noted that the functions called between these two were only there for housekeeping purposes, providing “OK” responses and shutting down some aspects of the bootloader which would be disabled anyway once the Android image had booted. Due to this, I decided to overwrite them with the small number of operations I needed to swap the images.
I only needed to add four additional instructions over these, meaning that there was just enough space to do what I needed. The four additional instructions were as follows:
- Move pointer back to the start of the payload – sub x19, x19, 4
- Read the offset value – ldr w22, [x19]
- Add the offset value to the Image pointer – add x19, x19, x22
- Push the new pointer value into the “Info” structure’s “ImageBuffer” pointer – str x19, [x21,#0xa0]
This would be sufficient to swap the pointer from the signed image to the unsigned image, and would facilitate this Time of Check to Time of Use attack, and allow for running of unsigned images without unlocking the bootloader.
Running Unsigned Code on Locked Bootloaders
There are some very good reasons why someone would want to run unsigned Android images on their device with a locked bootloader, the first of which would be Tethered root access. By booting an unsigned image rooted using Magisk one could have full access to their device’s data, including their photos, messages and contacts, without having to back it up, erase it, and restore it. Furthermore, this would allow someone to perform security research on their personal device with root access, and then remove the access via a reboot, booting back into the signed image. There would be minimal evidence that they had gained privilege access to the device.
While this is useful for research purposes, there are additional nefarious things attackers can do with these capabilities. Using this exploit, and a custom image, one could access all of a user’s files or just disable the lockscreen to access their apps. The same access that a user would gain for tethered root access would also be available to an attacker with physical access.
Lastly, Android allows users to further encrypt their phone via the developer options menu. This adds an extra layer of protection which adds a requirement for a PIN or passcode on boot in order to decrypt the userdata partition. This is different from the device’s unlock screen, which only protects the device at a software-level.

While this does protect userdata, it does not protect the core Android boot image, and an attacker who had gained temporary physical access to someone’s phone could easily upload a backdoor, which would become active once the user has input their PIN. This isn’t a viable attack, but it is interesting.
Conclusion
All of the vulnerabilities identified in the bootloader were disclosed to Qualcomm, and coordinated disclosure was performed with them. While these weaknesses did expose the SDM660 to risk, prior to patching, I was unable to identify any other Qualcomm Snapdragon chips which were vulnerable. All devices using this chip have had the patch deployed, and the vulnerability is no longer present.
The weaknesses were assigned the CVE: CVE-2021-1931.


