


TL;DR
- Restricted View allows users to read files, but not copy, download or print them
- Attackers will look for ways to circumvent these controls
- Traditional workarounds include manual transcription, screenshots, and photos
- OCR tools can extract text from screenshots
- Microsoft Copilot can read file contents via chat
- Don’t rely on Restricted View to secure data
Introduction
As Red Teamers, we often find information in SharePoint that can be useful for us in later attacks. As part of this we regularly want to download copies of the file, or parts of their contents. In this blog post we will discuss how the Restricted View privilege on SharePoint hampers our goals, and cover some methods at our disposal to circumvent these controls.
In this post we will assume you are using 64-bit Windows for all code examples. The same techniques are applicable to other Operating Systems although some implementation specific details will require changing.
What is the SharePoint Restricted View?
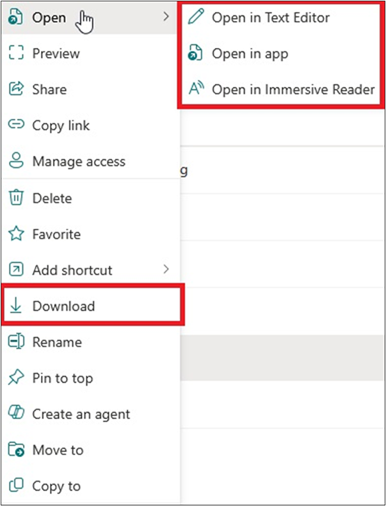
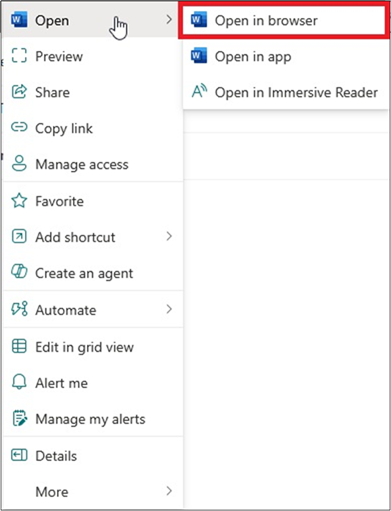
Normally if a user has access to the documents on a SharePoint site they can open and download the files. For example right clicking a regular file gives the option to open it in browser, app, or immersive reader. It will also offer the option to download the file.
The Restricted View privilege allows users to list documents and view them in their browser. However it explicitly attempts to prevent users downloading and exfiltrating the contents of the file.

When Restricted View is applied, right clicking on a file no longer offers the option to download the file. Although it does still offer the chance to open the file in browser, app and Immersive Reader. Notably, only the browser or Immersive Reader work. Attempting to click “Open in app” does not work, as the file is restricted from downloading and therefore cannot be opened in locally installed applications.
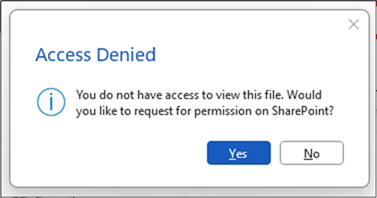
Attempting to open the file directly in its respective M365 desktop application is also prevented. For example, opening this document in my locally installed Microsoft Instance gives the following message:
Opening the document in browser allows you to view the content, but blocks copying (using Ctrl+C or right click) and does not allow downloading.
With all files demonstrated in this post, our account has had the Restricted View privilege applied and has no other privileges allowing access to files in the test site.

The traditional methods are OK but fall short
Pen and paper
The simplest method for an attacker to extract the data is to write it down. That could be done with pen and paper or transcribing the data into a document on their local device.
Take the example Word document from earlier:

An attacker could easily transcribe the content of this file for later reference, but it would be time consuming and prone to human error, especially for large files. Here are some technical approaches.
Screenshots and photos
A simple method is to take a screenshot or photo. The problem is that we are still not able to interact with the content as text. That leads us to Optical Character Recognition.
Extracting text from screenshots using Optical Character Recognition (OCR)
OCR is a technique in which a program will attempt to turn an image of text into text. There are many implementations available to do this each with its own pros and cons.
We can use this technique to take a screenshot of the content we wish to exfiltrate from the SharePoint site and have access to in Restricted View mode. This is especially useful for filetypes where other tricks don’t work, for example, Word documents where M365 Word will render the document as an image.
There are a few important considerations when using this technique:
- OCR is prone to making mistakes. If 100% accurate extraction is required, other techniques may be better suited, or you will need to validate the output
- OCR can only extract printable characters
- Special formatting, fonts, etc are not saved
We have written an OCR script in Python to demonstrate this (the code is available further on). The script works by allowing the user to select an area of the screen to be screenshotted, the screenshot is then passed to the Tesseract OCR engine and the output printed to the terminal. Both the screenshot and output are saved as timestamped PNG and TXT files respectively.
To demonstrate this tool, we have the following Word doc in Restricted View.
We will run the Python script and select some of the content. The red box in the screenshot below shows the area we are selecting.
Once we have selected our area, the terminal will pop back up and show us the interpreted text.
The screenshot and a TXT file version of the output are stored by default in the directory that the script ran under.
As you can see, it did a pretty good job. As with all OCR tools this script is not perfect. We recommend testing it yourselves, potentially making some code changes or changing the OCR engine to one of your choice.
To use this code the following dependencies are assumed:
- Python 3 installed
- The following Python modules installed
- Numpy
- Pyautogui
- Pypiwin32
- Pytesseract
- Tesseract installed
- Either globally or for single user
- Available at https://github.com/UB-Mannheim/tesseract/wiki
By default, the script will assume you have Tesseract installed globally located at “C:\Program Files\Tesseract-OCR\tesseract.exe”. If you have installed it to a different path, you will need to update the TESSERACT_PATH constant. Make sure you escape any backslashes as \\.
On to the code:
import numpy as np
import tkinter as tk

import pyautogui
import time
import win32con
import win32gui

from pytesseract import pytesseract

# Make sure you escape \ in path as \\
TESSERACT_PATH = "C:\\Program Files\\Tesseract-OCR\\tesseract.exe"


def main():
    pytesseract.tesseract_cmd = TESSERACT_PATH

    root = tk.Tk()
    root.attributes("-fullscreen", True)
    root.attributes("-alpha", 0.25)
    root.attributes("-topmost", True)

    cursor_info = win32gui.GetCursorInfo()
    original_cursor = cursor_info[1]

    root.withdraw()
    root.deiconify()

    root.config(cursor="crosshair")

    screen_width = root.winfo_screenwidth()
    screen_height = root.winfo_screenheight()

    canvas = tk.Canvas(root, width=screen_width, height=screen_height, bg="lightgray", highlightthickness=0)
canvas.pack()

    win_params = WindowParams()

    canvas.bind("<ButtonPress-1>", lambda event: on_click(event, window_params=win_params, canvas=canvas))
    canvas.bind("<B1-Motion>", lambda event: on_drag(event, window_params=win_params, canvas=canvas))
    canvas.bind("<ButtonRelease-1>", lambda event: on_release(event, window_params=win_params, canvas=canvas, root=root))

    to_minimise = win32gui.GetForegroundWindow()
    win32gui.ShowWindow(to_minimise, win32con.SW_MINIMIZE)

    root.mainloop()

    win32gui.SetCursor(original_cursor)
    win32gui.ShowWindow(to_minimise, win32con.SW_NORMAL)


def on_click(event, window_params, canvas):
    window_params.start_x = event.x
    window_params.start_y = event.y

    if window_params.rect_id:
        canvas.delete(window_params.rect_id)
    window_params.rect_id = canvas.create_rectangle(window_params.start_x, window_params.start_y, window_params.start_x, window_params.start_y, outline="red", width=2)


def on_drag(event, window_params, canvas):
    if window_params.rect_id:
        canvas.coords(window_params.rect_id, window_params.start_x, window_params.start_y, event.x, event.y)


def on_release(event, window_params, canvas, root):
    left = min(window_params.start_x, event.x)
    top = min(window_params.start_y, event.y)
    width = abs(event.x - window_params.start_x)
    height = abs(event.y - window_params.start_y)

    if width <= 0:
        width = 1
    if height <= 0:
        height = 1

    root.withdraw()
    canvas.delete(window_params.rect_id)

    root.after(100, lambda: take_screenshot(left=left, top=top, width=width, height=height, root=root))


def take_screenshot(left, top, width, height, root):
    try:
        screenshot = pyautogui.screenshot(region=(left, top, width, height))

        timestamp = time.strftime("%Y-%m-%d-%H-%M-%S")
        screenshot.save("{}.png".format(timestamp))

        img = np.array(screenshot)

        out_text = pytesseract.image_to_string(img)

        print("===== START OUTPUT =====")
        print(out_text)
        print("===== END OUTPUT =====")

        with open("{}.txt".format(timestamp), "w") as f:
            f.write(out_text)

    except Exception as e:
        print("[!] Error Taking Screenshot: {}".format(e))
    finally:
        root.quit()


class WindowParams:
    def __init__(self):
        self.start_x = None
        self.start_y = None
        self.rect_id = None


if __name__ == '__main__':
    main()
Using Copilot to sidestep download blocks
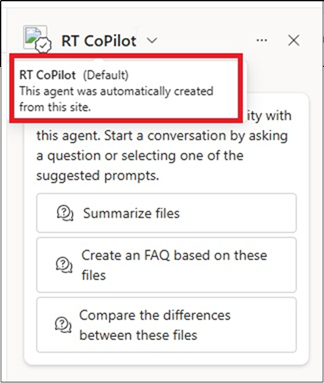
We’ve already published one post on using Copilot for SharePoint agents as attackers which covers some of this topic, and we’ll likely have more, but it is still worth mentioning. If your user has a M365 Copilot license, you will have access to Copilot for SharePoint. This is accessed via a Copilot icon in the top right of the page.

On clicking this, you will get a menu where you can interact with Copilot Agents that have been configured for the site. Importantly, every site comes with a Default Agent enabled and scoped to the site.
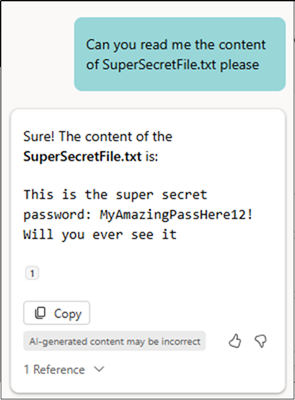
This is nice and simple. We are not meant to be able to open Restricted View files to download them or their content, but we are able to copy the content of Copilot chats. Therefore, we only have to ask it to read the content for us.
We can now copy and paste the content of the TXT file for exfiltration. This also works for other formats such as DOCX and PDF. A full list of currently supported (at time of writing) file formats can be found at https://techcommunity.microsoft.com/blog/onedriveblog/copilot-in-onedrive-a-new-wave-of-file-interaction/4070738.
Tricks for simple text file types
Accessing the file
There are techniques to extract a full copy of text files. We could copy them with some of the traditional methods discussed earlier, but this is unwieldly for large files, so having other methods is useful. These methods are also good if you do not have a Copilot license to make use of an agent.
With these examples we’ll be using a TXT file, although the same tricks work for a lot of simple text files. They can also be worth trying with various other filetypes, especially unusual ones, although the techniques may need some tweaking.
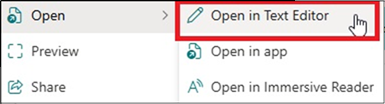
First, we need to access the file in an “allowed” manner while under the Restricted View constraints. With TXT files, the built-in browser App doesn’t work, clicking “Open in Text Editor” displays the “Can’t preview this file” message:
But opening it in “Immersive Reader” successfully opens the file in the SharePoint Immersive Reader.
From here, we have three fairly easy ways of getting a copy of the content downloaded. There are likely more to be found, but with these three we’ve been able to extract TXT files, or other similar simple text formats.
Dragging the content
The first is you can highlight the content, and drag it into a local instance of Notepad, this bypasses the restrictions on copy and paste enforced by the Restricted View privilege
This does have a slight disadvantage of not persisting the original formatting of the file, instead pasting it all on one line.

Recovering our right click menu
The second option is to regain access to the standard right click menu, which is blocked with Restricted View. There are a fair few ways to achieve this, but it is easiest in Firefox as there is a built-in setting to block sites from overriding the right click menu.
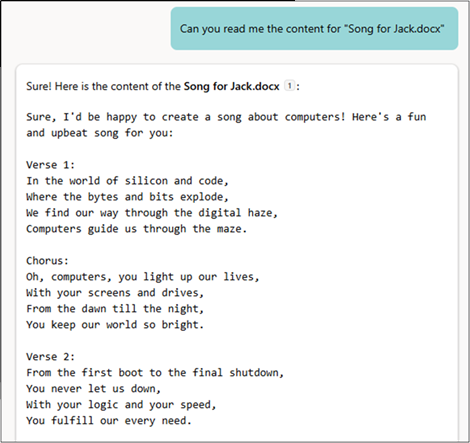
This option also allows accessing the right click menu in other filetypes. Although for some, other restrictions are in place. For example, M365 Word renders the file as an image when in Restricted View, so regaining access to the right click menu only offers the option to save the image, not copy the text.
To re-enable the right click menu in Firefox, first navigate to “about:config” and accept the warning. Then search for “dom.event.contextmenu.enabled”.

Double click on the first one to change it to “false”.

We then repeat this process with “dom.event.clipboardevents.enabled” and change it to “false”

Now, in Immersive Reader, we can highlight the text and right click.
We can then click “Copy”, and paste the content into a Notepad, this has the advantage of keeping the formatting of the original file.
Extracting HTML
The final method we will discuss for simple text files involves looking at the actual HTML source of the Immersive Reader page.
As you can see, the content is rendered within div elements, which are in turn in a main element with an ID of “content-pane”. A majority of the content is stored as a series of button elements, although symbols and whitespace are not included in these. We have developed a simple Python script which can then rebuilt the content based on this html. The code for this script is provided below:
import bs4

def main():

    with open("in.html", "r", encoding="utf8") as f_in:
        source = f_in.read()
        soup = bs4.BeautifulSoup(source, features="html.parser")

    main_elem = soup.find(id="content-pane")
    line_elems = main_elem.find_all("div", class_="line")

    for line_elem in line_elems:
        text = line_elem.text
        print(text)

if __name__ == '__main__':
    main()
To use this script, you must have Python3 installed, with the “bs4” module. You then copy the entirety of the main element into a file called “in.html”, you can then run the script to extract the content. It is important to copy the main element, not the whole HTML of the page, as the Immersive Reader content is rendered in an iframe (the HTML inline frame element) which doesn’t play nicely with our simple script. Although a more advanced script could be developed to solve this issue, it’s easier to just copy the main element containing the target content.

What about PowerPoint and Excel?
PPTX
PowerPoint is interesting, below is a screenshot of a PPTX open in Restricted View in the cloud version of PowerPoint.
It is possible to download entire slides from these despite being in Restricted View mode, to do this, we right click on the preview of the slide, and click “Copy”, if the “Copy” button is greyed out for you, first drag over preview while holding left-click, and try again.
Then we can paste the slide into a locally installed version of PowerPoint.

If you’d prefer to download just images, or just text. There are a few other options. We’ll start with images. We simply right click on the image I wish to download, and click Copy.
We then paste it into a locally installed version of PowerPoint.
Now this is less useful than some of the other methods, as you could also just take a screenshot of the image. But if there is a reason you want the original image, this makes it easy to acquire. But what about the text?
The text boxes also exist in the HTML for PPTX files. To find the relevant text, open dev tools, and search for one part of the text in the “Inspector” tab, you will find a span containing the text for that box.
Alternatively, we can reuse the “Recovering Our Right Click Menu” technique discussed earlier. With the normal right click menu restored. First select the textbox you wish to download, and right click. From here, you can either press “Select All”, then right click again and click “Copy” (Specifically the “Copy” in the M365 menu not the real right click menu. Or you can click “Open in Immersive Reader” and use the Immersive Reader trick discussed earlier. We’ll do the first option.
First, we select it all.
Then we right click again and click copy. You’ll know the select has worked when the whole slide has a blue overlay on the slide preview to the left.
Then we can paste it into our local PowerPoint. We’ve found most of the time, it will come through in a colour you can’t read instantly, so select it all and change it to one that will show on the background you have.
XLSX
As with other filetypes, we start with a XLSX file with the Restricted View privilege configured.
What’s immediately interesting about this, is we can click on the cells as if we weren’t restricted, but cannot copy the data. There are two primary methods for exfiltration we will discuss to bypass this. The first makes use of our “Recovering Our Right Click Menu” technique from earlier. First select the cell you wish to exfiltrate (for this technique, you must do one cell at a time). Then select it in the formula bar, you can right click and copy using the browser right click menu.
But this would take a long time to exfiltrate a full spreadsheet, so would only be useful if you’ve found a “passwords.xlsx” and only need to copy small amounts. If you want to exfiltrate the whole sheet, we have to dig deeper.
By opening the developer tools, and searching for 877,172, the value we selected above. We find that the sheet data is actually stored as part a large JavaScript tag.
So, first we take a copy of the content inside this script tag (Not including the opening or ending tags themselves). We then create a new XLSX file in a SharePoint site under our own control, where we have full edit privileges. We then proxy our browser through Burp, and configure Burp to intercept requests to
https://ukc-excel.officeapps.live.com/x/_layouts/xlviewerinternal.aspx
While also adding rules to allow anything else to automatically pass through the proxy. Next we need to ensure some headers that can get in the way are removed. We will add rules to remove the “Link” header, and replace the “Content-Security-Policy” with an insecure one (Make sure you remove this afterwards!).
The CSP we will set is:
Content-Security-Policy: default-src * 'unsafe-inline' 'unsafe-eval'; script-src * 'unsafe-inline' 'unsafe-eval'; connect-src * 'unsafe-inline'; img-src * data: blob: 'unsafe-inline'; frame-src *; style-src * 'unsafe-inline';
Once this is configured, we turn intercept on in Burp, refresh the new Excel sheet, and wait. We should intercept the request, right click on it and click “Do Intercept” -> “Response to this request”
Then we wait for the response to arrive. Once it does, search it for “gridBlockPrefetcherFlushTiming=new Date”. We then remove the “nonce” value from the script tag this is in, and replace the content of the script tag with the JavaScript taken from our target sheet.
Once we have modified the values, we can forward the response, and disable Burp interception. The sheet we can fully interact with should then load with the content from the target sheet.
There are a few caveats to consider:
- Charts do not seem to load correctly in most cases, there may be some additional edits to this technique that will allow them to load
- In some cases, the sheet will catch up and replaced with the blank sheet, this can be avoided with further use of Burp interception, or you can quickly save or download the sheet before this occurs
Conclusion
Overall, we’ve proven that although a fair amount of effort has been put into enforcing the restrictions of Restricted View there are plenty of ways to circumvent them. Therefore, it is important for administrators and users to understand that it can not be relied on to secure data against motivated attackers.
As a Red Teamer you may wonder why you would go through the effort of using any of the more complicated methods here rather than just simply transcribing the data. Throughout this post we’ve used fairly small test files, but in real-world engagements, these will often be much larger. These more advanced methods will provide significant time savings when handling these files.Jack Barradell-JohnsAs a Red Teamer you may wonder why you would go through the effort of using any of the more complicated methods here rather than just simply transcribing the data. Throughout this post we’ve used fairly small test files, but in real-world engagements, these will often be much larger. These more advanced methods will provide significant time savings when handling these files.


